Coaster Gift Set

Coasted Gift (6)

This two-material project is so simple, with such beautiful usable results – real coasters! Perfect for Memorial Day drinks perhaps? They are great just to have around your own home, or even to send off as a gift.

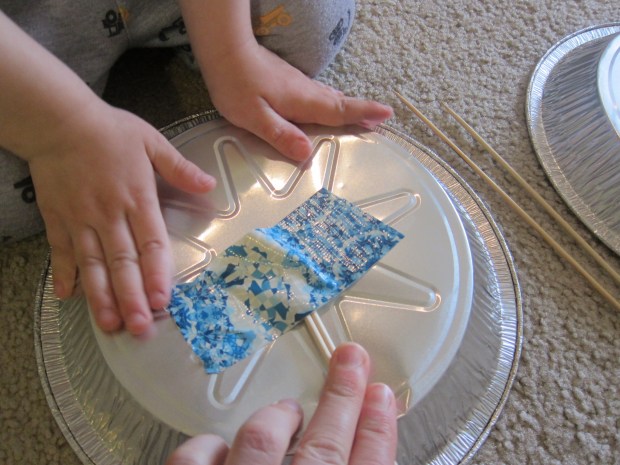
I pulled out all of our washi tape and 4 foam squares (circles would work well too), and let Travis have free creative reign.

Coaster Gift (2)

At first he just wanted to play with the washi tape a little.

Coaster Gift (1)

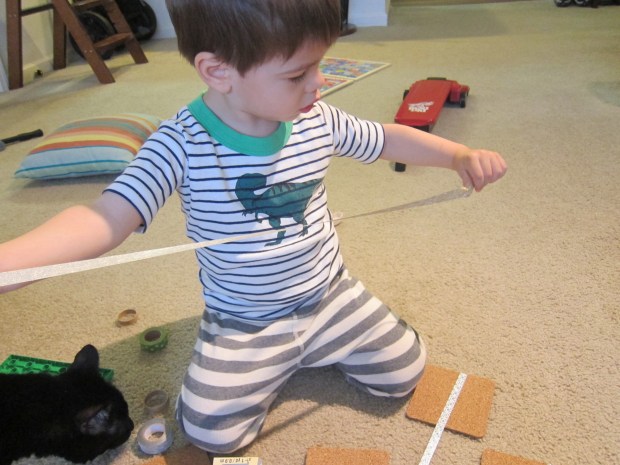
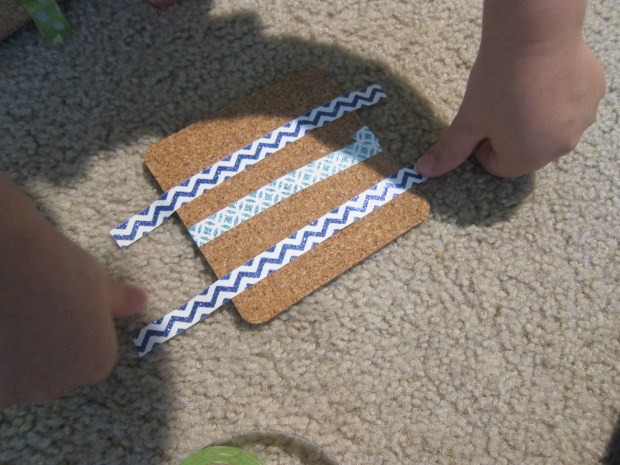
Then he saw the picture of this craft from where I had found it online. “Look, there are three lines!” he observed. He then wanted to replicate a coaster with three lines.

Coaster Gift (4)

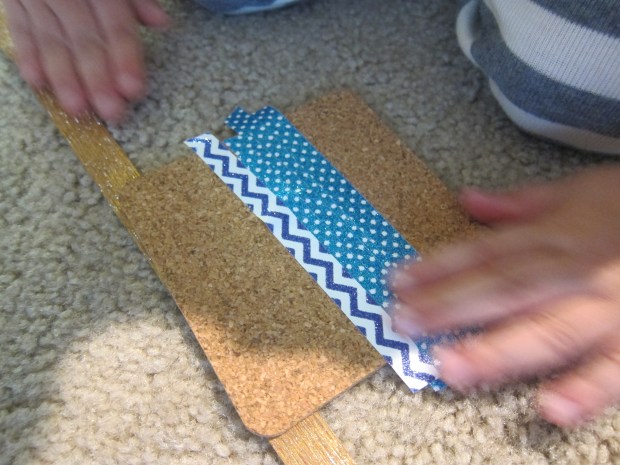
We also replicated one with an X, and then he made up a few design creations of his own.

Coasted Gift (5)

A delightful little project; we made sure to send some on to his great-grandparents as a surprise gift.

Coaster Gift.JPG

Tin Can Wind Chimes

Tin Wind Chime (7)

Before you toss those cans of beans or soup, save a few for this adorable project.

Over a few days, we rinsed out three cans and set aside until dry. Then it was time to cover them with paint!

Tin Wind Chime (1)

Travis particularly loved how the paint went over the ridged parts of the metal.

Tin Wind Chime (2)

Once the paint dried, it was time to attach our chimes together – a decidedly mommy job. To make a hole in each can, I held a screw to each and hammered until perforated.

Tin Wind Chime (5)

Travis was a big help hammering along next to me with his toy tools!

Tin Wind Chime (3)

Threading the cans together proved to be tricky even for adult fingers – I had to use very fun sewing thread.

Tin Wind Chime (4)

Eventually we had our three cans in a row and they were ready to chime!

Tin Wind Chime (6)

Veggie, Bean & Quinoa Croquettes

Croquettes

Wait, I can get my toddler to eat veggies and beans and quinoa in one sneaky vegan recipe? Yes please! Serve these plain for toddlers, or use to make meatball sub sandwiches for older kids.

Ingredients:

  • 1 (15-ounce) drained can kidney beans
  • 1 minced small onion
  • 1 minced medium zucchini
  • 1 peeled and minced carrot
  • 2 minced garlic cloves
  • 1 cup cooked quinoa
  • 2 tablespoons low-sodium soy sauce
  • 2 tablespoons tomato paste
  • 1 tablespoon yellow mustard
  • 1 tablespoon Italian seasoning
  • 1/4 cup vital wheat gluten
  • 1/2 cup breadcrumbs
  1. Place the kidney beans in a bowl and mash with a potato masher or fork.
  2. Add all of the remaining ingredients except the breadcrumbs, stirring until combined.
  3. Using your hands, divide the mixture into about 20 balls, and roll in the breadcrumbs before arranging on a baking sheet.
  4. Bake at 350 degrees F for 25 to 30 minutes. Let stand about 10 minutes to cool before serving.

Wooden Napkin Rings

Wooden Napkin (3)

We recently switched Travis from his highchair to a big boy table. It seemed like the perfect occasion to make him his own napkin ring as well!

For this simple craft, all you need are wooden beads and pipe cleaners. Threading the beads on is great practice for little fingers.

Wooden Napkin (2)

As we worked, Travis and I discussed the different beads – some dark wood, some lighter, and in different shapes like squares and circles.

He lost interest after a while and the beads themselves became fodder for a game. Meanwhile, I finished the napkin rings by looping any remaining pipe cleaner back over itself to seal.

Wooden Napkin (4)

Slip in a napkin and you’re done! These would be a lovely project for kids around the holidays, too.

Wooden Napkin (6)

Sticky Almond Blondies

Almond Blondie (1)

With good-for-you ingredients like dates and chia seeds, you can feel good feeding these to your kids for snack or dessert!

Ingredients:

  • 1/2 cup pitted dates
  • 1 tablespoon chia seeds
  • 1/4 cup maple syrup
  • 1 and 1/2 teaspoons fresh-squeezed lemon juice
  • 1 and 1/2 teaspoons vanilla extract
  • 1/2 teaspoon baking soda
  • 1/8 teaspoon ground nutmeg
  • 2 and 1/2 cups almond meal
  • 1/2 cup coconut sugar
  • 3 tablespoons nondairy chocolate chips
  1. Place the dates, chia, maple syrup, lemon juice, and vanilla in a stand mixer. Beat at full speed until the dates are fully pulverized.
  2. Add the baking soda, nutmeg, almond meal, and sugar; process at low speed until just combined.
  3. Transfer the mixture to a 9×9-inch baking pan coated with cooking spray, patting into an even layer. Top with the chocolate chips, pressing them into the batter slightly.
  4. Bake at 325 degrees F for 20 minutes. Let cool completely before cutting into squares.

Almond Blondie (2)

Sand Art

Sand Art (7)

You can make sandboxes inside from so many indoor-friendly materials – oatmeal flakes, cornmeal, salt. But every once in a while, I like to buy refill packs of real sand and Travis has a blast shoveling through it. This time, instead of just shoveling our sand, we made art!

First, divide your sand into several containers – make sure they have lids.

Add a few drops of food coloring to each container. Seal the lids and shake tightly.

Sand Art (2)

Our color didn’t disperse as well as I hoped, but we left it to sit overnight, and after stirring through the following morning, we had enough of a sandy rainbow.

Sand Art (4)

My plan had been to fill a mason jar using a funnel, adding one layer of each color at a time, but Travis was so delighted he just started adding colored sand to the jar by the spoonful.

Sand Art (5)

The bottom of our jar was a bit of a muddled mess, but eventually we poured in our colors one at a time for a pretty, layered effect.

Sand Art (6)

Seal the jar and display your lovely sand art some place prominent!

Frozen Ice and Sand Comets

Frozen Comet (7)

If your child loves outer space, this game is sure to be a smashing success.

Travis and I talked about how comets are made of ice and dust, and decided to make our own. I froze ice cubes and then crushed the ice in the blender for a more easily workable texture – the crushed ice was a big hit!

Frozen Comet (1)

Then we sprinkled on sand, making a sandy dusty comet-y mix. Travis loved watching the two combine.

Frozen Comet (3)

Once we had a good mix, I packed some into a plastic cup, and we added a little bit of extra water.

Frozen Comet (5)

Place your comets in the freezer until solid.

Now comes the real fun part – take the comet outside and toss it on the ground so you can demonstrate what happens when one collides with a planet!

Frozen Comet (10)


Breakfast Friends

Breakfast Friend (3)

We love this adorable breakfast idea from Barefoot Books‘ Kids’ Kitchen set.

Ingredients:

  • 4 slices whole-wheat bread
  • 2 Ener-G eggs
  • 3 tablespoons plain coconut yogurt
  • 2 teaspoons agave nectar
  • 1/4 teaspoon cinnamon
  • 2 tablespoons Earth Balance butter
  • Raisins for decoration

Breakfast Friend (2)

  1. Use animal-shaped cookie cutters to cut fun (friendly!) animals out of the bread slices.
  2. In a bowl, whisk together the Ener-G eggs, yogurt, agave, and cinnamon. Dip the bread slices into the egg mixture one a time, coating both sides.
  3. Melt 1 tablespoon butter in a large skillet, and add two of the bread slices. Cook for 1 to 2 minutes on each side. Repeat with the remaining butter and bread slices.
  4. Don’t forget to add raisin eyes and decorations before eating! Yum – which friends will you invite to breakfast?

Breakfast Friend (1)

Frog Rock

Frog Rock (6)

Here’s a sweet and simple project that comes together fast, with super cute results.

The best part by far was our spring nature walk – we always come home with treasures! Travis found the most perfect rock, and I decided we should turn it into a little frog. This sent us hunting for green leaves to cover our frog with amphibian skin, and Travis loved finding leafy treasures.

Frog Rock (1)

At home, we tore some of the leaves into smaller pieces, and glued them in overlapping patterns on the frog.

Frog Rock (3)

When the glue dried, I added little felt eyes and feet.

Frog Rock

Travis had so much fun leaping his frog about!

Frog Rock (5)

Pie Tin Cymbals

Pie Cymbals (6)

To add to our growing collection of rock band paraphernalia, we made our own cymbals today! Travis loved the big bang that these make.

Use chopsticks or kebab sticks as the handles, and duct tape securely to the back of two disposable pie tins. Bonus points for fancy duct tape.

Pie Cymbals (1)

We decided to further embellish our cymbals with pom poms, which Travis enjoyed gluing on…

Pie Cymbals (4)

However it wasn’t long before some enthusiastic cymbal-ing knocked all the pom poms right off. So perhaps stickers would be a better decoration next time.

Pie Cymbals (2)

Either way, have some fun and make some noise!

Pie Cymbals (5)