Paint with Spaghetti Brooms

Spaghetti Brooms (7)

The kids have payed with cooked spaghetti, but never before have we used it to paint. Veronika loved that these looked like miniature brooms!

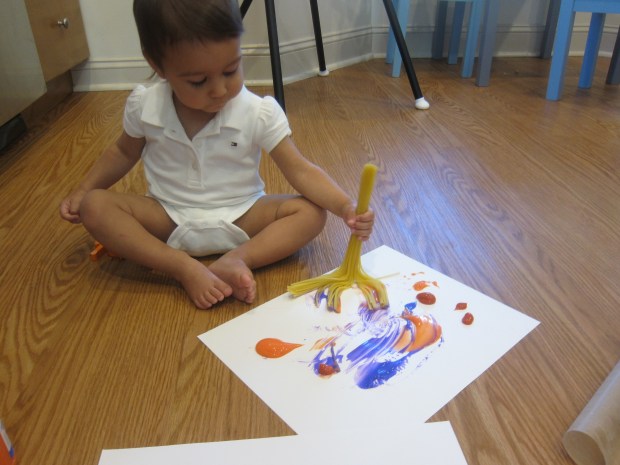
To make a broom “paintbrush”, secure a bundle of uncooked spaghetti together with a rubber band near one end.

Spaghetti Brooms (1)

Cook the spaghetti bundles in boiling water, but use caution only to heat the bottom portion of the noodles, not the “handle”. I held on to the part with the rubber band so the rubber wouldn’t melt or singe, and let the “broom” tips soften in the water for only about 2 minutes. This is definitely a grown-up step, and make sure to avoid the steam. You can cook your noodles longer, but I knew Veronika would have an easier time painting if they were a bit firm.

Spaghetti Brooms (2)

Once cooled, I showed Veronika the brushes. She loved exploring them before there was even paint.

Spaghetti Brooms (3)

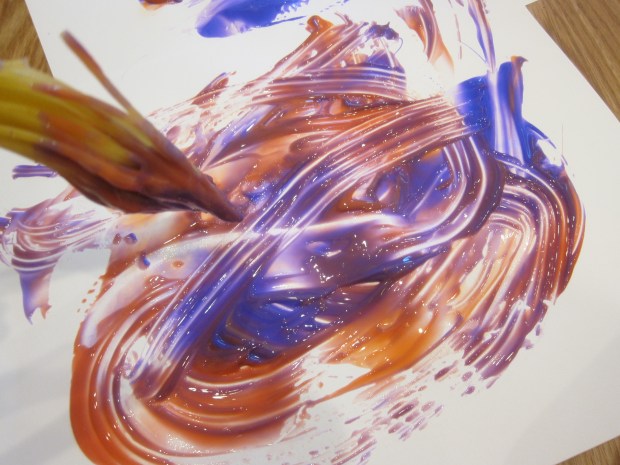
We then blobbed craft paint onto poster board, and I showed her how to “sweep” the color. My little happy helper took right to this version of painting!

Spaghetti Brooms (4)

She loved testing out the different bundles, swirling the colors, and more.

Spaghetti Brooms (6)

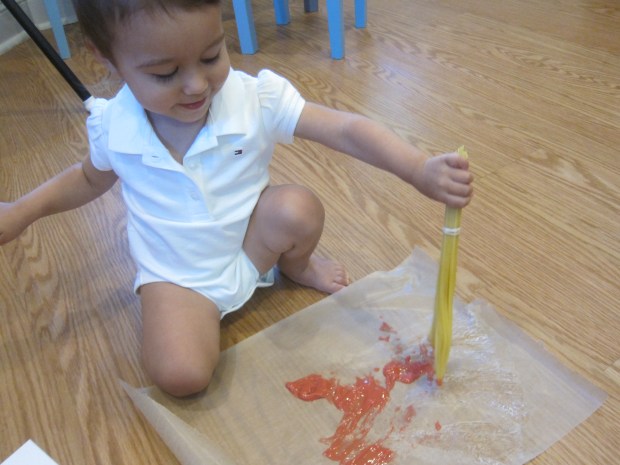
The individual noodles leave neat textured tracks through the paint, an effect even Veronika could master at 20 months.

Spaghetti Brooms (8)

A cute project, with surprisingly little mess!

Spaghetti Brooms (5)

Some Float, Some Don’t

Some Float (6)

When you’re toddler gets older, there will be no shortage of flotation experiments to try for early lessons on density. But for younger toddlers, you can simply introduce the concept of flotation with this simple game of observation. Some things go ker-plunk to the bottom of the water and some things float, and for now that’s all that matters!

I set out a shallow tray of water with a towel underneath for easy clean-up, and then pulled out a variety of objects.

Some Float (1)

Of course Veronika was immediately interested in everything in the pile, including a spoon, a clothespin, a plastic animal toy, a piece of sponge, a key, a wooden block, a comb, shredded paper, and more.

One by one, we dropped the items in the water.

Some Float (2)

“Will it sink or float?” I asked for each one. “It sinks!” I would say happily. Or, conversely, “It floats!” She parroted both these statements back to me, even though it was brand new vocab. But this is precisely how kids learn!

Some Float (3)

Then it was time just to let her explore the objects in the water. She loved squeezing the sponge pieces.

Some Float (4)

And crumpling the paper between her fingers until it disintegrated into our water.

Some Float (8)

The clothespin was fun to scoot around like a little boat.

Some Float (5)

And when she was done, I dumped the water in the sink and wiped the floor dry, and the game was complete!

Some Float (7)

Summer Barley Salad

Summer Barley

Juicy strawberries add the perfect summer touch to this easy salad.

Ingredients:

  • 2 cups cooked barley
  • 1/2 cup cooked and sliced green beans
  • 1/2 cup chopped strawberries
  • 2 sliced green onions
  • 1/4 cup olive oil
  • 2 tablespoons red wine vinegar
  • 2 tablespoons lemon juice
  • 1 tablespoon agave nectar
  1. In a large bowl, combine the barley, green beans, strawberries, and green onion, stirring to combine.
  2. To prepare the vinaigrette, whisk together the olive oil, vinegar, lemon juice, and agave. Drizzle over the barley mixture and stir to combine.

Staying Cool

Staying Cool (1)

We’re currently in the midst of a heat wave, and are looking for any way to beat the heat. To turn possible-misery into a teachable moment, today I helped Travis explore ways to keep cool, all parked right in front of a nice cool fan!

For this simple STEM experiment, we started out simply by turning on the fan and moving either closer to it or further away. I asked Travis which was cooler, and he rightly noted that being close was best.

Staying Cool (2)

Then we draped a wet paper towel over one of his arms. Now he alternated the wet arm and the dry arm in front of the fan. Which felt cooler? The wet arm!

Staying Cool (3)

So now we had some scientifically-backed ideas to cool down on a hot day: wind and water. We brainstormed other things that might keep us cool, too, like shade.

For a minute there, we beat the heat!

Just Dance

Just Dance (6)

We had some great musical fun today, starting with this prompt: what mood was Travis in, and what music food that mood. In other words, what was his current theme song? Though I might have hoped the answer was something joyful and bouncy (I’m always up for rocking out to Can’t Stop the Feeling) I was not at all surprised that Travis picked Duel of the Fates from Star Wars. Hey, it fit his mood!

Just Dance (3)

So we got the music going and I challenged Travis to come up with two dance moves, one using just his hands, and one using just his feet. We soon had a little arm roll followed by a kick for 4 beats.

I encouraged him to think of the next steps. We talked about the term “choreography”, and soon had a routine involving twirls, waving feather boas in the air… and then improvising!

As the final touch, we raided the dress-up bin. Costumes would be a must!

Just Dance (2)

From here, the “dance” turned more into acting out this movie scene, too. What followed was half-acting, half-interpretive dance, and little sister joined in.

Just Dance (4)

With light saber props, of course!

Just Dance (7)

There are so many ways to elaborate on this activity. Have your child pick a song as their “theme” of the moment… or write their own song! Vary the costumes each time, or add props. Make it more of a dance routine, or more of a play as you act out a story to music.

I would love to hear about your dance fun in the comments, so please share! Without any further ado, here is The Travis:

Make Me a Match

Make me a Match (1)

Veronika loves counting out two of any object, especially when we read books and look at the pictures. “One bicycle, two bicycle,” she might say or, “One bird, two bird.” So today I decided to give her a 3-D quiz on the same concept!

I put a variety of objects in a small box, making sure the items weren’t toys per se, including coasters, square magnatiles, empty paper towel tubes, and canning rings. I put one of each item in the box and then scattered the second from each set along a tape “trail” leading away from the box.

Make me a Match (2)

I called Veronika over to the box with excitement. “Here’s a coaster!” I said. “Can you find me a match?” “Match” was a new word in her vocabulary, so I rephrased my question in the way that was more familiar. “One coaster… Two coaster.” She looked where I pointed to the second and beamed with pride. Now she got it, and she set off down the road to make a match.

One canning ring…

Make me a Match (3)

Two canning rings!

Make me a Match (4)

One paper towel tube…

Make me a Match (5)

Two paper towel tubes! I see you!

Make me a Match (6)

In this way she aced every single item on the list.

Make me a Match (7)

This was a great little lesson for teaching the concept of a pair.

Make me a Match (8)

Nursery Rhyme Productions

Nursery Productions (2)

Today Veronika and I played around with the classic nursery rhyme of Jack and Jill, not just as rhythmic and musical play, but by also acting it out. This was great both for her gross motor skills and for developing imaginative play. You might even consider it her first theater performance!

First, I simply refreshed her memory about the rhyme, since it’s not one we sing that often:

Jack and Jill went up the hill,

To fetch a pail of water.

Jack fell down and broke his crown,

and Jill came tumbling after.

We also watched a cute cartoon version of the song, and then it was time to act out her first role! On the first two lines, I helped her climb up onto a step stool.

Nursery Productions (3)

On the last two lines, she climbed down and then filled a bucket with “water” (actually scraps of blue fabric). Torn blue construction paper or blue tissue paper would also work as pretend water.

Nursery Productions (6)

Well she absolutely loved this whole process. She wanted to climb up onto the stool over and over, and graduated to doing it without my hand for support.

Nursery Productions (4)

Then it was time to work on climbing down “all by self”, too.

Nursery Productions (5)

Plus the bucket and fabric scraps were great fun to play with, nursery rhyme or no.

Nursery Productions (1)

She enjoyed the game so much that we’ll have to think of which nursery rhyme to use next for Veronika’s second “play”.


Water Wheel

Water Wheel (4)

This homemade water wheel is easy to make and works so well, arguably even better than the version that Travis put together from a recent Kiwi Crate.

The set up was largely a grown-up job, as it involved hot glue and scissors. Trace an empty ribbon spool onto a plastic lid (such as from a non-dairy yogurt container). Cut out the plastic circle and hot glue onto the spool.

Water Wheel (1)

Pierce a hole through the center with a push pin.

Now use plastic condiment cups as the spokes of your water wheel; hot glue these around the spool as close together as possible. Insert a skewer through the hole you made with the push pin, then slip a straw over the skewer for comfort.

Water Wheel (2)

Time to spin!

Water Wheel (3)

We headed outside and used a recycled water bottle to pour water over the contraption. The water wheel worked so well, even though I had worried gaps between the condiment cups might mean poor performance.

We even later took it up to bath time as a tub toy! Want more water experiments? Check out some of our previous fun with water.

Summer Scavenger Hunts

Summer Scavenger (7)

Summer is here and school is out, but there’s still so much to learn on any excursion outdoors. To wit, we headed off on a nature hunt today with a three-part agenda for exploration.

First, I simply announced that we were off to explore: What did Travis hope to find? After some initial thought, he settled on butterflies and bees. To make the hunt exciting, I gave both kids their own little notebook to draw in (though obviously little sister’s drawings would be more of a scribble), a pencil to take notes, and a magnifying glass. It was time to look and discover!

Summer Scavenger (2)

Travis was soon rewarded with a white butterfly, plus lots of bees buzzing among the flowers.

Summer Scavenger (3)

He loved pausing on a bench to draw a flower!

Summer Scavenger (4)

For the second part of the hunt, I gave his search a little more direction with a list of things to find. The categories and his answers were:

  • Something wet: a puddle on a rock
  • Something scratchy: a plant stem
  • Something soft: fern leaves
  • Something slimy: wet lichen on a tree
  • Something pretty: flowers
  • Something dry: tree bark
  • Something from a tree: a leaf on the ground
  • Something tall: a rock
  • Something hard: a tree trunk
  • Something blue: a blue jay

He enjoyed the challenge a lot, and pulled out the magnifying glass for most of the items he found.

Summer Scavenger (7)

“I see something tall!” he shouted proudly, running to a big rock.

Summer Scavenger (11)

Oddly, the hardest to find was something slimy, though we thought a recent rain storm might have turned up lots of worms.

For the final part of the lesson, it was time for a rainbow hunt. I recommend bringing along paint chips (free at hardware stores) for this activity, and working your way through ROYGBIV. Travis very carefully compared his samples to the flowers and other items that he found, rejecting these flowers as not a true yellow for example.

Summer Scavenger (8)

He took it very seriously until each color was checked off the list!

Summer Scavenger (14)

How are you enjoying nature so far this summer? Please share in the comments!

Summer Scavenger (5)

Butterfly Art

Butterfly Art (7)

You and your toddler can make one of these beautiful paper towel butterflies, or a whole bunch of them to hang on walls or windows. Younger toddlers will probably need to use a paintbrush, but consider using an eye dropper with older toddlers; it’s a great tool to hone fine motor skills.

To start, I set a piece of paper towel down on a craft tray, along with watercolor paints and a cup of water.

Then I showed Veronika how to dip the brush in the water, into the watercolor, and finally onto the paper towel to decorate her butterfly. “Dot dot dot!”

Butterfly Art (3)

I also wanted Veronika to practice with the eye dropper variation, but didn’t want to use liquid watercolors because they can stain. Instead, I mixed some of the watercolor paint with a little water in a cup so Veronika could practice dipping and squeezing that way.

Butterfly Art (1)

It was the first time she mastered the art of squeezing to release water from the dropper. She loved watching the color come out!

Butterfly Art (2)

Then she proved that she still loves to be impish, and upended the cup of water all over the paper towel. That made for one very wet butterfly!

Butterfly Art (4)

Luckily I knew it would dry eventually.

Butterfly Art (6)

As the finishing touch, fold the paper towel in half, then gather up in the center and wrap a pipe cleaner around the middle; bend the extra pipe cleaner on top into antennae. Our butterfly looked so pretty fluttering about the kitchen!