Tofu Bites

Tofu Bites (1).JPG

These crispy tofu bites are a fantastic homemade alternative to store-bought chick’n nuggets. A big hit both for those who are Baby Led Weaning and with older kids!

Ingredients:

  • 1 (1-pound) package firm tofu
  • 1/4 cup whole wheat flour
  • 1/2 teaspoon black pepper
  • 1/2 teaspoon garlic salt
  • 2 teaspoons olive oil
  1. Cut the tofu into 36 triangles.
  2. Combine the flour, pepper and garlic salt in a shallow bowl. Dredge the tofu pieces in the flour mixture and transfer to a baking sheet brushed with the olive oil.
  3. Bake at 425 degrees F for 10 minutes. Let cool before serving.

Tofu Bites (2)

Hide-and-Seek

Hide and Seek (2)

Forget peek-a-boo, Veronika is old enough now for her first version of hide-and-seek! We enlisted big brother Travis’s help for this one, an eager participant.

He thought it was hilarious to trot out of sight. Veronika follows him like a puppy, so I knew she would follow once he disappeared from sight.

Hide and Seek (1)

As added incentive, have the older child call out (Veronika’s not yet sophisticated enough for real finding). When she “found” him, he yelled “peekaboo!” and they both erupted in laughter.

Hide and Seek (3)

They both wanted to play this over and over!

Hide and Seek (4)

Where’s Travis?

Hide and Seek (5)

Peek-a-boo!

Hide and Seek (6)

If you don’t have an older sibling (or just want to repeat the game while playing with baby solo), then a doll or teddy bear can be your hider.

Hide and Seek (7)

Can Veronika find dolly? She sure can.

Hide and Seek (8)

This time, I supplied the hearty, “Peek-a-boo!”

Hide and Seek( 9)

A super-cute round of hide-and-seek.

Play Parachute

Play Parachute (4).JPG

Of the various parachutes Travis has made, this one flew the best.  So read on!

To make it, first we traced an 18-inch circle on a plastic garbage bag, great for both measuring and cutting skills.

Play Parachute (1)

Use a hole punch to make 8 holes at even intervals around the parachute. The hole punch was tough to get through the plastic, so once I had made an indent, I sometimes had to poke the rest of the way with a finger.

Play Parachute (2)

Tie a length of string into each hole, making sure they are all the same length. Punch two holes in a paper cup and tie four strings into each hole.

Play Parachute (3)

If you want, you can decorate the cup with stickers or markers. Travis added a few stickers, but truth be told wasn’t that interested in the decorating portion.

Play Parachute alt

Gather the “parachute” up like an umbrella, then fold it in half and tuck into the cup so the folded part is pointing upwards.

Play Parachute (5)

Now it was time to head outside and throw as high as we could (a mommy arm was helpful here).

Play Parachute (6)

Then watch the parachute open up and float to the ground.

Play Parachute (7)

Travis wanted to add a passenger to our parachute, so we put in a brave solder (i.e. a Lego).

Play Parachute (8)

However, the parachute wasn’t able to unfurl with this little guy in the way, so I recommend letting your parachute having unmanned flights!

Play Parachute (9)


Grandparents Day Pictures

Grandparents Day (4)

Today (September 8) is grandparents day! If you are lucky enough to be near grandparents, I hope you enjoyed something special today. For those who live further away, consider having your little one draw a picture!

I suggested to Travis that he draw a picture of a favorite activity he shared with his grandparents. This turned into a picture of Darth Vader, which is probably better because the idea came from him!

Grandparents Day (3)

We added a second drawing of apple picking…

Grandparents Day (1)

…because we finished the with a beautiful multi-generational trip to the orchard!

orchard (4).jpg

It was also chance for Travis to hear stories from when they were little, like how his grandmother had a raspberry bush in her front yard. These shared outings are fantastic ways to let your kids learn about an older generation. Older kids might want to make it more of a proper interview, and can draw pictures of what they learn about their grandparents as kids.

How did you celebrate Grandparents Day this year? Please share in the comments!

Sorting and Swapping

Sorting Swapping (6).JPG

How do you keep a baby busy while a big sibling makes cookies? With this adorable sorting and swapping game!

I gave Veronika two plates, one piled high with lemons and small oranges, the other empty. These fruits were ideal because they were small enough for her to hold, big enough not to be choking hazards, and the peels prevented her from actually biting into them.

I showed her how to move everything from the first plate to the other. She was eager to get her hands on a lemon!

Sorting Swapping (1)

It was a great chance to introduce the ideas of empty and full. Then I placed all the lemons on one side and all the oranges on the other, a great way to talk about different colors.

Sorting Swapping (4)

Obviously this advanced sorting is too much for a ten-month-old to replicate, but it was useful for Veronika to see the grouping. She loved transferring the fruits back and forth for quite some time.

Sorting Swapping (2)

Plus the plates were fun to play with!

Sorting Swapping (3)

So in sum, a very easy way to keep baby entertained in the kitchen.

Sorting Swapping (5)

Fluffy Tree Pencil Toppers

Fluffy Pencils (4)

These fluffy foofy funny pencils are meant to look like the trees from The Lorax; they’re a fantastic craft if you’ve recently read the book with your child… Or just to have the coolest back-to-school pencils in the room!

To make the pencils, first wrap in tape. We used yellow washi tape and then wound around that with black.

Fluffy Pencils (2)

The trick of winding the tape at an angle was a bit difficult for Travis, but I was proud of him trying!

Fluffy Pencils (1)

Next we used craft boas and small Styrofoam balls for the tops of the trees. You can attach the boas with tacky glue, which will require a bit more patience, but Travis requested hot glue. That made this a grown-up step! Glue one portion at a time, working around until the whole ball is covered, then trim off any excess boa.

Fluffy Pencils (3)

Poke a sharpened pencil into each Styrofoam ball to make a hole; now flip the pencil around and hot glue the eraser end into the hole you’ve created.

Fluffy Pencils (5)

Your pencil tree is ready to use!

Fluffy Pencils (6)

Out and About

Out and About (2)

Instead of the usual verses of Wheels on the Bus, here’s a fun song I’ve taken to singing as I’m out and about with Veronika, to teach her about sounds that things in the world make.

First name the thing. It’s helpful to use the real word (think: dog instead of doggie), and then say the appropriate sound. You might sing:

The dog in the town goes woof woof woof

Woof woof woof

Woof woof woof.

The dog in the town goes woof woof woof

All through the town.

Repeat for every appropriate item in your day, varying the verses as needed! Here are some fun ones we found just today.

The tractors on the farm go brrrm brrrm brrrm.

Out and About (1)

The guitars at the fair go strum strum strum.

Out and About (3)

And the cars on the road go vroom vroom vroom.

Out and About (4)

There are so many verses of this you’ll probably never run out! We finished with a read-through of a fun sound book at home! Try Vroom Vroom Garbage Truck.

Out and About (6)

Blueberry Mini Muffins

Mini Blueberry (1)

These adorable mini muffins are just the right size for a baby’s hands, making them a fantastic Baby Led Weaning breakfast.

Ingredients:

  • 2 cups whole wheat flour
  • 1 and 1/2 teaspoons baking powder, divided
  • 1/4 teaspoon salt
  • 1/2 cup applesauce
  • 1/2 cup ground flaxseed
  • 1/4 cup canola oil
  • 1/2 teaspoon vanilla extract
  • 3/4 cup apple juice concentrate, thawed
  • 1/4 cup plain non-dairy yogurt
  • 1/4 cup unsweetened almond milk
  • 1 and 1/2 cups blueberries
  1. In a bowl, combine the flour, 1 teaspoon baking soda, and salt. Set aside.
  2. In a second bowl, stir together the applesauce and remaining 1/2 teaspoon baking soda. Add the flaxseed, canola oil, vanilla, apple juice, yogurt, and milk.
  3. Add the wet ingredients to the dry ingredients, stirring until combined. Stir in the blueberries.
  4. Divide the mixture between 42 mini muffin cups, about 1 tablespoon per muffin. Bake at 350 degrees F for 25 minutes.

Mini Blueberry (2)


Expanding Star

Expanding Star (6).JPG

We’re on a roll with toothpick tricks around here! This one has a nice patriotic feel to it, so might be fun to save for a holiday. But it was equally neat on a chilly September morning!

You can use plain toothpicks, but for that stars-and-stripes feel, I colored a few toothpicks with red and blue marker.

Expanding Star (1)

Snap five toothpicks in half, but don’t break them all the way through; you now have five V shapes.

Expanding Star (2)

Arrange the Vs on a paper plate so they are touching. For a little added red and blue fun, we dripped a few drops of food coloring around the plate.

Expanding Star (3)

Use a pipette to drip water directly in the center of the toothpicks – excellent for fine motor skills.

Expanding Star (4)

Travis was amazed as his star began expanding outward.

Expanding Star (5)

“It’s still growing!” he marveled. The star stopped after that, but then there was lots of fun to be had dripping water over our food coloring to make big blobs, and mixing it all together.

Expanding Star (7)

Root Veggies for Baby

Chicken Parsnip (2).JPG

Root vegetables are fantastic nutritionally for little ones, and if prepared correctly, there’s no need to worry about these sometimes-tough veggies as a choking hazard. The secret is to make them soft and warm and homey; they’re perfect for impending fall weather, in sum!

Chickpeas and Carrots

Chickpea Carrot

Pulse 1 (15-ounce) can chickpeas in a food processor until crumbly or smooth, depending on desired consistency. Stir together with 4 ounces carrot puree.

Chick’n and Parsnip Dinner

Chicken Parsnip (1)

Cook 4 Gardein chick’n strips according to package direcitions; finely mince.

Meanwhile, peel and chop 2 small parsnips. Cover with water and bring to a boil; continue to cook for about 15 minutes, until tender. Mash with a potato masher. Serve alongside the chicken, or stir the chicken pieces into the mashed parsnip. I also added a tiny bit of Earth Balance butter to this to make the parsnips creamier.

Roasted Rutabaga and Pear

Rutabaga Pear

Peel and chop 2 small pears and 1 rutabaga. Bake at 400 degrees F for about 30 minutes, or until very tender. You can serve in strips, but Veronika preferred them mashed up together, which helps sweetened the rutabaga.

Rutabaga Pear

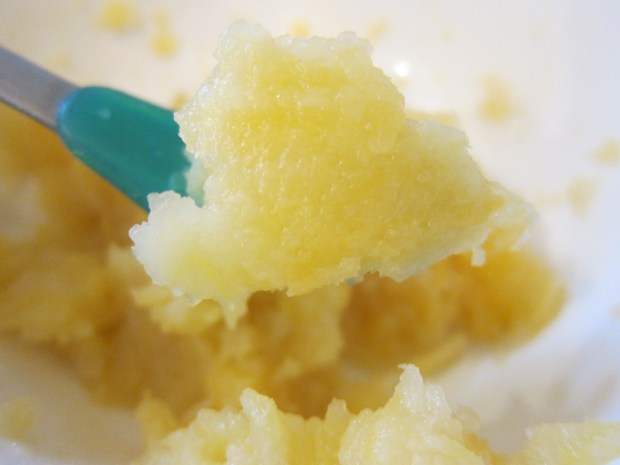
Mashed Turnip and Sweet Potato

Sweet Potato Turnip

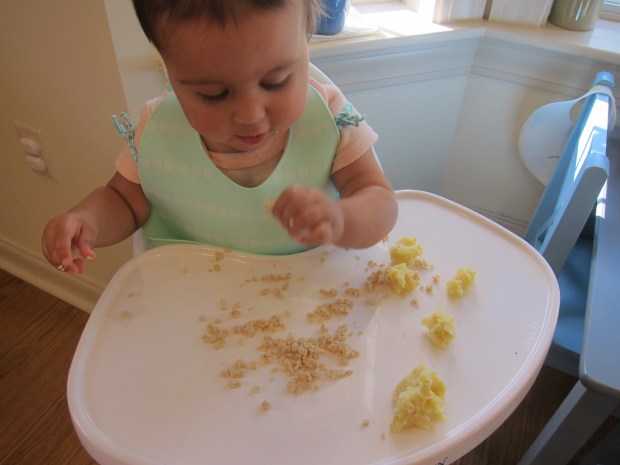
Peel and cube 1 small sweet potato and 2 small turnips. Cover with water and bring to a boil; cook for 20 minutes, until very tender. Mash and serve!

Veronika likes this one alongside refried beans or lentils!