Origami Boat

Origami Boat (10)

Travis and I have been finding neat materials from which to make boats, now that we’re on a bit of a pirate kick. I found the instructions for this origami boat online, and thought it looked fun. It turned out to be quite tricky, but Travis and I had a ball, laughing at our gaffes, and cheering when we got it right!

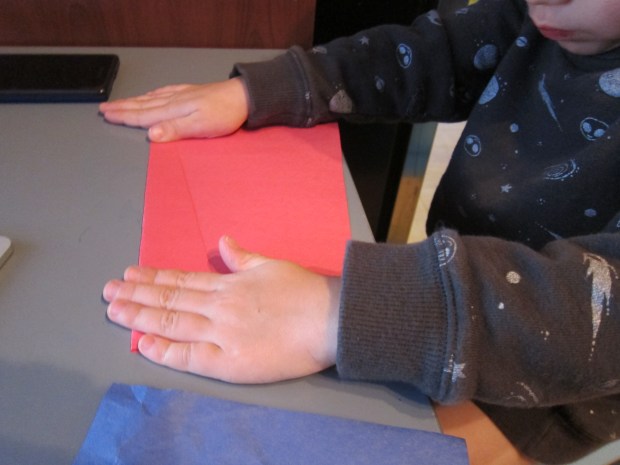
Ideally use origami paper, but construction paper works in a pinch. Either way, begin by trimming into a rectangle. Fold the paper in half horizontally, and open back up. Fold in half down vertically and leave folded.

I was so proud Travis wanted to do his own folding!

Origami Boat (2)

Next fold the upper two corners into the center crease, forming two triangles.

Origami Boat (3)

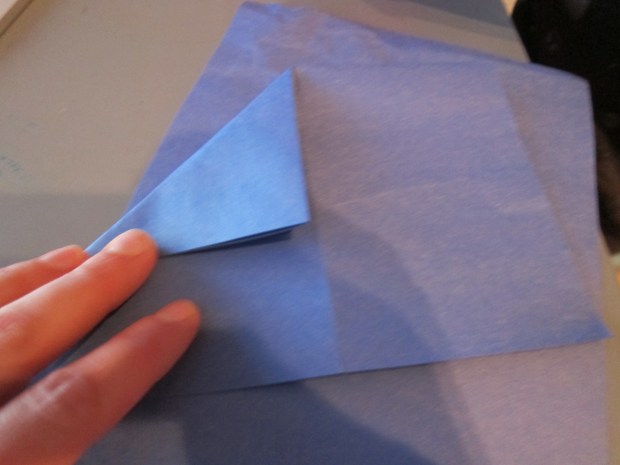
Fold up the bottom of the paper on both the back and front – now it looks like a pirate hat!

Origami Boat (4)

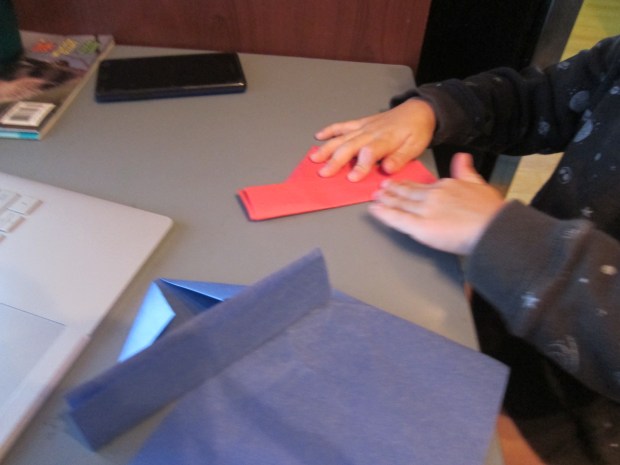
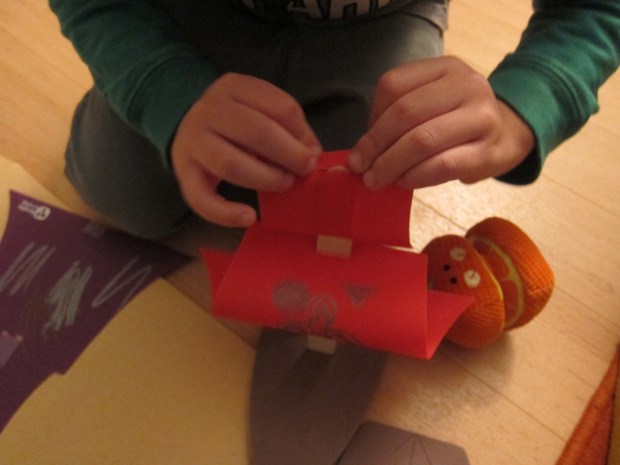
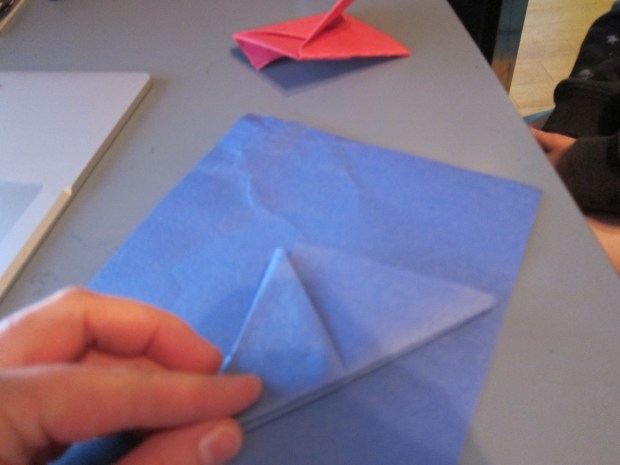
But don’t stop there. Now you’re going to push the bottom two corners toward each other, a process that really only makes sense once you feel it intuitively. It will make the paper into a square that folds flat (hint: tuck in the excess flap on the front and back).

Origami Boat (5)

Now fold up the bottom of this diamond on both front and back, pressing flat.

Origami Boat (6)

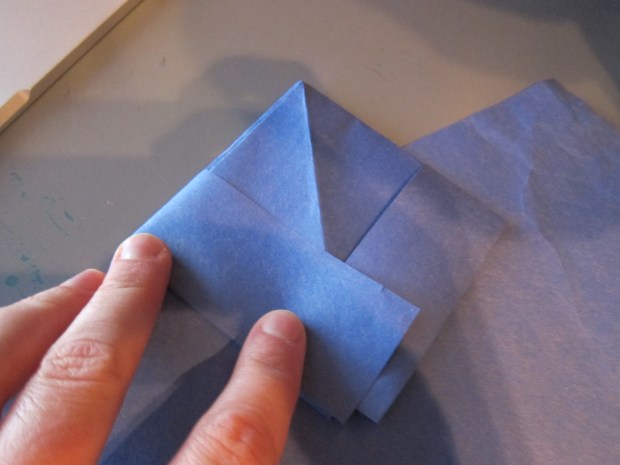
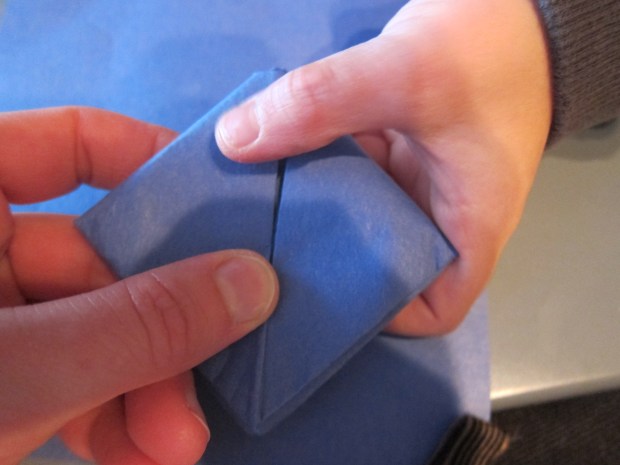
Take the edges of this triangle toward the center – another tricky step! You’ll form another square. We had a good giggle over this one as we figured it out!

Origami Boat (7)

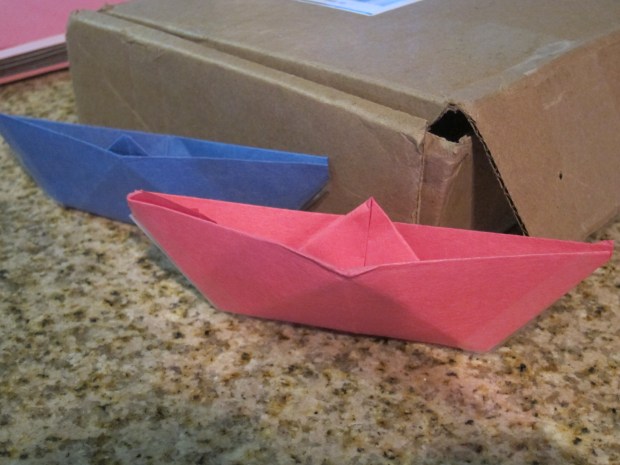
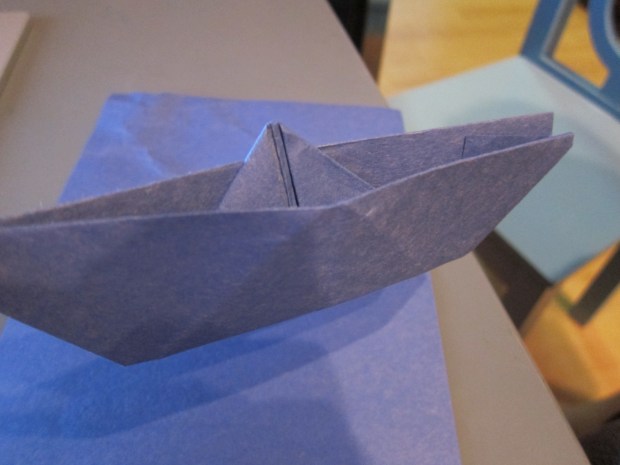
Finally, pull the top corners out, and press flat – now you have a boat!

Origami Boat (8)

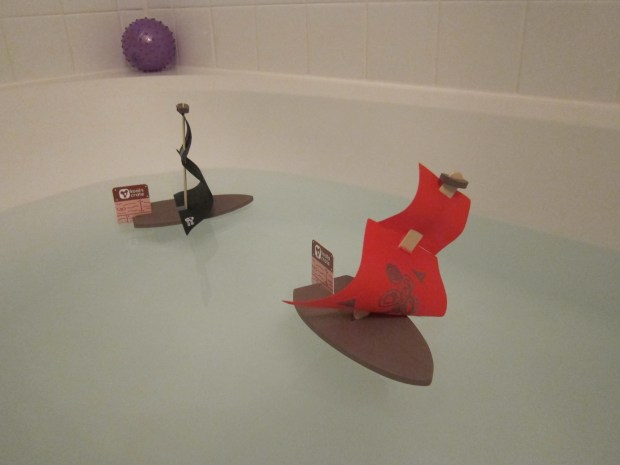
It should hold pretty well, but for a little added security, I stuck masking tape on the edges.

Origami Boat (9)

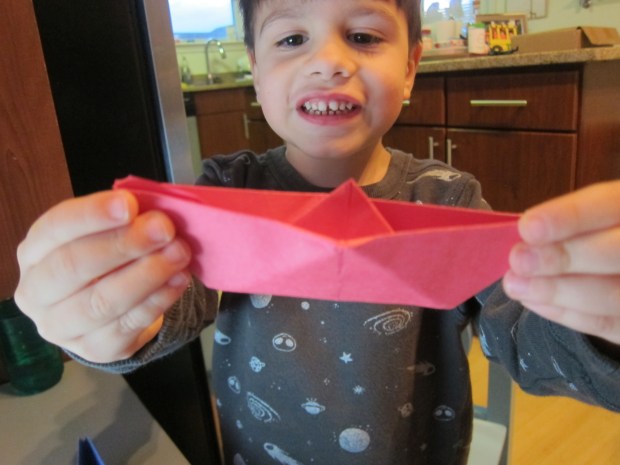
Travis was SO proud, an loved his boats so much that he requested a fleet. I soon became pretty adept at making them, so he had lots of boats to fly around the apartment.

Happy folding!

Develop the Gaze

Develop Gaze (4)

Here’s our final activity for the first month of Veronika’s life! As with many of the activities this early on, today’s was about taking a quiet moment – a must, for an infant in a busy home! We paused just to look at each other, and truly give her time to develop her eyesight.

Great moments for this include nursing – when an infant is an ideal 8 to 10 inches from your face – or when you hold your baby in your arms. Veronika loves being cradled in one elbow and just staring up at me – I swear she makes me feel like a pop star. This might be the closest I’ll ever come to the celebrity status of a Bruno Mars. In particular, she seems fascinated when I eat, eyes big and wide.

Develop Gaze (2)

So today, give your baby these moments, and take time to gaze back. Here’s another wide-eyed stare I caught on camera, although the flash made her blink.

Develop Gaze (3)

You can also let infants stare at their big siblings, from a slightly further distance away. This will be a great way to develop their eyesight. Travis loved helping out for today’s demonstration!

Develop Gaze (1)

What does your infant love to watch you do? Do they seem fascinated by a particular feature? Please share in the comments!

Pirate Telescope Spotting Game

Telescope Game (6).JPG

Travis and I can’t get enough of pirate games these days, and this fun activity engaged us on multiple levels – as an artistic craft to start, and then as a competitive game. If you have enough kids, it would be perfect to play at a pirate-themed birthday party!

First, we needed to set the scene. We originally intended to paint on a big piece of craft paper (a large piece of cardboard would work, too), but we were out of blue paint – you can’t have an ocean scene without blue!

Thinking quickly, we switched to markers and crayons. I drew Travis a basic scene: ocean, pirate ship, desert island. Big kids may want to take charge of this part themselves!

Telescope Game (2)

Next we needed a couple of telescopes. Some decorative washi tape and an empty paper towel tube made one quite quickly.

Telescope Game (1)

We tried to make a stacked telescope by layering cups together. This might have worked more easily with paper cups, since we had to tape two plastic ones together (and work carefully to snip out an eye hole), but the tape sort of ruined the look.

Telescope Game (3)

This image is way more what we were going for.

maxresdefault

But there wasn’t time to be fussy! (We fit this game into baby sister’s nap), so now it was time to test our pirate spotting skills.

Telescope Game (5)

Taking turns, one person added something to the ocean landscape, and the other pirate looked through the telescope to discover what was new.

Telescope Game (4)

This was a great challenge for Travis’s budding art skills. He had fun drawing me a treasure chest, a starfish, and more.

Telescope Game (7)

And he loved spotting the items that mommy pirate drew, like a whale and a parrot.

Telescope Game (8)

As mentioned, you could have a whole group of kids play this at a party, and turn it into a competition for who spots the new item first!

Enjoy, landlubbers!


Check the Diaper Bag

Diaper Bag (1)

If you’re following along with my daily infant activities, then your newborn is nearly a one-month-old! That likely means that even new moms and dads are beginning to venture out with baby, if they haven’t already. And for veteran parents, you’ve probably had to take baby everywhere since day 1! But chances are the fatigue is catching up to you after 4 weeks with little sleep, and it’s a good time to do inventory before you step out of the house… of the diaper bag that is.

Typically, I like to keep the diaper bag mostly ready to go, so it’s a no-brainer to leave the house fast. A few items need to go in and out, but others can always stay.

First, you’ll want a good bag, one with lots of interior pockets to easily fit diapers, wipes, diaper cream, and more. A lot of great bags come with a foldable diaper mat, which is a must for yucky Koala Care stations! I love my version from Land’s End.

Diaper Bag (2)

Once you have the bag, sort out the baby essentials, which can mostly live in the diaper bag and be restocked as needed. I keep a spare outfit (usually my least favorite outfit in Veronika’s current size) and only change it if it gets worn. Also of course are diapers, wipes, diaper cream, and plastic bags for disposal.

Diaper Bag (3)

Don’t forget older siblings, who may need a change of clothes, too, if still young. Bigger kids can get away with a water bottle and snack, which you can keep on hand. And throw in a snack for yourself, mama! All this takes energy.

Diaper Bag (4)

Extra credit goes for entertainment. Leave in an easy baby book or a favorite toy. Magazines are great for big kids, since they weigh almost nothing but include great entertainment.

Diaper Bag (5).JPG

Happy travels!

Sunken Treasure

Sunken Treasure (4)

After lots of fun dressing up as pirates, Travis and I needed to head off on a treasure hunt for “booty.” I involved a little STEM learning in the game by turning it into a test – which treasure will float, and which will sink to the bottom of the ocean?

First, I made a list of items to find around the house, and Travis helped check them off as we went.

Sunken Treasure (2)

He found a little box to gather his treasures into, and already loved the game!

Sunken Treasure (1)

Items included: things from the kitchen like cucumber slices, toothpicks, and cookie cutters; things from his room like toy dinosaurs, marbles, and bouncy balls; and things from outside like leaves, rocks, and sticks.

Next we filled a glass of water and set about testing all of our items.

Sunken Treasure (6)

Travis loved dropping things in the glass!

Sunken Treasure (5)

We soon detected a pattern – metal objects tended to sink and wooden ones tended to float. The rubber bouncy ball surprised us by sinking! When we were done, I fished the objects out of the glass, and “Pirate Travis” had to dry and polish all his treasures.

Sunken Treasure (7)


Dancing Hands

Discover Hands (1)

This adorable activity is a great way to help your infant discover his or her hands, and feel how they are connected to the rest of the body.

Simply hold your baby’s hands (or let them hold on to you with the grasp reflex), and start to make movements. You can do this randomly, but it’s even better to music.

Discover Hands (2)

You can try soothing music – we did a few strains of Mozart! – but feel free to make things more upbeat if that suits your baby’s mood.

Maybe because she hears it all the time (thanks to big brother), Veronika seemed to prefer having her hands rock out to pop music.

Discover Hands (5)

Travis joined in for an impromptu dance party.

Discover Hands (3)

This ended up being a great sibling bonding moment, his feet and her hands dancing to the beat. A great little activity!

Discover Hands (4)

Pirate Crate

Koala Pirate (21)

Ahoy matey! With just a couple months left in our Koala subscription, Travis was eager to see what the Pirate Crate was all about, and dove right in to all 3 projects! As always, you can replicate these projects with materials from a craft store, more or less.

First up was Pirate Dress-Up – a paper hat to fold, and a felt eyepatch. The eyepatch was an instant hit – wow, he felt like a real pirate!

Koala Pirate (1)

Simply thread the provided patch onto a bit of black elastic, and tie a knot to secure it.

Koala Pirate (2)

Next we added the pirate hat, a large piece of black construction paper with dotted lines to fold. These were nicely labeled by both number and color, making it easy for kids.

Koala Pirate (3)

To decorate the hat, use the provided stencils and magic markers. Travis really enjoyed stenciling in shapes (“Look, I made a diamond!”).

Koala Pirate (5)

I helped show him some of the suggested overlapping shapes to make pirate-themed decorations (rectangle + heart = crossbones) but mostly he was content just to scribble and make his own designs.

Koala Pirate (6)

Avast, matey!

Koala Pirate (7)

He eagerly asked if we could make the Parrot Puppet immediately after. Color in the provided template with magic markers. There are also feather stickers to adhere.

Koala Pirate (9)

To make the puppet stand, thread elastic through a cardboard base and secure the elastic on with tape, letting the ends dangle down. Fold the cardboard in half and tape again – now the parrot figure slips right on.

When the parrot is not on the stand, the elastic can cleverly be tied around the wrist – a parrot pal just like every good pirate needs!

Koala Pirate (10)

The third project, a real floating Pirate Ship, was a big hit! Insert a craft stick into a brown foam base, and thread one of the 4 provided sails onto the stick.

Koala Pirate (13)

Kids can decorate the sails with stencils, too, but Travis only gave the decoration a cursory thought. He much preferred to see the sails on the masts, and was delighted he could raise and lower them like a real sail.

Koala Pirate (15)

A cardboard “rudder” inserted into a slit at the back of the foam base allows your boat to go straight, left, or right, depending which slot it’s in. So of course we had to test them in the bathtub!

Koala Pirate (16)

Have fun playing around with the rudder’s position, or racing the boats against one another. Travis also loved “flying” the boats in the air.

Koala Pirate (17)

To round out Travis’s costume, we also put together the suggested Pirate Hook. Roll a piece of aluminum foil tightly – Travis insisted on doing so himself!

Koala Pirate (18)

Adults, poke a hole in the bottom of a plastic cup. Insert the wrapped foil, curling the end into a hook shape. Pop the cup over your child’s hand and ahoy there – it’s Captain Hook!

Koala Pirate (20)

Shiver me timbers! Thanks for a great time, Koala Crate.

Bird’s-Eye View

Bird's Eye (2)

I’ve tried out various ways of carrying Veronika around the house, both for her own sense of discovery (the “leopard” is great for little tours around the house!) and to keep things novel for myself as a parent.

Today was all about propping her up over the shoulder, which gives your little one a “bird’s eye” view of things. Not only will a home look different for an infant who normally lies down, but this position also has the benefit of helping with babies who spit up frequently.

Bird's Eye (4)

I’ve read recommendations to keep a baby upright for 20 minutes after each nursing session, but honestly who has the time? If I carry Veronika on my shoulder for a bit, she gets upright time and I still get things done!

So today’s activity is simply to give the bird’s eye view a try. You can (as with leopard pose) do a little tour around the house, or just narrate your chores as you move about one room.

Bird's Eye (1)

Or take your baby to look at something beautiful, as we did with a local Christmas tree festival – the bird’s eye view was perfect!

trees (4).JPG

Farro Salad with Roasted Vegetables

Farro Salad.JPG

This filling salad is a great addition to a vegan holiday table, and was my contribution to this year’s celebration. We love it paired with Gardein’s stuffed holiday roast!

Ingredients:

  • 1 cup farro
  • 2 cups vegetable broth
  • 1 teaspoon ground cumin
  • 1/2 teaspoon ground ginger
  • 1/2 teaspoon black pepper, divided
  • 3 cups cauliflower florets
  • 2 cups sliced rainbow carrots
  • 8 ounces chopped cremini mushrooms
  • 5 tablespoons olive oil, divided
  • 1 and 1/2 tablespoons lemon juice
  • 1/2 teaspoon mustard
  • 2 tablespoons chopped fresh parsley (optional)
  1. In a saucepan, combine the farro, broth, cumin, ginger, and 1/4 teaspoon black pepper. Bring to a boil, then reduce heat and simmer, covered, for about 25 minutes, until the liquid is absorbed. Set aside.
  2. Meanwhile, combine the cauliflower, carrots, and mushrooms in a roasting pan. Drizzle with 2 tablespoons olive oil and sprinkle with 1/4 teaspoon black pepper. Roast at 400 degrees F for 25 minutes.
  3. In a large bowl, whisk together the remaining 3 tablespoons olive oil, the lemon juice, and the mustard. Add the farro mixture and roasted veggies. Sprinkle with chopped parsley just before serving if desired.

The salad is good warm or at room temperature, making it ideal for a busy holiday feast!


“Baby Napping” Sign

Baby Napping (3)

We’ve been lucky so far with Veronika – she can pretty much sleep through any level of noise, be it a birthday party or an afternoon at home. But as we enter the holiday season, there’s going to be a lot more noise and a lot more company, and sometimes it’s helpful to give guests or neighbors a hint that baby is sleeping before they come crashing noisily in.

This is a great project for older siblings to help with, too. We pulled out Travis’s art kit to put together a “baby napping” sign.

Baby Napping (1)

Encourage your child to write the words on the sign if they are interested (Travis was not), and to help select colors or cute images. To wit, we glued on a picture of a swaddled infant.

Baby Napping (6)

Once the sign is complete, you can tape it up in any moment that demands quiet.

Baby Napping (7)

Happy napping!