Paper Bag Valentine Satchel

Paper Bag Valentine (6)

This project is a neat way to upcycle any paper bags you have from the grocery store, just in time for Valentine’s Day! The finished satchel makes a great gift for teachers, grandparents, or friends.

To start, I traced a heart (using red marker of course) on a brown paper bag, and guided Travis’s hand with safety scissors to cut out.

Paper Bag Valentine (1)

Once you have the first heart, trace onto a second piece of brown paper and cut out so the two sides match.

I added red dots around the heart as guidelines for Travis to hole punch – Valentine’s Day 2018 is quickly becoming the year of the hole punch for us!

Paper Bag Valentine (2)

Next up help your child develop their lacing skills by threading a shoelace through the holes. I picked up a cheap heart-print shoelace on Amazon in keeping with our Valentine theme. If you want your gift recipient to use the heart as a real satchel, don’t lace along the top, and knot the ends of the shoelace to form a handle.

Paper Bag Valentine (3)

We decorated our satchels with stamps. I set out a few that felt Valentine’s-ish (hearts, lips, and flowers), and suggested Travis use red ink, although he preferred blue. No problem, it’s his creativity!

Paper Bag Valentine (5)

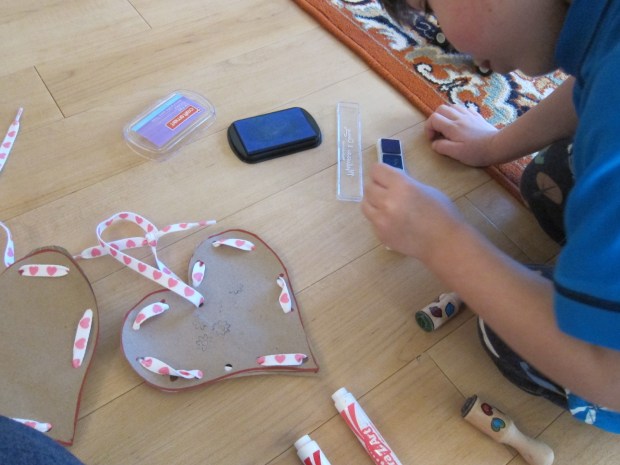
You can add a note to your recipient on the back as a final touch, or leave it blank.

Paper Bag Valentine (7)

Make a Speedy Bobsled

Bobsled (6)I love how timely the craft in our monthly issue of High Five always is. This month, Travis learned how to make a bobsled just in time for the start of the Olympics!

Of course it made no sense to put together a bobsled when Travis had no reference point, so first we watched a few videos of past teams. He was then super revved up to create one at home.

All you need is an empty toilet paper tube to be the bobsled, and a long piece of cardboard for the track. Ideally use a three foot long piece of cardboard as your track; I only had two feet in length, which worked just fine, but it meant our bobsled couldn’t race as far downhill.

Cut the tube open along one side, and then paint.

Bobsled (1)

I asked Travis if he wanted to paint his sled in the colors of a particular country. Actually, the red white and blue here isn’t America but Australia – he’s big into an Australia phase.

Bobsled (2)

I suggested making the track white for ice, but Travis wanted an Australian-flag colored track as well.

Bobsled (3)

We left the track and bobsled to dry while he was at school, and returned to an afternoon of Olympic fun!

To finish the sled, simply tape two plastic straws on the bottom (decorative washi tape was pretty, though not a must), with the bent parts of the straw pointing upwards like sled runners.

Bobsled (5)

Woosh! Action shot!

Bobsled (7)

We took turns launching the bobsled and rating its runs on a scale of 1 to 10. We give a gold medal to this craft, thanks High Five!

Bobsled (8).JPG


Stained Glass Window Art

Stained Glass (14).JPG

Just about this time last year, when Travis was two-and-a-half, we made toddler stained glass. Now that he’s three-and-a-half, we’ve grown a bit more sophisticated with our designs! This project introduced a new art medium – puffy paint! – which absolutely delighted Travis.

First, place a piece of contact paper, sticky side down, on a work surface. You’re going to use your puffy paint directly on here, so make sure the contact paper is some place it can dry undisturbed for a while.

Stained Glass (1)

I knew Travis wouldn’t be able to draw the exact outline of a house for our stained glass, so I set up two work stations side by side. While I outlined the house, he went wild with other puffy paints on his work surface.

Stained Glass (4)

He told me he’d painted a castle, a prince, a king, and the girls visiting (whoops, too much Cinderella!). Meanwhile, he was ecstatic when he realized I had copied the house shape off of a template online. Next time I would make sure to have a large bottle of black puffy paint on hand – I had to switch to green mid-way.

Stained Glass (3)

Let your puffy paint dry overnight.

To fill in the panes of our “glass”, we used glitter glue in lots of fun shades.

Stained Glass (7)

After a bit of trial and error, Travis grew quite adept at keeping the glitter glue between the lines of the puffy paint.

Stained Glass (9)

We did run out of puffy paint with a few spaces left to fill, so I mixed up some quick colored glue (glue and any shade of tempera paint). Let dry completely again.

Stained Glass (10)

Trim any excess contact paper, and then your stained glass will adhere right to any window.

Stained Glass (11)

It was so beautiful with the sun shining through!

Stained Glass (12)

What other shapes or designs would you make to hang as “stained glass”? We’d love to hear in the comments!

Stained Glass (13)

Cotton Swab Snowflake Craft

Cotton Snowflake (9)

I’ve never been a fan of cut-paper snowflakes as a craft. Quite frankly, I’m no good at it, and mine end up looking like circles with a few holes in them, instead of lacy flakes! But with pretty sparkling snowflakes outside our window, we wanted some indoor craft to bring the snow inside, and this cotton swab version was much easier to pull off.

To be honest, Travis was a little young for it. Older kids may be much more into shaping and designing their six-pointed flakes, and can really get creative with the process. As to Travis, he still had lots of fun, just in his own preschool way…

…starting with ferrying the cotton swabs over to me by “forklift.” Shipment received.

Cotton Snowflake (1)

He thought it was fascinating to watch me clip the cotton swabs in half (which, fyi, is not easy to do, the stems are tough; adults may want to help even older children with this step).

Cotton Snowflake (2)

Next I showed him how to arrange the cotton swabs into six-pointed shapes like snowflakes.

Cotton Snowflake (3)

We adhered ours to circles cut from blue constructions paper, but if you prefer, glue them together over wax paper and lift them off the wax paper once the glue has dried.

Cotton Snowflake (5)

Travis set about adding lots of glue and cotton swabs to his “snowflakes.” I loved watching his creative process, including smearing on the glue with a cotton swab at one point.

Cotton Snowflake (8)

As mentioned, older kids may want to create increasingly complex designs, and can cut the swabs into even tinier components.

Cotton Snowflake (7)

After the glue dried, we hung the snowflakes in the window.

Cotton Snowflake (10)

What beautiful flakes falling down!

Cotton Snowflake (11)


Rock Snowman

Rock Snowman (6)

A recent burst of warm(ish) weather got us outside over the weekend, and my little collector is always eager to bring home treasures from our walks. In fact, I always carry a zip-top plastic bag with me when we outside just for this purpose!

Rock Snowman (3)

Today we returned him with a variety of rocks and sticks, so thought we could build little winter snowmen.

Rock Snowman (1)

First the rocks needed a good coat of white paint, and we left them to dry overnight.

Rock Snowman (2)

When we settled in to build our snowmen, it turned out we really only had one rock large enough to be the base, which meant only one snowperson could be built. The rest of the rocks ended up as little “snowballs.”

Rock Snowman (5)

I put together the snowman for Travis with hot glue – three rocks glued together, two little sticks for the arms, and buttons and googly eyes hot glued on.

The finishing touch was a little top hat I simply made from construction paper.

Rock Snowman (7)

Don’t have rocks on hand to make a snowman? Check out our shredded paper or glowing bottle versions instead!

Recycled Jet Pack Costume

Jet Pack (12)

We’ve been having fun with empty cereal boxes lately. Combine that with Travis’s current interest in the moon and space exploration, and what better item to turn our cereal container into than a jet pack?

To start, cut the ends of two toilet paper tubes and fold them outward; they’ll look almost like little octopuses.

Jet Pack (1)

Wrap the tubes in foil, then duct tape them to the ends of the cereal box.

Jet Pack (2)

Note: Ideally you’ll have silver duct tape. Unfortunately, I only had yellow duct tape on hand… but it was nothing that a little silver paint couldn’t solve in a pinch!

Jet Pack (4)

Next, wrap the cereal box in aluminum foil, and tape the edges with duct tape. (Add your silver paint to cover any duct tape, if needed, at this point).

Jet Pack (5)

It’s up to your little explorer how they want to decorate the jet pack. Travis always needs lots of glue of course.

Jet Pack (7)

We added construction paper buttons and glitter glue, because of course a project this silver needs glitter glue.

Jet Pack (8)

Use hot glue to attach ribbon or string onto the top and bottom corners of the box; these will be the shoulder straps.

Jet Pack (13)

Our jet pack couldn’t launch without flames, of course! A few strands of tissue paper glued into each tube solved that problem.

Jet Pack (9)

And now we’re ready to fly.

Jet Pack alt

What else might you make from empty cereal boxes? I’d love to hear ideas in the comments!

Jet Pack (10)

Egg Carton Penguins

Egg Penguin (6)

We don’t buy eggs, but I do confess that egg cartons from my in-laws’ house make for fantastic up-cycled crafts. We got the idea to make these cute figures after a feature on penguins in our first issue of Ranger Rick Jr. We quickly decided we needed some adorable toy penguins around the house!

Egg Penguin (1)

Cut an egg carton into indiviaul compartments and paint with black tempera paint. Since the carton was originally pink Styrofoam, it took two coats of paint before we hid the color underneath.

Egg Penguin (2)

Next we made sure to gave them white bellies!

Egg Penguin (5)

I cut out orange hearts to be the feet and orange triangles to be the beaks from a sheet of orange felt, and Travis helped glue these on.

Egg Penguin (4)

Googly eyes were the finishing touch!

Egg Penguin 8)

Now we have adorable penguins to march around and bring our magazine story about the animals to life!

Egg Penguin (3)

Snowman Wax Resist Painting

Snowman Wax (7)

It’s always fun to find new uses for that pesky white crayon in the crayon box… Sure you can draw on black paper, but this fun seasonal project has a magical feel for kids since it features a big “reveal” at the end.

First, you need to draw with white crayon on white paper, which hopefully won’t frustrate your kids. I told Travis to imagine he was drawing anything snowy – the snow fort we’ve made outside our patio, snowflakes in the air, etc.

Snowman Wax (1)

Because I wasn’t sure how much his white scribbles would turn up in the “reveal,” I made him a separate drawing with a white snowman and big puffy white snowflakes.

Snowman Wax (2)

Now the fun part: could we magically make our white pictures appear?

To prepare the paint, thin blue tempera paint with water; you want the consistency to be closer to watercolor. I actually would make ours even thinner next time, since it was a bit dark over our final result.

Snowman Wax (3)

Travis was very excited to see where the white crayon was on the paper!

Snowman Wax (4)

Then he grew impish and slathered on the paint quite thickly. A little thinning out on my part helped reveal the snowman’s three round layers a bit better.

Snowman Wax (5)

Overall, cute and nicely seasonal. Please share in the comments if you have other fun white crayon projects at your house!

Looking for more wintery indoor fun? Check out our recent shredded paper snowmen and pinecone snow owl projects!

Confetti Launcher

Confetti Launch (9).JPG

Well, we didn’t get to this one in time for New Years Eve, but there’s nothing wrong with having messy fun with leftover confetti just to fill a winter’s afternoon! Making the launcher will be a bit tough for the littlest hands, but Travis loved watching the assembly of it until it was time to make our confetti fly. Kids in elementary school on up can help with the entire process.

First, you’ll need two short cardboard tubes, such as toilet paper tubes. If they are the same size, cut one open and tape it so it is slightly narrower than the other.

Confetti Launch (1)

Cover both tubes in pretty decorative paper and set aside.

Confetti Launch (5)

Cut two slits along each side of the top of the wider tube, and thread through a rubber band. Stretch the ends of the rubber band around a jumbo craft stick.

Confetti Launch (3)

Trace the bottom of the narrower tube onto construction paper, and cut out the circle. Glue the paper to cover one opening of the tube.

Confetti Launch (2)

Now fit the narrow tube into the wider one, and glue the paper onto the craft stick. Let dry for at least one hour.

Confetti Launch (4)

Time to launch! Travis helped sprinkle in leftover New Years confetti.

Confetti Launch (6)

Little hands will likely need a grown-up’s help to pull the launcher back far enough, so I couldn’t capture a photo right in the middle of the action but…

Confetti Launch (7)

Confetti!

Confetti Launch (8)

We had to repeat over and over of course. We’ll definitely be making this for parties and celebrations to come!

Snow Globes

Snow Globe (5)

Our snowy themed indoor fun continues, as negative wind chills are still keeping us mostly indoors. These snow globes didn’t turn out as pretty as the kind you’d buy in a store, but we enjoyed making them!

First, you’ll need to arrange little figures or miniatures, and glue to the lid of a mason jar. We had fun sorting through cute bird-themed figures we had at home, which looked great when we affixed them (I used hot glue, a grown-up step).

Snow Globe (1)

Next time though, I would use something taller, since these didn’t really stick far up enough into our swirling “snow.” But more on that later.

Snow Globe (2)

Help your child pour water into the mason jars until they are almost full. Then it’s time for the secret ingredient: vegetable glycerin. Travis loved the goopy texture. Add 1 teaspoon to each mason jar.

Snow Globe (3)

Finally, we needed to add snow…. glitter that is! Don’t overdo it, or you won’t really be able to see your figures in the jar. We might have been a little too heavy-fisted.

Snow Globe (4)

Now give them a shake to create a beautiful indoor snowfall! These would make great gifts if you want to save the idea for the holidays.


Snow Globes alt.JPG

Here it is snowing on our little birdhouse:

Snow Globe (6)