Over the Rainbow Snack

Over the Rainbow (1)

There might not be a pot of gold at the end of this rainbow, but it still makes the perfect St. Paddy’s Day snack!

Spoon blueberry non-dairy yogurt onto a plate or shallow bowl and spread into a thin layer.

Top the yogurt with a rainbow of fruit – we used red strawberries, orange mandarin oranges, yellow bananas, green kiwi, blue blueberries, and purple grapes. A little sprinkle of shredded coconut at each end gave us puffy clouds.

Perhaps a few gold-wrapped candies could make an appearance as well…

Over the Rainbow (2)

Butterfly Balancing Act

Butterfly Balance (6)

This balancing experiment is a nice way to talk about things like symmetry and centers of gravity, no matter how young your child is! They’ll love the beautiful butterfly you make, and absorb just a little science in the process.

First, I folded a piece of white paper in half and traced butterfly wings. Cut out the wings and unfold – you now have a perfectly symmetrical butterfly!

Butterfly Balance (1)

Now place that paper over something sturdier (we recycled a cereal box) and cut out – this part was definitely a grown-up step.

Travis loved decorating his butterfly with dot paints.

Butterfly Balance (3)

Once dry, it was time to see how it flew!

Using a little bit of playdough to anchor it, I inserted a straw. This will be the stand for the butterfly.


Butterfly Balance (5)

Tape a penny to each corner of the butterflies wings for weight.

Butterfly Balance (4)

Now balance it on the straw! You may need to shift a little until you find the center of balance, but once you do, your little butterfly friend will be aloft.

Butterfly Balance (7)

I confess, I think I was more impressed with the final results than Travis was!

Footprint Butterflies

Footprint Butterfly (8)

Painting doesn’t get messier – or more fun! – than this.

We needed a harbinger of spring with a sleety snowstorm outside, and I thought butterflies would be perfect. First, Travis and I selected blue and green paints, and swirled them together on a paper plate. I was hoping this would give the butterfly a patterned look like in nature, though mostly it just meant we had a lovely turquoise.

Footprint Butterfly (1)

I thought Travis might be squeamish about stepping right in the paint and planned to apply it to his feet with a paintbrush – but he surprised me!

Footprint Butterfly (2)

He let me hold the plate to his foot and mush it around (“It’s cold!”) and then was patient as I pressed his foot down on poster board, angling his toes slightly out, for one butterfly wing. Repeat on the other side.

Footprint Butterfly (3)

We made two butterflies on our poster board, but after that, things would have gotten too muddled. He was having so much fun though that I laid out additional sheets of paper for him to slip and slide and stomp on – make sure to hold your little one’s hand.

Footprint Butterfly (4)

Finally, our butterfly wings were dry; I added in bodies and antennae and Travis drew a few scribbles of his own.

Footprint Butterfly (6)

Send to a loved one as a happy spring card!

Bubble Wrap & Paint

Bubble Wrap Paint (8).JPG

This project is messy but so worth it – paint, cool textures, exciting results… What more could a toddler want from an art project?

To start, I set Travis up with a disposable cookie sheet and paints, and told him he could squeeze on whatever colors he wanted. This alone was cause for excitement, since usually I measure out a portion of paint for him to use. He was very deliberate choosing which color should go where!

Bubble Wrap Paint (1)

Now it was time to smear it all together with a plastic spoon, which he loved.

Bubble Wrap Paint (2)

Once our baking sheet was filled with paint, we placed a piece of bubble wrap, bumpy side down, over the paint and pressed to make sure it was fully coated.

Bubble Wrap Paint (3)

Carefully peel up the bubble wrap and transfer to a piece of poster board. Press down again, then lift off and reveal your painting!

Bubble Wrap Paint (5)

We had to make several prints of course, adding new colors each time.

Bubble Wrap Paint (9)

Then Travis wanted to get his hands on the painted side of the bubble wrap, and pressed his painted hands onto a clean piece of bubble wrap, which was nearly as fun since it led to popping the bubbles.

Bubble Wrap Paint (7)

Great messy fun!

Bubble Wrap Paint (6)

Sensory Construction Bin

Construction Bin (2)

This simple sensory bin is heaven for any kid who loves playing with construction trucks!

I ordered play sand from Amazon, and although the quantity I received wasn’t nearly what I expected, the amount ended up working well. I poured it into our plastic storage bin, just enough for a thin layer; this shallow sand meant we could make tire tracks, pile sand in some corners while leaving other spaces with only a thin cover, and otherwise have a grand old time. However, make the sand deeper if you want to!

Construction Bin (5)

When Travis woke up from his nap, I had the bin set up and ready to go – sand, trucks, and various materials to be construction truck lumber, including wooden craft sticks and some real wood chips we’d collected outside earlier in the day. The wood chips turned out to be home to a few tiny bugs, which gave our construction site a feel of authenticity!

Construction Bin (4)

Travis set right to, driving bulldozers, filling dump trucks, and making aforementioned piles of sand.

Construction Bin (6)

Soon, he announced he needed to wear his construction vest!

The craft sticks were great for setting up as the beams of a building.

Construction Bin (8)

We did this activity on our balcony in the sunlight, making for beautiful afternoon play.

Construction Bin (7)

Milk Carton Animals

Milk Carton (6)

With several empty Silk cartons around the house, we decided to play with them instead of relegating them immediately to the recycling bin!

This was a craft that I largely had to put together for Travis (too complicated for a two year old’s fingers!) but he was so into it, watching intently every step of the way, and mimicking making his own version with all the materials that were out.

Milk Carton (1)

First, we turned a creamer carton into a pig. I covered it with pink construction paper, which I cut to fit and taped in place (sorry, my woeful crafting skills are on display here, folks!)

Milk Carton (2)

Travis then helped glue two googly eyes into place and to tape on the curly pink pipe cleaner tale. He loved the pink cap that we turned into the nose!

Milk Carton (3)

No sooner finished than he asked if we could make a cow. We were all out of brown and black construction paper, so our cow was white with very vibrant orange spots – why not? Travis loved “helping” cut spots for the cow.

Milk Carton (4)

Once finished, he had a blast moving the animals around the living room, making them oink and moo.

Milk Carton (7)

Great imaginative props to play with!

Milk Carton (8)

Color Match Caterpillar

Color Match Caterpillar (4)

The Very Hungry Caterpillar is a much-loved book around here, so after a cute read of it this week, we made our own caterpillar, and “fed” him fruit – the game involved both imagination and a nice lesson in color sorting!

Preschoolers may want to put together their own caterpillar, but I largely assembled ours for Travis, gluing down circles of different color construction paper for the body, drawing on a face, and adding pipe cleaner antennas and googly eyes.

Color Match Caterpillar (1)

Once the glue dries, set out the caterpillar along with pom poms in colors that match your circles. We had “blueberries” “strawberries” “oranges” “lemons” and “grapes” for our caterpillar to eat.

Color Match Caterpillar (2)

To be honest, Travis wasn’t that into getting the correctly colored pom poms onto the corresponding circle, but he did think our caterpillar was very cute!

Color Match Caterpillar (5)

Carrot-Raisin Salad

Carrot-Raisin (4)This salad is simple enough that kids can help prep it with you – squeezing lemons and oranges is sure to be a hit! The perfect salad for busy bunnies in springtime!

Ingredients:

  • 1 pound shredded carrots
  • 1 cup raisins
  • 1 lemon
  • 1 orange
  • 1/4 cup brown sugar
  • Pinch of salt
  1. Combine the carrots and raisins in a bowl; set aside.
  2. Cut the lemon and orange in half, and squeeze with a juicer. Add the juices to the carrot mixture, along with the brown sugar and salt.

This recipe was the first that I’ve gotten my son to eat with raw carrots instead of cooked – a winner!

Carrot-Raisin (1)

Cloud in a Jar

Cloud in a Jar (5)

Turn a rainy day into a science lesson with this cute experiment! With thick rain clouds covering the sky, it was the perfect day to test out the craft (care of Parents magazine), and to ask Travis he thought would happen when our cloud become too heavy with water.

To demonstrate, fill a jar or clear bowl with water until almost full, then add a layer of shaving cream.

Cloud in a Jar (1)

Fill a second, small cup with water and dye it blue for your rain. Travis definitely needed to help with the drops of food coloring.

Now it’s time to make a rain storm! I wanted Travis to use an eye dropper so we could saturate our cloud gradually, but he was much too impatient so we started pouring on our rain instead.

Cloud in a Jar (3)

Needless to say, we soon had a monsoon! Travis loved seeing the blue color swirl down beneath our shaving cream cloud.

Cloud in a Jar (4)

And then this happened of course! A stormy good time.

Cloud in a Jar (6)

Cardboard Tube Crafts

Cardboard Tube (10)

When is a cardboard tube not a cardboard tube? When it becomes anything your child can dream up for their crafting!

We made two adorable projects this week, one with a short toilet paper tube and one with a longer paper towel tube – seriously, why doesn’t someone just sell these so you don’t have to wait for the roll to end before crafting?

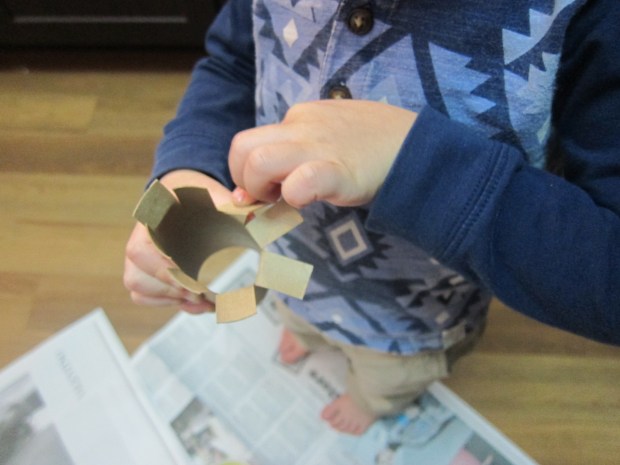
For the shorter tube, we made an octopus. I snipped the bottom to form 8 little tentacles, which absolutely delighted Travis as he helped fold them up.

Cardboard Tube (1)

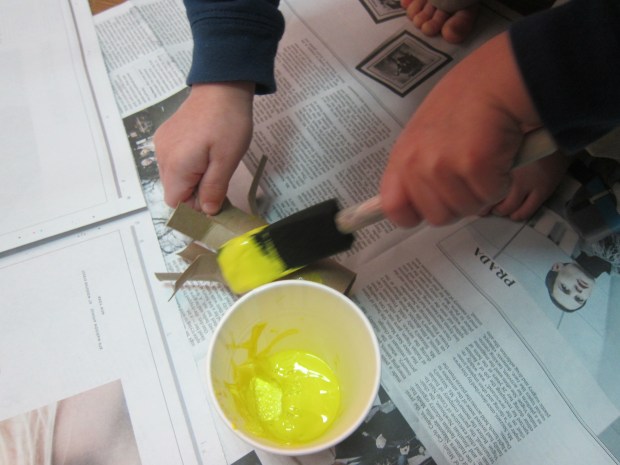
I asked what color his octopus should be and he settled on yellow.

Cardboard Tube (2)

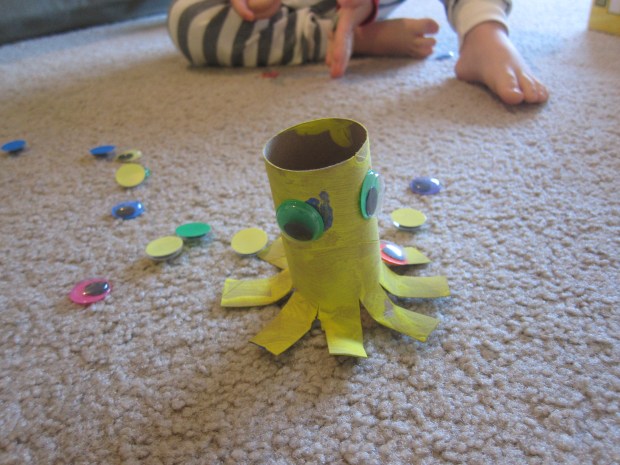
When the octopus dried, I glued on two googly eyes. Travis adored swimming his new little friend around, and wants to make a whole family (so we’ll have to wait for more empty rolls!)

Cardboard Tube (8)

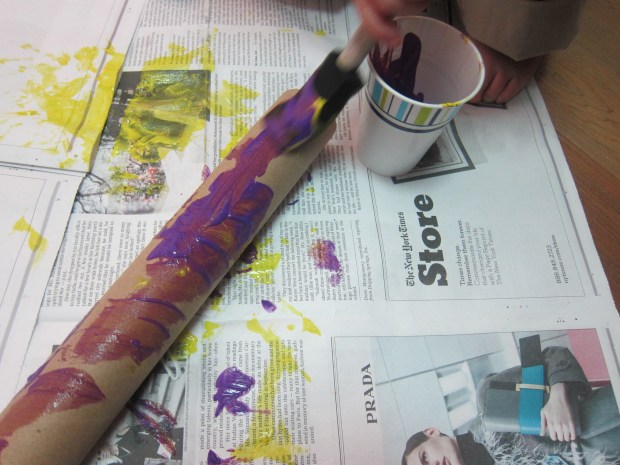
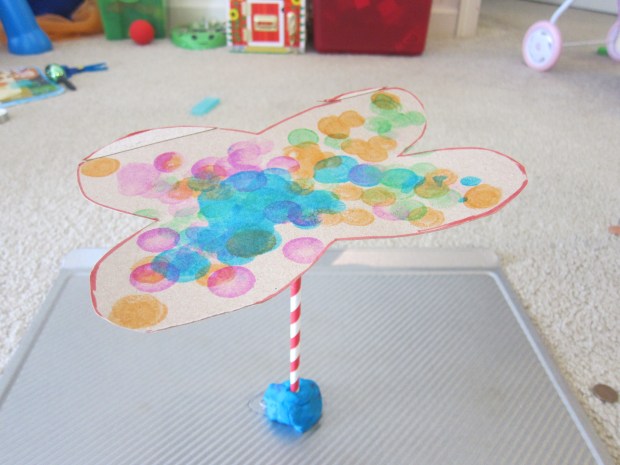
Far more complicated, we turned our paper towel tube into a magic wand. To start, Travis very carefully selected which paints to use, adding a bit of white, purple, and blue.

Cardboard Tube (3)

Once the paint dried, we added further decoration with foam stickers and glitter glue.

Cardboard Tube (6)

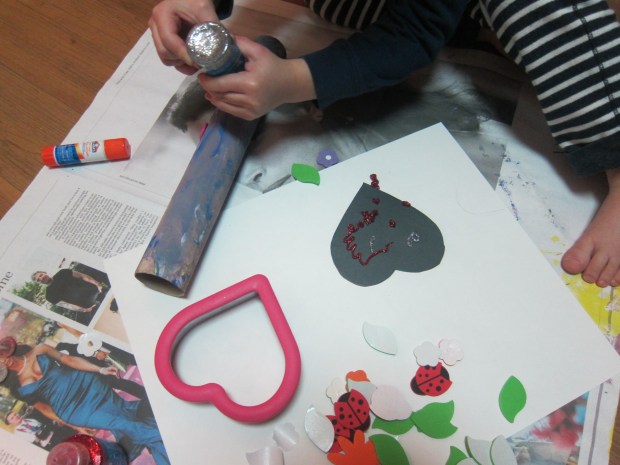
For the top of the wand, I traced a heart from a cookie cutter on construction paper and cut it out for Travis. This, too, needed glitter glue and foam stickers!

Cardboard Tube (7)

I glued the heart onto poster board backing to make it a touch sturdier. Next, Travis wanted to help punch two holes in the heart. We threaded ribbon through this for a fluttery magical wand effect.

Cardboard Tube (9)

Finally, I affixed the heart to the top of our tube with glue. Now he can cast magical spells wherever he goes! What will Sorcerer Travis turn a cardboard tube into next?

Cardboard Tube (11)