Chocolate Mousse Dip

Mousse Dip (1)

A dessert dip where tahini and tofu dress up in chocolate? Yes, please!

Ingredients:

  • 1/2 cup tahini
  • 1 cup non-dairy chocolate chips
  • 1 cup silken tofu
  • 2 tablespoons agave nectar
  • 1/8 teaspoon salt
  1. Combine the tahini and chocolate chips in a large glass bowl. Microwave for 30 seconds. Stir, then return to the microwave for an additional 30 seconds. Stir until the chocolate is melted.
  2. Combine the tahini mixture in a blender with the tofu, agave, and salt; process until smooth.
  3. Garnish with additional chocolate chips, if desired, for a pretty touch.

You can serve this dip with fruit, or even animal crackers for dipping. My preschooler occasionally likes it just by the spoonful!

Mousse Dip (2)

Note: The dip will solidify if refrigerated. You can make it creamier again with a quick 10 second re-heat in the microwave.

Hot Chocolate Science

Hot Chocolate (7)

Well now here’s a tasty way to bring some science into your winter afternoon. Or to add a sweet twist to your science. Whichever way you spin it to your kids, who can possibly protest a science experiment that ends a cup of hot chocolate?

I started out by posing a hypothetical to Travis. If we made him hot cocoa for a snack, which would dissolve fastest: cocoa in a cup of cold water, one of medium (room temperature) water, or one with hot water. He picked hot (great!), so I guessed cold to play devil’s advocate. Now it was time to test our hypotheses.

Set out three heat-proof cups and fill each with 6 ounces of water.

Hot Chocolate (2)

Travis proudly helped fill the first two cups. Use caution when pouring the hot water, a step best left to grownups.

Hot Chocolate (1)

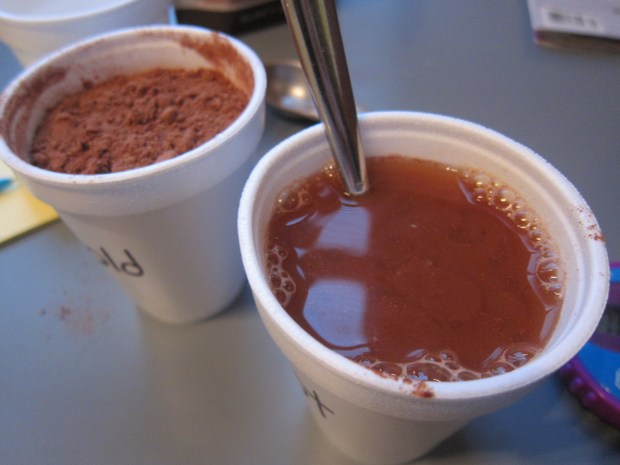
We then added 1 tablespoon of hot cocoa mix to each cup, one at a time, starting with the cold water. We tried to be scientific by timing our results with a handy stopwatch, although I confess our scientific method was spotty.

Hot Chocolate (4)

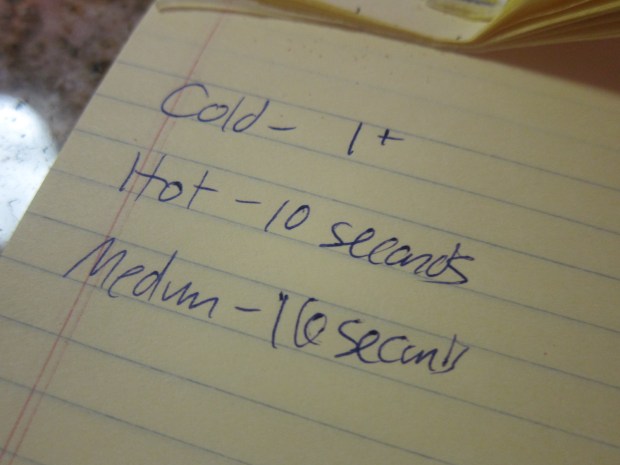
The chocolate in the cold water didn’t go anywhere, remaining powdery and clumpy even after lots of stirring. Truth be told, we have no idea how long it would have taken to dissolve, but far past our attention span on the stopwatch.

Hot Chocolate (5)

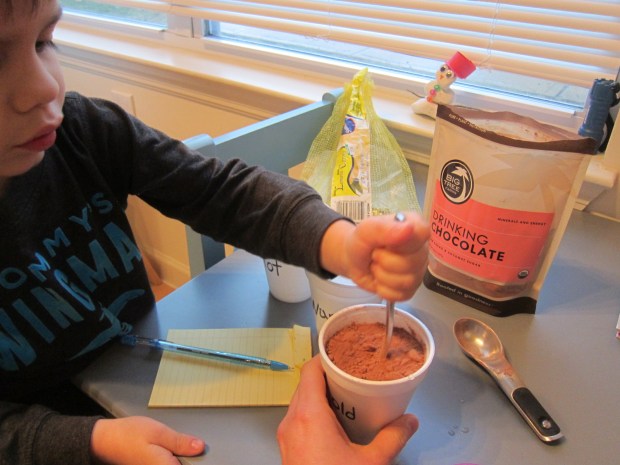
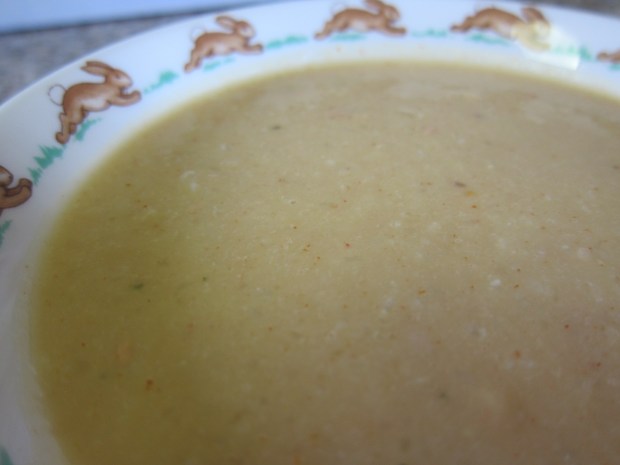
The hot water dissolved the cocoa in 10 seconds flat – a neat comparison that grabbed Travis’s attention.

Hot Chocolate (6)

Results for our medium water were a little fuzzy because it was probably hotter than it should have been. I had hoped to have water exactly at room temperature, but it was warm from sitting in the tea kettle. So that only took about 16 seconds to dissolve.

Hot Chocolate (8)

Either way, Travis got to enjoy a cup of cocoa at the end (from the hot cup, of course), and picked up a little science about how heat breaks apart molecules along the way.

Green Time: Evergreen Trees

Pine Tree alt

We’re still enjoying our first edition of Travis’s subscription to Ranger Rick Jr., which has already been the inspiration for scrapbooking, animal crafts, and more! There appears to be a recurring monthly feature called Green Time, encouraging play or activities outdoors. Me being me, my plan moving forward is to highlight these adventures on the blog!

January’s suggestion to get outside was to get to know an evergreen tree, an up-close-and-personal exploration of these verdant trees. Travis and I took advantage of mild temps (for January) and headed off to the park. When I told him we’d be getting to know a pine tree, Travis asked which one was going to be our friend!

Soon enough we’d spotted it, a majestic pine. We listened for sounds, although it was hard to distinguish much nature with cars nearby and plane traffic overhead. But we did get to use our sense of touch on the tree bark…

pine tree (1)

Sense of smell on the needles…

pine tree (2)

And simply got to know our friend. Travis was dusting him off here with an extra pine needle.

pine tree (7)

Needles and pinecones were easy to spot. It wasn’t the right time of year, unfortunately, to see insects or bird’s nests.

pine tree (4)

But we loved this burl on the trunk!

pine tree (6)

Thanks for getting us outside, Ranger Rick!

Veggie-Packed Mac ‘n’ Cheese

veggie mac (4)

For kids who won’t eat their vegetables, mac and cheese is the perfect venue to slip in a little extra veggie goodness while they are none the wiser. Here’s my super-speedy version, starting with your favorite store-bought mac ‘n’ cheese mix.

Ingredients:

  • 1 package vegan macaroni and cheese
  • 1 large sweet potato
  1. Prepare the mac and cheese according to package directions; set aside.
  2. Meanwhile, peel and cube the sweet potato, and cook in boiling water for 20 minutes, or until very tender.
  3. Transfer the sweet potato to a blender, along with a little of the cooking liquid; process until smooth.
  4. Stir 1/2 cup sweet potato puree into the mac and cheese; reserve the remaining sweet potato for another use. (Note: The puree is perfect for babies, if you’re feeding kids of multiple ages!).

From here, the varieties are almost endless. You could also use the same amount of butternut squash puree, cauliflower puree:

veggie mac - cauli.JPG

or carrot puree:

Veggie mac (3)

Sometimes I also leave the veggies a little chunkier, as with the carrot version shown here.

veggie mac (2)


Rock Snowman

Rock Snowman (6)

A recent burst of warm(ish) weather got us outside over the weekend, and my little collector is always eager to bring home treasures from our walks. In fact, I always carry a zip-top plastic bag with me when we outside just for this purpose!

Rock Snowman (3)

Today we returned him with a variety of rocks and sticks, so thought we could build little winter snowmen.

Rock Snowman (1)

First the rocks needed a good coat of white paint, and we left them to dry overnight.

Rock Snowman (2)

When we settled in to build our snowmen, it turned out we really only had one rock large enough to be the base, which meant only one snowperson could be built. The rest of the rocks ended up as little “snowballs.”

Rock Snowman (5)

I put together the snowman for Travis with hot glue – three rocks glued together, two little sticks for the arms, and buttons and googly eyes hot glued on.

The finishing touch was a little top hat I simply made from construction paper.

Rock Snowman (7)

Don’t have rocks on hand to make a snowman? Check out our shredded paper or glowing bottle versions instead!

Cheesy Cauliflower Soup

Cauliflower Soup

This soup has so many hidden good-for-you ingredients it’s like a gold mine! I simply use plain white cauliflower, but feel free to get fancy and use an orange variety if you want a more vibrant color to the soup. To suit my preschooler’s taste, a mixture of half water and half veggie broth keeps the soup from being too salty. Use 4 cups broth instead if you prefer.

Ingredients:

  • 2 tablespoons olive oil
  • 1 chopped yellow onion
  • 2 minced garlic cloves
  • 1 head cauliflower, chopped
  • 2 cups vegetable broth
  • 2 cups water
  • 1 teaspoon smoked paprika
  • 1 (15-ounce) rinsed and drained can navy beans
  • 6 tablespoons nutritional yeast
  • 1 tablespoon tahini
  1. Heat the olive oil in a large saucepan over medium heat. Add the onion and garlic; cook for 5 minutes, until the onion is translucent. Add the cauliflower, stirring well, then the broth, water, smoked paprika, and beans.
  2. Bring to a boil. Cover, reduce heat to low, and simmer for 15 minutes.
  3. Remove from heat and stir in the nutritional yeast and tahini. Working in batches, transfer the soup to a blender and process until smooth. Return to the saucepan to heat through before serving.

Add croutons for serving, if desired!

Arctic Animal Experiment

Arctic Animal (4)

Following up on fun and icy magnetic play, we wanted another way to play with ice indoors. Recent reading about arctic animals such as penguins and seals was the perfect launching off point. I posed the question to Travis: How do arctic animals stay warm in icy water? The answer of course lies in their blubber, the thick layer of fat under their skin. To illustrate this for your child, get messy with this silly experiment!

First, give your child a bowl of water with ice cubes, and encourage them to plunge their hand in – if they dare! Travis cautiously dipped a finger. Brr!

Arctic Animal (1)

I promised him we could keep his hand warm in the icy water with a few simple steps. First add a latex glove. This layer alone won’t do the trick, of course, but we tested just to be sure.

Arctic Animal (2)

Next, dip your child’s glove-covered hand in a big vat of vegetable shortening (if you’re looking for a vegan and organic option, try Spectrum Organics). It will make a huge mess as you get your child’s hand covered front and back in the shortening (let alone take pics in the process!) but we mostly managed. Next time I would wrap the shortening-covered hand in plastic wrap to seal in all the mess.

Arctic Animal (3)

Now it was time to dip in. To be honest, Travis was significantly less impressed than I was, but he did notice that the fat-sealed hand didn’t flinch away from the cold ice cubes. I took a turn after, just to feel the difference.

Yup, here’s mama, just hanging out with her hand in icy water.

Arctic Animal (5)

Truly, you could keep your hand immersed this way for quite some time and not be bothered by the cold. If I’m ever crazy enough to do a polar bear swim, I’ll be layering up in shortening first.

Magnetic Ice Science

Ice Magnet (2)

This easy game is such a neat winter-time twist on magnet play!

To prepare, simply place small magnetic items in the compartments of an ice tray, and cover with water. Think small pieces of pipe cleaner, paper clips, metal rings, and similar small items. Freeze overnight.

Ice Magnet (1)

The next morning, I popped the ice cubes out into a baking dish, and invited Travis to see if he could pick up the frozen ice cubes with strong magnets from our magnet set.

Ice Magnet (3)

The results turned out to be so interesting, and lasted us the better part of a half hour! A few items, where the metal poked through the ice already, worked right away. The paper clips were remarkably strong even through a layer of ice.

Ice Magnet (4)

Travis loved discovering what would stick to his magnet already and what needed a wait, for the ice to melt somewhat.

Ice Magnet (7)

For some additional fun – under close supervision! – prop the baking dish between two stools and run your magnet wands underneath; Travis loved watching the magnets slide as if by magic from his wand under the tray.

Ice Magnet (8)

As we played, it became clear that the pipe cleaners were the real puzzle. The slightest bit of water was enough to get in the way of the thin metal strip inside the fuzzy layer.

Travis was the one who suggested we chisel away at our ice cubes to get to them – the perfect idea!

Ice Magnet (9)

We really had to work for that pipe cleaner; the pieces wouldn’t stick to our wand until only the tiniest shards of ice remained.

Ice Magnet (10)

Success at last! Overall, great icy and scientific fun, and Travis enjoyed playing with the magnetic items and wands even once the ice had melted.

Ice Magnet (11)

Snowman Stacking Cups

Snowman Stack (5)

There are so many uses for these easy little snowman figures, from competitive stacking games to imaginative play. All you need are 12 Styrofoam cups and you’re ready to go.

The game couldn’t be easier to set up. First, we cut circles from adhesive-back black felt for the eyes. Whoops – at this point they looked almost like ghosts. Wrong time of year!

Snowman Stack (1)

Orange carrot noses and little dotted mouths helped set things right. Now they looked like snowmen.

Snowman Stack (2)

For older kids, you can stage great stacking games to see which formations you can come up with…

Snowman Stack (3)

…or who can stack them the fastest. Travis had a hard time getting the snowmen into a pyramid, but he loved running the stopwatch and timing while I tried! Note of caution: static electricity can make things especially funny and interesting when it comes to stacking Styrofoam.

Snowman Stack (4)

After that we used our cups more as a playful prop. Travis set all the snowmen up for a picnic with a campfire.

Snowman Stack (7)

We decided snowmen would melt if they had a hot campfire, so made it out of… shredded coconut snow!

Snowman Stack (8)

Nothing wrong with stealing a nibble.

Snowman Stack (9)

Again, for Travis as a preschooler, stacking into complicated arrangements wasn’t interesting. He preferred to pile the snowmen atop one another into one big stack.

Snowman Stack (11)

But big kids (and moms and dads!) can heat up the snowman stacking competition to see who goes the fastest, or who comes up with the best stacking arrangement.

Snowman Stack (10)

What games will you play with your snowmen cups? Please share in the comments!

Molasses Muffins

Molasses Muffins (1)

I probably don’t need to sing the praises of molasses to most vegans – we’re all familiar with this powerhouse of B vitamins and iron. I try to keep molasses on hand – it’s great in smoothies! – but had just a little bit left in a jar that I wanted to use up. Enter this perfect little recipe that only yields a half dozen muffins. It’s exactly right for when you only have a little bit of an ingredient on hand or don’t need to feed a crowd!

Ingredients:

For the topping:

  • 1 and 1/2 tablespoons Earth Balance butter
  • 1/4 cup flour
  • 1/4 cup sugar
  • 1/4 teaspoon cinnamon
  • Pinch of ground ginger

For the muffins:

  • 1/4 cup molasses
  • 6 tablespoons applesauce
  • 1 tablespoon canola oil
  • 3/4 cup + 2 tablespoons flour
  • 2 teaspoons baking powder
  • 1/8 teaspoon cinnamon
  • 1/8 teaspoon ginger
  • 1/2 cup raisins
  1. To prepare the topping, melt the butter and place in a large bowl. Add the remaining topping ingredients, combining with a fork; set aside.
  2. In a bowl, whisk together the molasses, applesauce, and oil. Set aside.
  3. In a large bowl, combine the flour, baking powder, cinnamon, and ginger. Stir in 1/3 cup of the topping mixture, along with the molasses mixture, and the raisins, stirring just until combined.
  4. Divide the muffins evenly among 6 muffin cups coated with cooking spray. Sprinkle evenly with the remaining topping mixture.
  5. Bake at 350 degrees F for 20 minutes – a wooden pick inserted in the centers should come out clean. Cool on a wire rack, or serve warm.

Molasses Muffins (2)