Drive Home Reading

Drive to Reading (5)

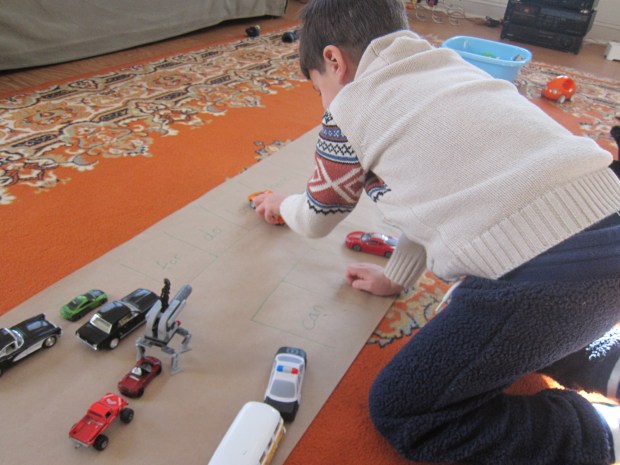
This activity is the advanced version of an alphabet parking lot I made for Travis back when he was in pre-school! Now he’s fast learning his sight words in Kindergarten, and I was so proud watching him drive up to the “parking spaces” I created today.

Lay out a long sheet of craft paper and draw rectangular parking spaces. I filled the spaces with common sight words, using only about ten words to start. I set out an assortment of Travis’s cars and called him over.

Drive to Reading (1)

“I love this game!” he said, remembering the alphabet version. I took over as the announcer, asking, “Can the orange car drive to the parking spot that says ‘in’ please,” and so on.

Drive to Reading (4)

It only took him a moment to scan through and find each word, which showed me he’s growing quite comfortable with these sight words.

Drive to Reading (2)

Of course we needed to park a silly Lego in the final space.

Drive to Reading (6)

He loved it so much, he immediately asked, “Can we play again!” So I quickly created a second parking lot adjacent to our first.

Drive to Reading (7)

He very seriously drove all the cars over. I added a few slightly tougher words, now, including “down” and “here”. That didn’t slow Travis down here in the slightest!

Drive to Reading (9)

Soon every car was parked. He even wanted a third round, which I didn’t have time for! I promised him a new lot, soon.

Seashell Sensory Bag

Seashell Sensory (4)

Veronika has never been to a tropical island, but chances are she’d be longing for a trip to one right now if she knew what she was missing! In a day that dipped down to 0 degrees, I brought some tropical warmth to her sensory play.

For this fun variation on a squishy bag, fill a gallon-sized zip-top bag with any blue goo from the drug store (blue hair gel, blue aloe vera, whatever you can find that has a nice aqua tint to it).

Seashell Sensory (1)

I added a handful of seashells from the craft store, sealed the bag, and simply mushed everything together.

Seashell Sensory (3)

The contrast of the hard seashells versus the gooey gel will fascinate your toddler, and the shells will mush around nicely in the goo if you don’t overfill the bag.

Seashell Sensory (5)

Those seashells might make you feel like you’re briefly on vacation, too!

Seashell Sensory (2)

Citrusy Rice Salad

Citrusy Rice Salad

This salad makes a nice introduction to citrus fruits for toddlers. Veronika hesitantly asked “Apple?” when I spooned some onto her tray. Close but not quite!

Ingredients:

  • 1/4 cup fresh-squeezed orange juice
  • 1 teaspoon agave nectar
  • 1/4 cup olive oil
  • 1/4 cup chopped green beans
  • 1/4 cup chopped orange
  • 1/4 cup chopped pineapple
  • 2 chopped green onions
  • 2 cups cooked brown rice
  1. To prepare the dressing, whisk together the orange juice, agave, and olive oil in a large bowl. Set aside.
  2. Meanwhile, steam the green beans for about 6 minutes, or until tender.
  3. Add the green beans to the bowl with the dressing, along with the remaining ingredients, stirring to coat.


Samosas

Samosas (4)

These hand-held treats make a fantastic after-school snack, or can be part of a larger meal packed in a lunchbox. They’re the perfect size for kids’ hands! Try Wholly Wholesome’s pie crusts for a vegan version.

Ingredients:

  • 1 cup prepared mashed potatoes
  • 1/2 teaspoon cumin
  • 1/4 teaspoon salt
  • Dash black pepper
  • 1 tablespoon minced cilantro
  • 2 chopped mint leaves
  • 2 (9-inch) pie crusts, thawed
  1. To prepare the filling, stir together the mashed potatoes, cumin, salt, black pepper, cilantro and mint leaves in a large bowl. Set aside.
  2. Roll the pie crusts out on a flat surface and trim slightly to form a rectangle. Cut with a pizza wheel into a tic-tac-toe board, for 9 squares in each crust.Samosas (2)
  3. Spoon the filling evenly into the center of the squares. Fold over into a triangle shape, pinching the edges to seal.Samosas (1)
  4. Transfer to baking sheets and bake at 350 degrees F for 18 minutes, until lightly brown.

Samosas (3)

Toys in Tin Foil

Toys in Tin Foil (2)

Similar to a recent game where I wrapped up old toys for Veronika, today I delighted her with little treasures she could unwrap from tin foil.

The exciting element here of course is the shiny foil, which might just fascinate your toddler more than the toys inside!

Toys in Tin Foil (3)

Then I showed her a sneak peak of what was inside.

Toys in Tin Foil (4)

She needed a little help with the unwrapping, but looked so proud when she reached the treasures (er, old toys).

Toys in Tin Foil (5)

Of course then she was busy with the toys; what’s old is new again when presented in this different context!

Toys in Tin Foil (8)

You can extend the fun by crumpling up the discarded foil into tight balls, which then become balls to shoot into a basket.

Toys in Tin Foil (6)

Unfortunately the game was short-lived thereafter because Veronika thought it was very funny to put the foil in her mouth, especially once she realized this earned a firm “no.” Hopefully you and your toddler can play a bit longer!

Toys in Tin Foil (7)

Threading Cereal on Pipe Cleaners

Cheerio Pipecleaner (2)

Veronika and I have been working our way through classic toddler activities lately; she’s at that tricky age between having developed the gross motor skills of a one-year-old, but not yet ready for the understanding or fine motor skills of an 18 month old. I remember this period feeling particularly tricky to fill with my older son, but this time around I’m prepared!

Hence, the emphasis on classic games lately. Today, I sat her down with a big blob of play doh on her highchair tray, but the play doh was only an anchor, not the point of the game.

Cheerio Pipecleaner (1)

Insert pipe cleaner pieces into the play doh base. Now show your little one how to thread o cereal onto them (we like the Morning O’s from Whole Foods 365).

Cheerio Pipecleaner (3)

Veronika quickly got the idea, although she loved lifting the cereal off to eat it more than she focused on threading it on.

Cheerio Pipecleaner (4)

That, of course, turns this activity into snack time, too, and there’s nothing wrong with that!

Cheerio Pipecleaner (5)

The pipe cleaners are also fun to lift in and out of the sticky play doh base.

Cheerio Pipecleaner (7)

Needless to say, it’s a great way to keep a toddler busy during meal prep.

Cheerio Pipecleaner (8)

The Scribble

The Scribble (2)

It was bound to happen: Veronika discovered that she can color on the walls (luckily with washable crayons!). So here’s an ingenious hack to foster your toddler’s artistic impulses with a safer way to color.

I used magnets to hang a large sheet of craft paper on the fridge and sat Veronika down in front of it with a few markers. She didn’t need me to tell her to start coloring; she immediately launched into the art of the scribble.

The Scribble (1)

Aside from one mommy stick figure, this drawing was 100% Veronika’s. She loved switching up the colors.

The Scribble (3)

She also was very focused on putting cap to marker in between colors, a great chance to work those fine motor skills!

The Scribble (5)

As she drew, I talked about how the color on the paper was a “yes” (use sign language here to reinforce the idea!), but that other places were a “no”, like the floor or her hands.

The Scribble (4)

This will help a toddler start to learn that art belongs on paper, for now at least!

As for those crayon marks on the wall, here’s an ingenious trick: Heat the area with a hair dryer for about 30 seconds to melt the wax. Then scrub off the remaining streaks with soap and water. Ingenious!

The Scribble (6)

Matoke (Plantain Stew)

Matoke.JPG

This hearty stew brought international flair to our kitchen tonight; the plantain-based dish is similar to those traditionally served at birthday celebrations in Kenya, a nice little addendum to some birthday learning Travis has recently enjoyed.

Ingredients:

  • 1 teaspoon canola oil
  • 1 small onion, chopped
  • 1 (14.5-ounce) can diced tomatoes
  • 8 ounces meatless crumbles
  • 3 ripe plantains, peeled and chopped
  • 2 baking potatoes, peeled and chopped
  • 2 cups water
  1. Heat the canola oil in a large saucepan over medium-low heat. Add the onion and cook for 5 minutes.
  2. Add the tomatoes and meatless crumbles; cook for about 10 minutes.
  3. Stir in the chopped plantains and potatoes, then cover with the water. Bring to a boil; reduce heat and simmer for 20 minutes, until the potatoes are very tender.


Follow Me

Follow Me (1)

Today I focused on gross motor skills during Veronika’s play. The title of this post refers both to literally having your little one follow you (up, down, and all around an obstacle course), as well as the idea of following directions. Both are great skills for your little toddler!

I set up a few couch cushions for a standard obstacle course, but added a few new twists today, namely a laundry basket and balls. She trotted over immediately to see what was up!

First, I showed her how to roll balls down one of the cushions. She loved doing so, with a big push.

Follow Me (2)

Next it was time to follow me, modeling how to crawl down the ramp. Crawling down can be tricky for little ones, so supervise closely.

Follow Me (3)

We headed back in the other direction where she followed my lead to toss balls into the basket.

Follow Me (5)

Next we upended the basket and I turned it into a choo-choo train. I went first (“Follow me!”) but soon she was the thrilled conductor.

Follow Me (6)

She played games with the balls on the cushions even after I stopped being the leader.

Follow Me (7)

You can add so many more elements to an obstacle course like this, whether a jump rope (to walk a straight line), a box (to scoot around the room), or just about anything else that can work your toddler’s gross motor skills.

Follow Me (4)

Make Your Own Pinata

Pinata (4).JPG

Travis has been learning about birthday traditions around the world, and one that especially intrigued him was the Mexican pinata. It seemed like a fun idea to make our own!

Full disclosure: we worked with materials from a kit, but if you’re doing this craft completely DIY, you’ll need to cut two equal-sized circles from cardboard, as well as a third strip of cardboard to be the loop between them. Tape the three pieces together, leaving a slot through which you can later add candy or other treats.

Cut strips of yellow paper, and then snip them half-way up to make fringe. Travis liked the challenge of this step.

Pinata (1)

Now begin gluing the strips onto the cardboard base, working from the bottom up.

Pinata (2)

Ours wasn’t perfect, but soon we had a fringed yellow face!

Pinata (3)

We added fun details like sunglasses and a smile cut from additional colored paper. Tape a string to the top of the pinata and loop it onto a stick. I held the stick aloft, while Travis took a swing!

Pinata (5)

For extra authenticity, kids can swing blindfolded.

If you don’t have candy, fill the inside of the pinata with fun confetti or even pom poms. Travis was ecstatic once the pinata had a tear and the pom poms rained down.

Pinata (6)