Bundt Pan Suncatcher

Bundt Pan Suncatcher (10)

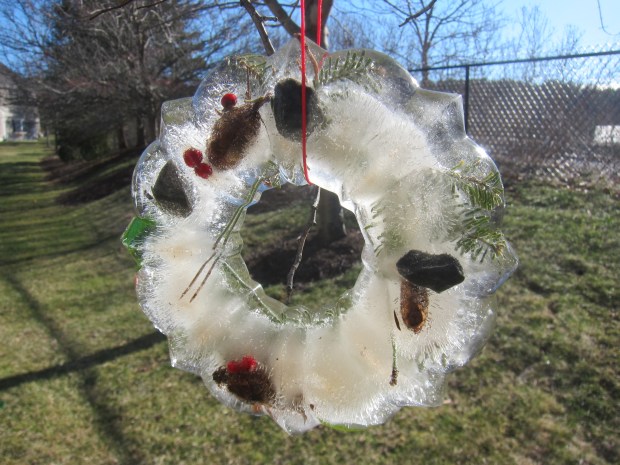
We’ve made sparkly winter suncatchers in cookie cutter shapes before, but this year we decided to think big: Bundt pan big that is!

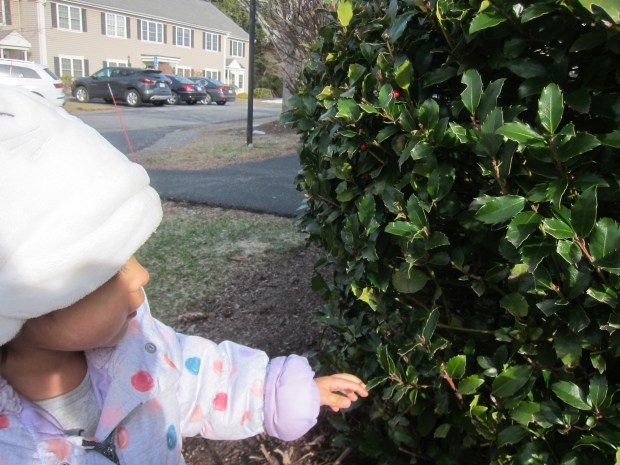
To start this gorgeous project, head off on a treasure gathering hunt. Veronika especially loved finding the bright pop of red berries and collecting small pine cones as we took a walk.

Bundt Pan Suncatcher (1)

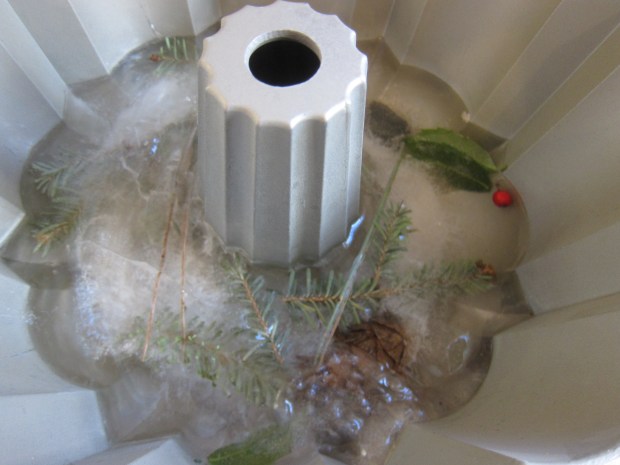
Once home, I filled a Bundt pan with water about half full, then we plunked in our treasures.

Bundt Pan Suncatcher (5)

Now simply set it outside to freeze! We actually had to wait a few days for this to work, since first I realized our layer of water was simply too deep and poured some out. Then we needed a night that dipped down to 20 degrees, and finally we woke to a beautifully solid chunk of ice.

Bundt Pan Suncatcher (7)

To unmold, simply run the bottom of the pan under a little hot water and slip out gently. I wrapped a bright ribbon through the hole in the center of this ice “cake” and suspended it from a tree branch.

Bundt Pan Suncatcher (8)

This was absolutely gorgeous in the sunlight!

Bundt Pan Suncatcher (9)

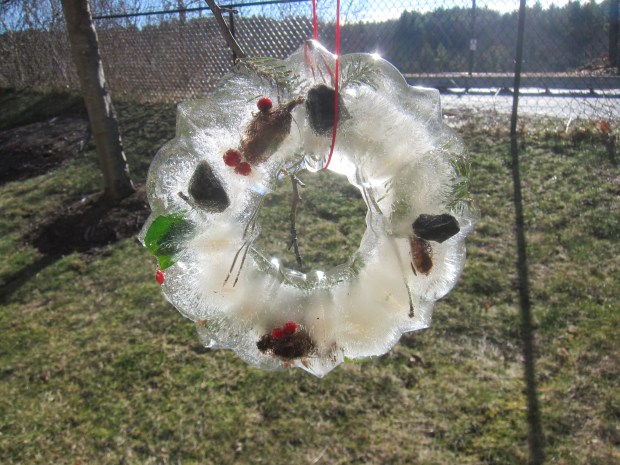
Travis loved that way that tiny icicles began to form near the bottom as the sun warmed the ice through a little.

Bundt Pan Suncatcher (11

We’re hoping for a few icy cold days so this can last before the sun melts it. As a bonus, all the nature treasures can simply fall where they lie as the suncatcher melts. Just be sure to clean up the ribbon!

Primary Colors Squishy Bag and Storytime

Primary Colors Squish Bag (5)

This activity is 50% storytime and 50% art activity, and 100% fun for your toddler.

I set up the color squishy bags first so they would be ready to go. Squirt one primary color into the bottom left corner of a small zip-top plastic bag, and then a second primary color in the top right corner. Seal tightly and tape down to the floor with duct tape. Repeat so that each primary color is paired once with the other two.

Primary Colors Squish Bag (2)

Now I was ready to invite Veronika over for this hands-on storytime! There are so many wonderful color books you can read, but we love Press Here and Mouse Paint, both of which are particularly good for talking about primary colors.

Primary Colors Squish Bag (4)

As we read through Mouse Paint, we copied the mice! As the red one danced in the yellow paint, we squished that bag together and got orange! The middle mouse mixed yellow and blue to make green, and we followed along with our squishy bag.

Primary Colors Squish Bag (6)

And finally the third mouse mixed red into blue, and Veronika did the same. She loved that the storytime was so interactive, not to mention simply loved the squishy feel of the paint bags!

Primary Colors Squish Bag (3)

There were lots of ways for her to continue the play solo, whether continuing to have fun with the sensory bags or leafing through the pages of the books.

Primary Colors Squish Bag (8)

What’s your toddler’s favorite book about primary colors? Please share in the comments!

Primary Colors Squish Bag (9)

Coconut Chocolate Chip Muffins

Coconut Chocolate Chip Muffins (2)

These sweet-but-good-for-you muffins hit the spot for breakfast, snack, dessert, or anywhere in between.

Ingredients:

  • 2 cups flour
  • 1 and 1/2 teaspoons baking powder, divided
  • 1/2 cup applesauce
  • 1/2 cup flaxseed
  • 1/4 cup canola oil
  • 3/4 cup brown sugar
  • 1/4 cup light coconut milk
  • 3/4 cup non-dairy chocolate chips
  • 2/3 cup shredded coconut
  1. In a bowl, combine the flour and 1 teaspoon baking powder; set aside.
  2. In a large bowl, whisk together the applesauce and remaining 1/2 teaspoon baking powder. Add the flaxseed, canola oil, brown sugar, and coconut milk to the applesauce mixture.
  3. Add the dry ingredients to the wet ingredients, then stir in the chocolate chips and coconut shreds.
  4. Divide the mixture evenly among 12 muffin cups lined with paper liners. Bake at 350 degrees F for 25 minutes. Cool for 10 minutes in the pan before transferring to a wire rack.

Coconut Chocolate Chip Muffins (1)

Salad Spinner Art

Salad Spinner Art (4)

There’s no need to buy one of those fancy spin art kits at the store; if you have an old salad spinner (or find one cheap at a yard sale), then you’re all set for this art project!

First, Veronika just wanted to play with the spinner when I set it out. She was strong enough to press down the knob on top all by herself, and was rewarded each time she made the basket inside spin.

Next, we placed a small paper plate in the bottom (between the bowl and the basket insert) and squirted a few colors of paint directly onto the plate.

Salad Spinner Art (1)

Replace the lid securely and give that salad spinner a spin!

Salad Spinner Art (3)

She loved watching it in action!

Salad Spinner Art (2)

The big reveal, though, was when we lifted the lid and she saw all the splattered colors. Needless to say, make sure you have several paper plates on hand because your toddler is going to want to repeat this one a few times.

Salad Spinner Art (5)

The result is such pretty art for almost no effort. Just make sure this particular salad spinner lives in your craft bin, not the kitchen cabinet.

Salad Spinner Art (6)

Fun with Calendar Pictures

Fun with Pictures (6)

January is the perfect time of year for this project, whether you’re tossing old calendars from last year or have been gifted a few extras at the start of the new one. Armed with those, you can put together a “picture book” for your toddler!

To wit, we always seem to have extra calendars with nature and animal themes, which are perfect for toddlers because they tend to depict familiar images.

Fun with Pictures (2)

First Veronika and I simply flipped through all the pages together and ripped out any that appealed to her. This was fun as an activity in its own right!

Fun with Pictures (1)

Once we had a pile, Veronika helped smear glue sticks on the back of each picture to attach onto black construction paper. Depending how durable you want the final “book” to be, you can cover with contact paper, too.

Fun with Pictures (3)

Next we played a sorting game. She helped divide the images into piles by category. We ended up with birds, mammals, buildings, and nature scenes. These pictures can serve as great vocab builders, too, for things your toddler might not see often in real life (like stars, waterfalls, or high mountains).

Fun with Pictures (7)

Finally, I punched holes in each page with a three-hole punch and put them all into a three-ring binder. Now it was a “book” that she could flip through whenever she wanted!

Fun with Pictures (5)

Mailbox Pretend Play

Mailbox Pretend Play (6)

Veronika is very into Blue’s Clues right now, and her favorite part of each episode is when Mailbox arrives bearing a letter for “mail time”. So today I set her up with her own post office!

To make each “mailbox”, simply fold a piece of construction paper over itself so the bottom half comes about 3/4 of the way up the top half. Staple shut along the sides, leaving the top open to form a pocket for mail deliveries.

Mailbox Pretend Play (1)

I made one mailbox for each family member (including the cat!) and then taped them up to the wall.

Mailbox Pretend Play (5)

To make our mail, I gave her an assortment of index cards, old envelopes, and leftover holiday cards. She loved scribbling, but was even more excited when I started drawing a few of the Blue’s Clues characters on envelopes so she could receive mail from them.

Mailbox Pretend Play (3)

I would hand her each letter and she proudly decided which “mailbox” to slot it into. “Let’s put this one in the purple!” she might say, and narrated the whole process.

Mailbox Pretend Play (7)

She was so excited pulling letters back out and seeing what she got in the mall!

Mailbox Pretend Play (9)

This was such easy but fantastic pretend play for a two-year-old. Does your toddler like to play mail delivery? Please share in the comments!

Mailbox Pretend Play (8)

Giant Connect the Colors

Giant Connect the Colors (1)

Here’s a fun way for toddlers to learn colors on a BIG scale. The only limit to this game, really, is how many cans of food you have in your pantry!

I happened to have seven cans which worked well since I didn’t want to overwhelm Veronika by using more than 2 or 3 sheets of paper for each color. Older kids, though, might have a blast setting up a maze of colors that covers a whole living room if your pantry has enough supplies!

Giant Connect the Colors (9)

To set up, I picked three colors (blue, red, and green) and set down two to three pieces of construction paper for each one. I topped each sheet with a can. These cans have dual purpose: to hold the paper down and to wrap yarn around in the next step.

Giant Connect the Colors (2)

I then set out lengths of yarn in colors corresponding to the sheets of paper. Wrap the end of each color around one can. Your child’s job is to take that yarn and connect it to all the cans sitting on the same color (so red yarn stretching to all the red pages, green yarn to all the green pages, and so forth).

When I first brought Veronika over to the set-up, I worried I had made a mistake and she was too young for the activity. She was very excited by the cans (“It’s beans!”) and distracted by checking them out. When I asked her what color the paper was, she only wanted to tell me what color the food item was.

Giant Connect the Colors (3)

But then we had a breakthrough. She correctly identified that the paper underneath the can was red. Could she hold the yarn and find another pieces of paper of the same color. “I think you see it!” I told her.

Giant Connect the Colors (4)

“I see it!” she responded, and trotted to the second piece of red paper. I showed her how to wind her red yarn around this can.

Giant Connect the Colors (5)

Time for a round of green yarn!

Giant Connect the Colors (6)

“I see it!” She trotted over…

Giant Connect the Colors (7)

…and proudly looped the green yarn around.

Giant Connect the Colors (8)

Once we were finished attaching all the yarn and cans, we had a neat maze along the floor. “It’s a spider web,” she said with excitement, and wanted to play and jump over the yarn maze for quite some time.

Giant Connect the Colors (10)

So we accidentally got in our gross motor skills for the day, too!

Giant Connect the Colors (11)

Soap-Powered Boat

Soap-Powered Boats (6)

Here was a neat and quick experiment to continue Travis’s recent exploration of surface tension. Or more properly, breaking the bonds that create surface tension!

First, we crafted two cardboard boats. Cut boat shapes from old cardboard or the lid of a shoebox, then cut a deep V notch in the back of each.

Soap-Powered Boats (1)

Decorate with any favorite art supplies! We used markers, washi tape, and little triangles cut from paper for sails.

Soap-Powered Boats (2)

To power your boats, place them in a shallow bin of clean water. Then, dip a q-tip in a little bit of dish soap and touch it right behind the V in the back of the boat. As the surface tension of the water breaks, the boats propel forward!

Soap-Powered Boats (5)

Unfortunately this experiment isn’t easy to do repeatedly. We had hoped to race our two boats, but once the soap hits the water you can’t repeat it unless you dump, fill with clean water, and start all over.

Soap-Powered Boats (4)

But the boats were fun as Lego rafts once the STEM experiment was done!

Soap-Powered Boats (3)

Catching Snowflakes

Catching Snowflakes (4)

We learned about this neat trick for catching snowflakes from Parents magazine and had a chance to test it out today when we looked outside and saw snow flurries!

Ahead of time, place a few sheets of black construction paper in the freezer. Just leave them there if you live some place that’s bound to get snow during the winter, because you’ll want to have them at the ready.

When we saw the snow, we bundled up, grabbed the frozen black paper and a magnifying glass, and headed outside.

Catching Snowflakes (1)

When the snowflakes hit the icy cold paper, they won’t melt. That gave Travis and Veronika the chance to peer at them with a magnifying glass. Travis marveled at how we could see the six points of each flake.

Catching Snowflakes (6)

Veronika just loved the beauty of it, and kept eagerly holding out her paper for more.

Catching Snowflakes (5)

What a simple but wonderful way to experience winter.

Catching Snowflakes (2)

Roasted Sweet Potato Pita

Sweet Potato Pita (2)

This warm pita pocket is a super-easy lunch to throw together thanks to this hack: a package of frozen sweet potato fries instead of cooking them from scratch!

Ingredients:

  • 1 pita bread
  • 2 tablespoons hummus
  • 1/2 cup sweet potato fries
  • 1/4 cup lettuce
  1. Split the pita in half and spread the inside of each half with 1 tablespoon hummus.
  2. Meanwhile, cook the sweet potato fries according to package directions. Divide the fries and lettuce evenly among the pita halves.

Serve warm or at room temperature.