Glow-in-the-Dark Constellation Cards

Constellation Cards (6).JPG

This project is such a neat update on simply sticking glow-in-the-dark stars on your child’s wall or ceiling as décor. Turn it into a mini astrology lesson – as well as an art project! – and you have homemade constellations.

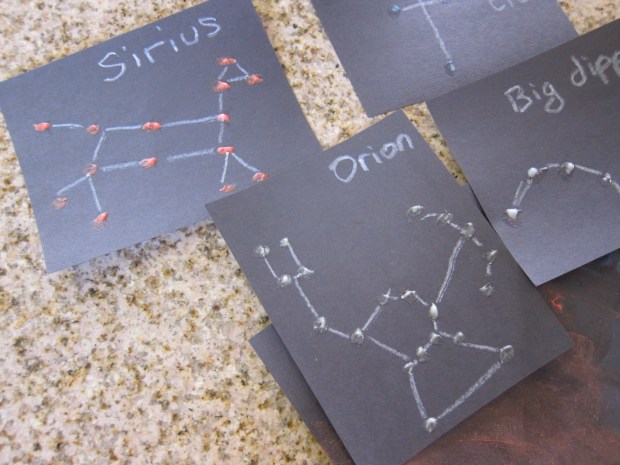
First, we needed to find images of constellations as inspiration. I’m no artist, so relied heavily on the ones we found in our Usborne Book Big Book of Stars and Planets.

Constellation Cards (1)

Set out dark paper and glow-in-the-dark paint and recreate the star patterns. Older kids can draw the outlines and stars themselves. Younger kids may be happier filling in the dots if you draw circles where the stars go first.

Constellation Cards (3)

In fact, Travis was happy painting his own invented “constellation” while I did the more meticulous detail of recreating what was in the book – just fine for a three year old!

Constellation Cards (4)

A couple pointers: If you have dark cardstock instead of construction paper, use that. The paint will show up better. If you’re relegated to porous construction paper like we were, make sure your star dots are quite thick, or the paint won’t show up once it’s lights out.

Constellation Cards (2)

We let the paint dry, then I connected the stars with white crayon. I added the name of each constellation in crayon as well.

Constellation Cards (5)

Note: If you prefer, you can also paint the lines between stars with glow-in-the-dark paint, but I liked the idea that Travis would see just the stars in the dark, and the constellation lines by day.

Next up was mounting the cards on the ceiling – uh oh, could mama reach that high? Thanks to a stool, she could! I positioned them directly above the lamp in Travis’s bedroom so they could “charge.”

Constellation Cards (7)

At lights out, we saw the best starry night sky! My camera could barely capture it, but do you see the glow?

Constellation Cards (8)


Recycled Jet Pack Costume

Jet Pack (12)

We’ve been having fun with empty cereal boxes lately. Combine that with Travis’s current interest in the moon and space exploration, and what better item to turn our cereal container into than a jet pack?

To start, cut the ends of two toilet paper tubes and fold them outward; they’ll look almost like little octopuses.

Jet Pack (1)

Wrap the tubes in foil, then duct tape them to the ends of the cereal box.

Jet Pack (2)

Note: Ideally you’ll have silver duct tape. Unfortunately, I only had yellow duct tape on hand… but it was nothing that a little silver paint couldn’t solve in a pinch!

Jet Pack (4)

Next, wrap the cereal box in aluminum foil, and tape the edges with duct tape. (Add your silver paint to cover any duct tape, if needed, at this point).

Jet Pack (5)

It’s up to your little explorer how they want to decorate the jet pack. Travis always needs lots of glue of course.

Jet Pack (7)

We added construction paper buttons and glitter glue, because of course a project this silver needs glitter glue.

Jet Pack (8)

Use hot glue to attach ribbon or string onto the top and bottom corners of the box; these will be the shoulder straps.

Jet Pack (13)

Our jet pack couldn’t launch without flames, of course! A few strands of tissue paper glued into each tube solved that problem.

Jet Pack (9)

And now we’re ready to fly.

Jet Pack alt

What else might you make from empty cereal boxes? I’d love to hear ideas in the comments!

Jet Pack (10)

Cereal Box Racetrack

Cereal Racetrack (9)

The next time you polish off a box of cereal, think twice before tossing it into the recycle bin. Cereal boxes make for fantastic upcycled crafts! Proof? This easy car racetrack.

To start, begin cutting down the long side of the box, about two inches in from the edge. Continue to cut all the way down, around the bottom, and back up the other side.

Cereal Racetrack (1)

Now snip the corners where the sides meet the bottom, so the piece lies flat. Repeat this step on the other side of the box, again two inches in from the edge. Join those two pieces together and you’ll have one long track. We did this with two cereal boxes, so the image below shows the resulting tracks from both boxes.

Cereal Racetrack (3)

Line your race tracks with colored duct tape to create the perfect racing surface.

Cereal Racetrack (4)

You can add embellishments such as pipe cleaner hoops for your cars to travel through.

Cereal Racetrack (5)

Later, we were feeling especially fancy and cut construction paper into decorative “flames,” which we then taped onto the pipe cleaner hoops.

Now ladies and gentlemen, start your engines!

Cereal Racetrack (8)

Travis got the hang of giving his cars a push (rather than keeping a hand on them) quite quickly, and in fact his cars beat mine in many races!

Cereal Racetrack (7)

A super easy and super fun way to race inside on a winter day.

Cereal Racetrack (6)

Breakfast Nachos

Breakfast Nachos (2)

As the name of this recipe suggests, this twist on nachos is just right for starting the day before kids head off to school. Of course, nothing wrong with serving the nachos for dinner, either! Check your tortilla chip bag for the suggested serving size, which will depend on the size of the chips and particular brand. Generally “one serving” makes the right-sized base for the rest of these ingredients. The portion below will serve two little tots, or one hungry big kid (or grown-up!)

Ingredients:

  • 1 serving tortilla chips
  • 1/3 cup scrambled tofu (store-bought or homemade)
  • 1 tablespoon guacamole
  • 1 tablespoon salsa
  • 1/4 cup shredded Daiya cheddar
  1. Arrange the tortilla chips in a pile on a foil-lined baking sheet.
  2. Top evenly with the tofu scramble, guac, salsa, and cheese.
  3. Bake at 425 degrees F for 5 minutes, just until the cheese melts.

Breakfast Nachos (1)

Letter Match Parking Lot

Parking Lot (11)

This game is by far the best way yet I’ve found to get Travis excited about matching upper and lower case letters. He knows his upper case with no trouble, but still mixes up some of the lower case toughies, like d and b, n and u, or p and q. Start your (toy) engines and your little ones will be matching all their letters in no time!

To prepare the parking lot, we first needed to make sure we had 26 cars in the house. I thought we might be a few short, but it turns out we had more than enough – where do all these cars come from? Travis was thrilled when he saw them all lined up.

Parking Lot (1)

Write out the lower case letters on stickers, and apply one to each car; set aside.

Parking Lot (2)

Next I set up the parking lot, drawing 26 spaces on a big sheet of poster board.

Parking Lot (3)

You can use a ruler if you want your lines to be nice and neat. Label each parking space with capital letters, A through Z.

Parking Lot (4)

Now it was time to drive our cars in. Travis has dragged his heels with other letter matching games but to my delight, he thought this was just about the best game in the world. Each car received a driver’s name, and drove proudly to its assigned spot.

Parking Lot (6)

I was happy I only had to correct him a couple of times, on some of those tricky mirror image ones mentioned above. Little m finds a spot!

Parking Lot (8)

He found it a little difficult to locate the right capital letter a few times, especially when the lot was empty at the beginning. It was helpful to sing the ABC song together, so he knew whether the letter would be near the top row or bottom.

Parking Lot (5)

Because you can’t have a game without a hefty dose of preschooler imagination thrown in, he soon decided that it was a snowy parking lot, and all of the cars would need to shovel out.

Parking Lot (10)

No sooner did we park them all than he wanted to do it again!

Parking Lot (12)

What’s your favorite way to match capitals and lower cases with your preschooler? Please share in the comments!

Penny Toss

Penny Toss (6).JPG

On the heels of our Mouse Hole Roll, Travis and I added a penny toss to our indoor circus and carnival games!

To start, we needed three different colors of construction paper and round items to trace. You can turn this into a hunt for circular items around the house if your kids are learning their shapes. Records were perfect for the middle and smallest circles, but I had to free-hand the largest circle since we didn’t have anything round that was quite that big.

Penny Toss (1)

Glue the circles together and let dry.

Penny Toss (2)

Colored-in clown templates add a nice decorative touch.

Penny Toss (4)

Then it’s time to play!

Penny Toss (5)

Travis wasn’t quite as into the penny toss as he was with the mouse hole game, but we got in some good tosses.

Penny Toss (7)

His first few attempts bounced quite far off the circles, which I could see surprised him. So it was good motor skills practice to learn more precise aim.

Penny Toss (8)

Bullseye!

Mouse Hole Roll

Mouse Hole (8).JPG

Travis and I made a bit of an indoor circus over the long holiday weekend, including a few cute carnival game ideas we spotted online. The first we put together was a mouse hole rolling game.

To start, you’ll need any box; cut off the flaps and set one flap aside for decoration later. Discard the remaining flaps.

Mouse Hole (1)

The box doesn’t have to be huge, but the one we had on hand was a fairly good sized. This ended up being great though – it is by far the largest surface Travis and I have ever painted together, and he was gleeful, deciding it was almost like being a house painter.

Mouse Hole (2)

We slathered three sides and the top in blue paint.

Mouse Hole (4)

We also painted the remaining flap, then set both aside to dry (safely in the bathroom where little boys and cats wouldn’t bump into them and become covered in wet paint!)

Mouse Hole (3)

Once dry, our game needed a few final touches. Adults: cut three holes from the bottom to be the mouse hole goals. Kids can then color in mouse templates (we found ours online) and glue on.

Mouse Hole (6)

Dot markers and the name of the game adorned our cardboard flap, which I then hot glued to the top of the box.

Mouse Hole (7)

To play the game, simply take turns rolling golf balls or ping pong balls at the target, and see who can get the most little mice into the holes!

Mouse Hole Roll (10)

Feet work too, of course.

Mouse Hole Roll (9)

Needless to say, this game was a big hit.

Mouse Hole Roll (11)


Frozen Soap Bubbles

Frozen Bubbles (3)

Here’s the perfect game to turn cold (and I mean truly freezing!) weather to your advantage. Believe it or not, I used to hate winter and cold weather. As a mom, I now found myself gleeful when I saw the 10 degree forecast since I knew it meant our frozen bubble solution was definitely going to work.

To prepare the bubble solution, pour a little dish soap into a container, and add a few drops of vegetable glycerin. Notice Travis’s eager hands by the countertop there – he was very curious what I was up to.

Frozen Bubbles (1)

We wanted to test our solution indoors before venturing outside and realized we had no bubble wands around the house! Fret not: cut a few straws in half, gather into a bundle, and secure with a rubber band for the easiest homemade blower ever.

Why pop bubbles with your fingers when you can use a sword?

Frozen Bubbles (2)

Ok, the next step was to bundle up and face the chill. The longer you’re in the cold, the more interesting this will be. The bubbles don’t pop when they hit the ground, but instead float down in big clumps and freeze to the grass.

Frozen Bubbles (5)

Perfect for popping with that sword, of course.

Frozen Bubbles (4)

If you pop them with a finger, they become almost stringy, instead of disappearing straight away. Popping them left what looked almost like white frost on the ground, and Travis adored it!

A note to all those of you feeling cabin fever: Travis was initially hesitant to go outside, but he had so much fun that he was soon demanding we make more bubble solution – and I was the one who had to say our pink noses meant it was time to head back inside. So give those kiddos a nudge and get out there to enjoy! Easily the most magical 10 minutes of our day.


Celebrating the International Kite Festival

Kite Fest (4).JPG

I love introducing Travis to international holidays and festivals, and this cute idea popped up in Little Passport’s blog to mark the International Kite Festival or Uttarayan. Celebrated January 14 and 15 in Gujarat, India, we joined in the fun with a quick homemade kite. This project wasn’t anywhere near as involved as the plastic bag kite we crafted some time back (nor did it truly fly), but it was great fun to flutter about!

To make the kite, cross two wooden skewers into an x and tie at the center with string.

Kite Fest (1)

Cut a long piece of string, and wrap around the tip of one skewer. Stretch to the next tip and wrap. Continue until you’ve stretched and wrapped around all four tips, creating a square frame.

Kite Fest (2)

Cut a square from tissue paper slightly larger than your frame. Fold the edges of the tissue paper over the frame and secure with tape.

Kite Fest (3)

For the tail, add a long piece of string and tie on additional strips of tissue paper for bows.

As mentioned, the kite didn’t fly so great (it has no spool of string to launch it, for one thing!), but Travis loved running with it behind him and having it flutter all over the apartment.

Kite Fest (6)

We watched a video about the celebration so Travis could further appreciate what we were making. Add in some friendly insect kites we had at home, and we had a nice little indoor Uttarayan of our own.

Kite Fest (5)

One additional note: If you are anywhere near an actual celebration of the kite festival, please avoid using kites where the strings have been treated with glass (a common practice). This can cause serious injury to birds who fly into the strings. Have a happy and humane Uttarayan!

Egg Carton Boat

Egg Boat (5).JPG

Travis has been having so much fun with the foam and cork canoe we crafted a few weeks back that we decided to add to our upcycled bathtime collection!. Half of an egg carton from my in-laws’ house was the perfect base for our boat.

Cut an egg carton in half; save the remaining half for another use.

Egg Boat (1)

Decorate the carton with markers or paints. Markers will probably work fine on a cardboard egg carton, but since ours was Styrofoam, we used dot markers. Travis loved making each tip of the boat a different color.

Egg Boat (2)

I cut a triangle from white paper, which we decorated as well, then taped to a wooden stick. Voila! A sail.

Egg Boat (3)

Stick your mast into the base of the boat, and it’s time to set sail.

Egg Boat (4)

Use any toy figures you have, such as Duplo people, to be your sailors. Ahoy mateys!

Egg Boat (6)

The verdict is that this boat didn’t last very long (the sail is toast the minute it gets wet), but Travis had so much fun with it that bath was double its normal length in time! I don’t post bathtime pictures, but needless to say there was lots of capsizing, splashing, rescue games, motor boats running out of gas, storms at sea, and more.