Glow-in-the-Dark Croquet

Glow Croquet (9).JPGNights are getting longer, which means finally the sun sets before Travis goes to bed. That opens up whole realms of possibility for games we can play! To wit, put those glow-in-the-dark-sticks and bracelets (ubiquitous this close to Halloween!) to novel use with this game of mini croquet.

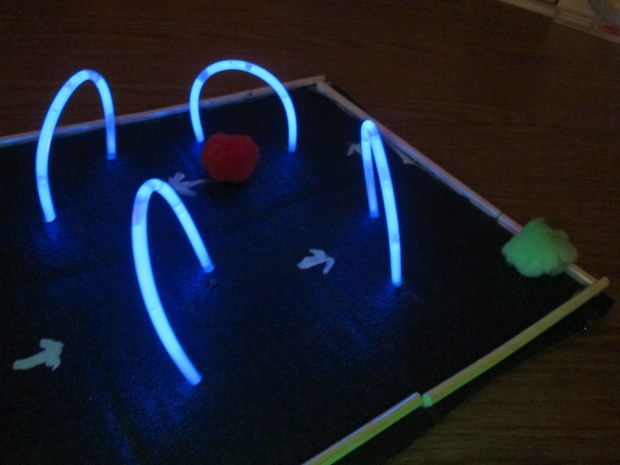
First, we painted a piece of large cardboard. Travis chose a sparkly blue, thinking that would look like a starry night sky against our glowing wickets. Paint two coats and let dry.

Glow Croquet (1)

Glue on paper straws around the entire rim of the cardboard as bumpers; let dry.

Glow Croquet (2)

At first, we made straw mallets by cutting a 2-inch piece of straw and gluing crosswise on a second straw to form a T. These didn’t hold up well, so read on for our quick fix.

Glow Croquet (3)

To make the wickets, poke holes in the cardboard. Activate 4 glow bracelets (or up to 8 if you want more wickets!) and insert into the holes, bending each one into an upside-down U.

Glow Croquet (4)

Add arrows with white-out or white paint showing the direction of play.

Glow Croquet (5)

Have each player select a different color pom pom for their ball. Now take turns whacking through the wickets and see who reaches the end first!

Glow Croquet (6)

As mentioned, our straw mallets didn’t hold up well. No problem! We snapped a few regular glow sticks to activate them, and used these as the mallets.

Glow Croquet (7)

Needless to say, Travis was smitten with the game. Anything that glows is always a hit!

Glow Croquet (8)


Rubbings Collage and Puzzle

Rubbings Collage (6).JPG

Here’s a neat way to create your own shadow puzzle, an advanced version of a game Travis and I played long ago. One child can challenge him or herself with the final product, or invite a friend or sibling fill in the puzzle once created.

First, Travis and I gathered metal items from around the house. We ended up with a coin, a paper clip, a hole punch, a spoon, and a key.

Rubbings Collage (1)

Place the items on a piece of paper and cover with a second sheet of paper. Rub with the side of a crayon to reveal the shadow of the images underneath.

Rubbings Collage (2)

It was interesting to see what worked well (the flatter things) and what didn’t; the spoon was quite tricky!

Rubbings Collage (3)

We removed the items and now Travis had to match everything up to its silhouette, a challenge he enjoyed.

Rubbings Collage (4)

Again, this was fun with one kid but would be a great game for two kids: one to make the puzzle and the other to fill it in.

Rubbings Collage (5)


Bubbles on the Breeze

Bubbles on Breeze (5)Don’t underestimate the magic of bubbles. Blowing bubbles is an activity I remind myself to return to at intervals, since children engage with them differently as they age. The last time we did bubbles, Veronika was sitting up and just starting to crawl. Now, she’s fast as can be, and wanted to scoot after them and pop them!

So the instructions for today’s activity: Open up a bottle of bubbles and blow!

Bubbles on Breeze (2)

I pointed them out to Veronika, and how they shimmered and floated.

Bubbles on Breeze (3)

This little girl wants to walk, so it was also fun to hold her at the waist and help her reach out for them.

Bubbles on Breeze (4)

A perfect sunlit pause.

Bubbles on Breeze (1)

Make a Mailbox

Make Mailbox (7)

Kids just love the mail and playing mailbox, and this is true even before they fully understand what the pretend play is all about! So today I made Veronika her first mailbox, simply by cutting a slit in an old shoebox.

Make Mailbox (1)

We had fun decorating it together; while Veronika proudly scribbled in purple, I added “U.S. Mail” across the top and some red and blue coloration.

Make Mailbox (3)

It was time to send the mail! Use old envelopes or stationary or even playing cards for your “letters”. I showed her how to put them in the slot…

Make Mailbox (5)

…and then reach in to take them out again. She got the hang of it right away.

Make Mailbox (6)

Add to the pretend play by addressing a note or two to your baby. You can then pretend to “read” the mail together.

Make Mailbox (2)

For proof that games like this never grow old, big brother Travis needed to horn in on the action.

Make Mailbox (4)

Soon he was practicing his handwriting as he addressed letters, mailing them through the slot, and opening them back up again.

Make Mailbox (9)

It kept both of them entertained for ages!

Make Mailbox (10)

You can finish the fun with a trip to a real post office, or even just a stop to watch a mail carrier at work, delivering letters from the truck.

Make a Mailbox alt.jpg

Coconut Pineapple Rice Pudding

Coconut Pineapple Rice Pudding

If your baby doesn’t like oatmeal for breakfast (which always seems to be the go-to for little ones), try rice instead! This sweet treat also makes a great sugar-free dessert. Look for organic canned pineapple like Native Forest.

Ingredients:

  • 1 cup arborio rice
  • 1 (20-ounce) can crushed pineapple, undrained
  • 1 (14-ounce) can full-fat coconut milk
  1. Spoon the rice into the bottom of a casserole dish with lid; set aside.
  2. Meanwhile, combine the pineapple and coconut milk in a saucepan and bring to a boil.
  3. Pour the pineapple mixture over the rice and place the lid on the casserole dish. Bake at 325 degrees F for 1 hour.

Rhythm Sticks

Rhythm Sticks (6)

These easy DIY rhythm sticks lend themselves to so many games, musical and otherwise! To make a few simple pairs, I purchased dowels at the craft store and painted each set a different color. For starters we had blue and purple, but keep adding to your collection for lots of colors if desired.

Rhythm Sticks (1)
Once the paint dried, I showed Veronika a few easy ways to play with them. First I simply encouraged her to tap the sticks while I hummed a song.

Rhythm Sticks (8)

Then I held out one of the sticks from my pair so she could tap against mine. This is almost like rhythm stick Patty Cake.

Rhythm Sticks (2)

We put on music and just played along, of course!

Rhythm Sticks (5)

Then it was fun to challenge her to match color to color. Keep this particular version up as your baby advances to toddlerhood.

Rhythm Sticks (9)

It can also be fun to see how your baby uses the sticks, perhaps in ways you haven’t imagined, and to imitate the moves. Veronika liked rolling hers on the floor…

Rhythm Sticks (7)

…and waving them in the air. So I followed suit!

Rhythm Sticks (10)

We loved this musical interlude together.

Hide the Ball Memory Game

Memory Game (2)

My dad used to perform a “magic trick” when I was a child, hiding a ball under one cup only to seemingly make it reappear from under another like magic. This is a simpler variation on that old trick, perfect to play with your almost-one-year-old!

I used only two cups and a ball because I knew the items themselves would be of great interest to Veronika, who sure enough wanted to grab everything nearly before I had time to hide the ball. Use three cups if your baby is more patient!

I let her see me hide a ball under one of the cups, then asked her where it was.

Memory Game (1)

Each time her hand immediately moved to the cup over the ball, almost too fast for me to snap a good picture.

Memory Game (3)

Obviously this game is great for object permanence. Even cuter, this time she wanted to hide the ball herself. As soon as she uncovered it, she puzzled over how to insert the ball so it was hiding again.

Memory Game (5)

Inevitably her cup was facing upwards, not down, but I loved watching her brain at work on this one.

Memory Game (4)

Mosaic Art

Mosaic Art (7)

When I first spotted this craft idea online, the suggestion was to draw a picture and then cut into squares before gluing down to form a mosaic. It turns out Travis didn’t want to draw his own picture… but he did love making a mosaic from an existing Star Wars picture!

Mosaic Art (2)

I drew a grid on the page he selected and Travis loved cutting along the lines until we had 30 or so small squares.

Mosaic Art (3)

Note: It’s helpful to label these on the backside so that the mosaic comes together without frustration.

Mosaic Art (4)

We selected green construction paper as the background and then began gluing down the squares, leaving some green showing on all sides. This is also a great lesson in counting for kindergartners. Travis loved seeing the battle droids take shape again.

Mosaic Art (5)

At the end, we had a fun piece of mosaic artwork.

Mosaic Art (6)

Make Your Own Soccer Ball

Homemade Soccer Ball (6)

After reading about homemade soccer balls used by kids the world over, specifically in Zimbabwe thanks to a Highlights magazine article, Travis was inspired to make his own! We sort of winged it on this one, but our little ball turned out great.

We only needed three items: a plastic bag, old newspaper, and string.

Homemade Soccer Ball (1)

First I helped Travis wad up newspaper and stuff into one small (3 gallon) plastic bag.

Homemade Soccer Ball (2)

I knotted it when about half full and pulled the bag inside out around the knot for a double layer. This was our “core.” We then repeated with a second bag and more newspaper, securing with a second knot and fold over.

Homemade Soccer Ball (3)

Knead with your hands into a more round shape if your ball is looking a bit oval. Now tie string around the outside. Four strings held ours tight.

Time to go play!

Homemade Soccer Ball (4)

Travis loved playing pass and taking shots on a goal. We were both so pleased with how well it rolled and held up.

Homemade Soccer Ball (5)

Next time you find yourself without a ball, don’t be daunted: make one!

Plan a Treat

Plan Treat (2).JPG

Today’s blog activity wasn’t for Veronika; it was for mommy and daddy!

It’s so important to remember to do something special for yourself now and then, whether that means connecting with a partner over a night out on the town, or having friends in for a movie.

A local “speakeasy” with inventive cocktails was on the menu, while grandparents kept watch.

Plan Treat (1)

It was the best feeling to return and hear that Veronika didn’t make a peep but we got to sneak in some grown-up time. My best suggestion for a night like this is to keep the conversation away from the kids; focus on you.

If you don’t have a grandparent nearby who can babysit but the cost of babysitters is prohibitive, one other great idea is a babysitting circle. You can join an app, or simply watch a friend’s kids one night and they watch yours the next. And everyone gets to enjoy a treat!