Mirror Pattern Gloves

Mirror Socks (10).jpg

This project is a fun intro-to-sewing for little kids, and also helped drive home some recent lessons on mirror imagery that Travis and I have talked about lately.

To make the gloves, you’ll need a long pair of socks. I had Travis put his forearms at the ends, and traced a wide L shape where his fingers and thumb would go.

Mirror Socks (1)

Cut off and discard the sock above this L.

Mirror Socks (2)

Fold the sock inside-out and do a basic running stitch (in, out, in, out) to attach the two sides, up to where the thumb is. Honestly, I am no seamstress: here is my hack job of a running stitch.

Mirror Socks (4)

But Travis loved helping thread a plastic needle and make a few practice threading motions.

Mirror Socks (3)

Put the sock right-side out again and try it on for size! Repeat with the other sock to make your second glove.

Mirror Socks (5)

We wanted to decorate our “mirror image” gloves with felt stickers but the only ones I had were Christmas-themed! So perhaps he can pull these out to wear around the holidays.

Mirror Socks (6)

As he placed each sticker, he thought hard about what would make a mirror image. Should the blue sticker go to the left or to the right?

Mirror Socks (7)

He quickly got the hang of it. And loved wearing the fingerless gloves once the project was complete!

Mirror Socks (8)

Aluminum Foil Art

Aluminum Foil Painting (7)Something as simple as switching up the canvas can make an everyday activity like painting feel new again! Recent shiny mirror play prompted me to have Travis paint not on paper but on… foil!

I put the foil against a sturdy cardboard backing, and used snack bag clips to hold it securely.

Aluminum Foil Painting (1)

At first I thought he might want to use permanent markers on the foil. These made not only vibrant colors, but also fun texture where it indents the foil slightly.

Aluminum Foil Painting (2)

He was instantly designing a Star Wars ship (of course), but quickly decided to move on to paints.

I mixed tempera paint colors with a couple drops of dish soap in each (which supposedly helps it adhere to the foil better).

Aluminum Foil Painting (3)

Now he was off and running!

Aluminum Foil Painting (4)

He mixed colors, made fun designs, and wasn’t content until the whole surface of the foil was finished.

Aluminum Foil Painting (5)

What novel canvas has your child used for art? Please share in the comments!

Aluminum Foil Painting (6)

Rice Cereal Sensory Tray

Rice Cereal Sensory (2)

One-year-olds are a tough age when it comes to devising activities. They’re old enough to want variety and to do things with those little hands and bodies, but not skilled enough yet for the games and projects they can enjoy once true toddlers (closer to 15 or 18 months).

Here’s a fantastically easy sensory bin that’s sure to engage a baby at just this age. If you have a box of rice cereal, just dump it in a bin! I added a few of her favorite little toys (Duplo figures, plastic farm animals) and buried them somewhat in the cereal. Now everyone was hiding in the rice paddy!

Rice Cereal Sensory (1)

I also added a rake for her to explore with, thinking this would make less of a mess than shovel. This wasn’t necessarily the case, but the rake became a fast favorite, and she trotted over to her playroom with it once the sensory play was done!

I also added a spritz bottle. Toddlers can practice squeezing the handle themselves. For Veronika at age one, I spritzed the water so she could watch the droplets in the sun-lit room.

Rice Cereal Sensory (7)

The instant the water hits the rice cereal, you’ll also get a scent sensory bin, with the homey smell of cereal for breakfast wafting up.

The water also means the rice cereal will clump together. She delighted in handfuls, picking them up, marveling when they stuck to her little palm, and shaking them loose with glee.

Rice Cereal Sensory (9)

And of course, trying a taste!

Rice Cereal Sensory (10)

She had fun raking through and finding the toys.

Rice Cereal Sensory (8)

Then it was lots of scattering the rice cereal around for ages.

Rice Cereal Sensory (6)

But don’t worry about clean-up. The rice cereal (even when wet) sweeps up like a charm with a simple dustpan.

Rice Cereal Sensory (11)

This was definitely a winner!

Rice Cereal Sensory (4)

Circle of Objects

Circle of Objects (2)

If you’re looking for a simple way to encourage your one-year-old to start using nouns and names of favorite toys, a circle of objects is a fantastic idea.

I cleared other distractions from the room and set out a few items for Veronika in a big circle, keeping the number manageable (aim for 6 to 8 things). I included: a box, stacking rings, a ball, a scarf, a toy car, a small book, and plastic cow. The idea was to have a variety, but also things that could be named with one word.

I placed her in the middle, and the choice was hers! When she trotted over to the box first, I named it. “Yes, that is a box.”

Circle of Objects (1)

She wanted to put the stacking rings inside it. More great opportunity for talk! “You found the ring. You found the green ring. Can the green ring go inside?

Circle of Objects (3)

Next the scarf caught her eye. “You found your scarf. The scarf is soft.”

Circle of Objects (4)

I draped this over a few of the items in the circle that she hadn’t made it to yet, to draw her attention. Soon she was happily uncovering and then playing with the car and small book.

Circle of Objects (5)

“The car goes fast!” I chimed in, as she spun the wheels and drove it around. This could go inside the box, too!

Circle of Objects (7)

You get the idea. Whatever it is your baby picks up from the circle, say the noun and some simple sentences to go along with it. And wait for that thrilling moment when your baby says the word back!

Circle of Objects (6)

Tape Resist Letters with Homemade Edible Finger Paint

Finger Paint Tape Resist (6)

It was Daylight Savings today, and parents know what that means: an extra-long day where the kids wake up extra-early. Here’s just the right kind of messy project to help fill those extra hours… Daylight savings or any day the kids are up early!

I knew I wanted a messy art project for Veronika, but she’s still too little for paint since those little fingers go right to little mouth. This homemade finger paint recipe was perfect. After breakfast, I made the following:

Finger Paint Tape Resist (1)

Combine 2 and 3/4 cups water in a saucepan with 1/2 cup cornstarch. Bring to a boil.

Meanwhile, dissolve 1 packet of vegan jel dessert (such as Simply Delish) in 1/4 cup cold water. I used the orange flavor, meaning our paint would be nice and sweet, but unflavored is fine!

Once boiling, remove the saucepan from heat and stir in the jel mixture. Let cool completely.

Transfer to plastic cups and add food coloring if desired for other colors. Since the finger paint was naturally yellow, I added a few drops of red for some orange cups and a few drops of blue for some green ones.

Finger Paint Tape Resist (5)

Next, I added masking tape to a few pieces of construction paper for the tape resist portion of the project. A big V for Veronika seemed just right, and we made a T for Travis, too. Give the paper to your little one and add a few big blobs of paint.

Finger Paint Tape Resist (2)

Veronika was more hesitant than I would have thought to get her fingers in there at first! I showed her how to smear the paint all over the paper, mixing and mushing the colors.

Finger Paint Tape Resist (3)

I moved her down to the floor at one point, thinking she might want to get messier with lots of paint and paper spread out, but even then, she was a touch hesitant.

Tape Resist alt.JPG

No matter what, your paper will be very wet once completed, and will probably take all day to dry; I know ours did!

Finger Paint Tape Resist (4)

Once the “paint” dried, I peeled off the masking tape for the big reveal.

You could also do this activity with more complicated patterns or pictures, simply applying the masking tape in whatever design you like. Big kids might just want to get their hands in there too!

Tic-Tac-Yum

Tic Tac Yum (3)

Here’s a novel way to play tic-tac-toe… and to have a healthy snack. Winner takes first bite!

To set up the game, wind yarn around a flat mirror until you’ve divided it into 9 squares like a tic-tac-toe board. Secure on the back with tape.

For the Os, cut celery hearts into slices in the shape of a C. For Xs, cut chunks of non-dairy cheese and then make a slit so each piece looks like a V.

Tic Tac Yum (2)

Once arranged on the mirror, Travis was delighted to find the C was now an O and the V was now an X!

Tic Tac Yum (1)

I challenged him to a match…

Tic Tac Yum (4)

…but it wasn’t long before the Vs began disappearing as a snack. Tic-tac-yum indeed!

Tic Tac Yum (5)


Mirror Illusions Kiwi Crate

Kiwi Mirrors (17).JPG

Travis’s Kiwi Crate this month focused on mirrors and the tricks of light that allow for illusions. There was a bit of overlap with the Secret Agent crate, so I was surprised it was next in our queue from the company, but he still enjoyed the projects!

First up was making a Trick Box. This very simply involved folding open the provided green cardboard box and slipping in an illustrated insert. (Kids also have the option to illustrate their own insert).

Kiwi Mirrors (7)

Place the insert in the box, then slip in the provided mirror, making sure it is at the correct angle (arrows marked inside help kids to ensure a proper alignment).

Kiwi Mirrors (8)

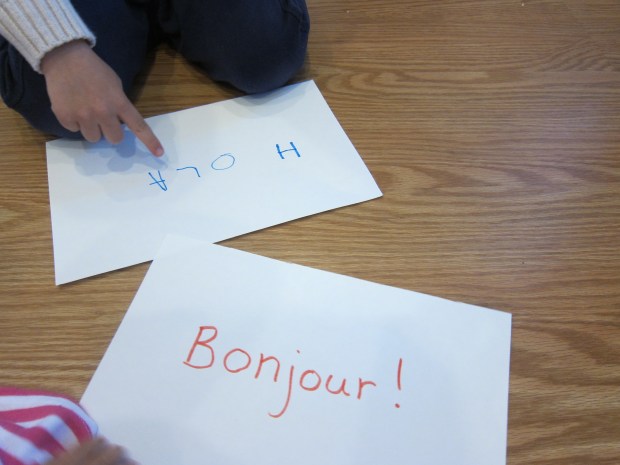
Peeking through the box now reveals the image in reverse. This was a bit lost on Travis, as he couldn’t read the “hello there” message he’d chosen either forwards or backwards.

More of an impact came from the penny trick you can perform: Drop a penny through the slot in the top and it seems to disappear, when really it is just falling behind the angled mirror. This is a fun one for kids to play a “magic trick” on friends and family.

Kiwi Mirrors (16)

Next up was making a Painted Puzzle. Place the provided wooden squares in a frame, and cover with one of the provided clear stickers. Travis did this a bit differently, attaching all four clear stickers, so our results weren’t perhaps perfect.

Kiwi Mirrors (9)

But the painting method was neat! Travis liked using the paint stampers, which are dipped into provided tiny paint pots. Cover the surface of the wooden tiles, let dry, then peel off the stickers.

Kiwi Mirrors (10)

The painted puzzle can now be taken apart and put back together again. But even cooler is viewing it through…

…Mirror Goggles, the final project. To make these (which look almost like Google’s VR viewer), open up the provided cardboard goggle box.

Kiwi Mirrors (1)

Travis got to exercise his fine motor skills to attach the sides with a brad; add padding foam around nose and forehead for comfort; and place a sticky donut and bead on top. This bead is going to help you keep your head up later, read on!

Kiwi Mirrors (2)

Thread an elastic through the holes on either side and secure with cord stoppers, then attach a mirror to the underside of the goggles with sticky foam. Your goggles are ready for viewing!

Kiwi Mirrors (4)

Wearing them took a bit of practice, with the goal of piecing together your Painted Puzzle or a provided wooden puzzle. I had Travis watch me first, as you really need to keep your head up to have the mirror show you what’s on the work surface below. Don’t tilt your head down for peeking or the bead will fall from the donut!

Kiwi Mirrors (5)

Once he got it the hang of it, Travis thought it was so cool. I loved watching his hands move, forward when they needed to go backwards and vice versa, until he started to understand he was seeing in reverse; it was like observing the gray matter of his brain at work.

Kiwi Mirrors (14)

If it won’t frustrate your kids, have them try writing their name or drawing a picture while wearing the goggles. Full disclosure, this is hard. Here’s my attempt to write his name!

Kiwi Mirrors (15)

There was lots more fun to be had in Explore magazine. First, we made a map (a bit of an overlap from Secret Agent). When read normally, it led him nowhere. Then he looked at it through the selfie feature on my phone.

Kiwi Mirrors (11)

Aha, he spots the treasure…

Kiwi Mirrors (12)

Success!

Kiwi Mirrors (13)

Then I showed him an example of backwards writing (again an overlap from Secret Agent).

Kiwi Mirrors (20)

There’s also a mirror word search for older kids, and a few cool mirror illusions you can try to recreate at home like multiplying apples…

Kiwi Mirrors (19)

…or a disappearing middle!

Kiwi Mirrors (18)

We finished with a bedtime read of two suggested books: Light: Shadows, Mirrors, and Rainbows by Natalie Rosinsky and Mirror, Mirror: A Book of Reverso Poems by Marilyn Singer. The latter features fantastic poems that can be read both backwards and forwards.
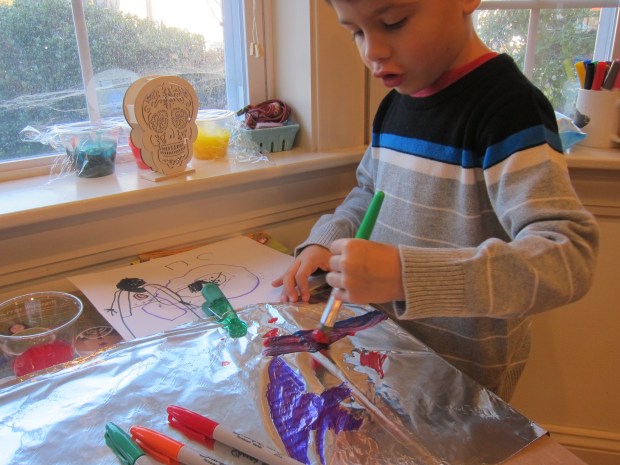
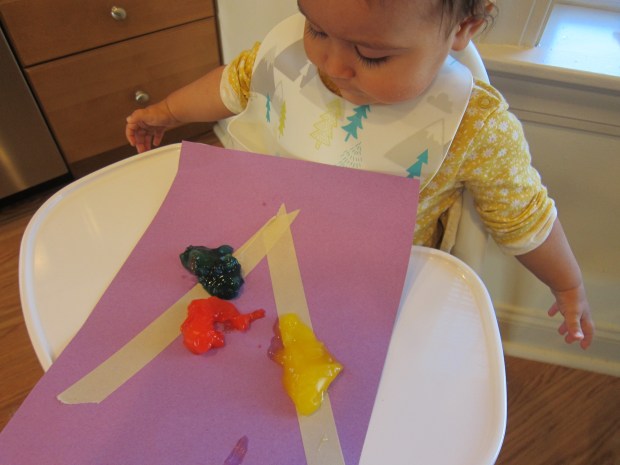
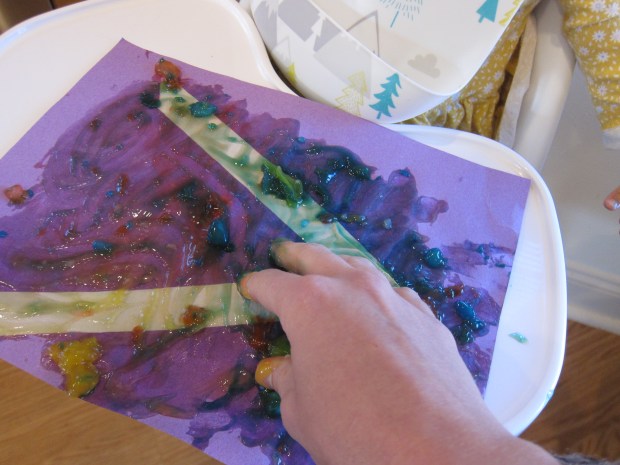
Baby Flying

Baby Flying (5)

Veronika went flying today! Ok, she didn’t really board an airplane, but here are three fun ways to turn your little one into a plane. Play them now before he or she is too heavy! Photo credit for all three versions goes to big brother Travis, who mostly managed to capture the antics in frame.

For the first method, stand with your baby between your legs, lying down on his or her tummy. I lifted Veronika up, supporting firmly beneath her stomach, and gently swung her back and forth.

Baby Flying (1)

For this one I love to sing the “shake them low” verse from Shake Those Simmons Down; it gets a laugh every time!

Baby Flying (2)

For the next version, she was in higher airspace: Do more of a football tuck with your arm under your baby’s chest, and zoom him or her back and froth. Airplane noises encouraged!

Baby Flying (3)

The final version suggested actually holding one hand and one foot and swinging baby around in circles. This sounded like a good way to pop a joint from a socket, so I held Veronika a little more firmly, but she loved the circling spins. Whee!

Baby Flying (4)

World Hello Day

World Hello Day (2)
Well, hello! It turns out that today (November 2) is World Hello Day, and Travis boldly accepted the challenge I set him: To say hi to ten people over the course of the day.

He was so proud with each chance that came while out of the house. A big hello to the woman next to us in the parking lot, a proud hello to the cashier at the drugstore, hello to the librarians when we stopped in for books, and more.

World Hello (3)

Each time, he turned to me with pride and said, “That’s three” and so on, until he reached 10.

World Hello (5)

Little sister wanted to get in on the hello fun, too, as she practices how to wave!

World Hello (4)

For more hello fun, we made big posters in languages we know. Travis is learning Spanish at school, so I helped him with the spelling of “hola”, and he decorated it for his Spanish teacher.

World Hello Day (1)

What new ways can you think of to say hello to neighbors and friends? Please share in the comments!

Organic Farmer’s Pie

Farmers Pie b.JPG

This toddler-friendly recipe has enough flavor and heft to please the whole family. I like to use the California burgers from Amy’s Kitchen, but swap in your favorite brand to customize the taste!

Ingredients:

  • 2 large sweet potatoes
  • 1 tablespoon olive oil
  • 2 minced garlic cloves
  • 1/4 cup chopped onion
  • 1/4 cup chopped zucchini
  • 1/4 cup chopped carrot
  • 3 cups cooked and crumbled veggie burgers
  • 1/2 cup plain non-dairy yogurt
  • 1/2 teaspoon salt
  1. Peel and dice the sweet potatoes and transfer to a saucepan. Cover with water and bring to a boil; continue to cook for 10 minutes, until tender.
  2. Meanwhile, heat the olive oil in a large skillet over medium heat. Add the garlic, onion, zucchini, and carrot; cook for 5 minutes, until tender.
  3. Add the veggie burger crumbles. Spoon the mixture into a 3-quart casserole dish and set aside.
  4. Drain the sweet potatoes and return to the pan. Add the yogurt and salt; mash with a potato masher until smooth and spread over the top of the burger mixture.
  5. Bake at 350 degrees F for 15 to 20 minutes, until heated through.

Farmers Pie a