Watercolor and Painter’s Tape

Watercolor & Painter's Tape (7)

Whether you’re using tape resist painting for holiday projects or just any old day of the week, there’s always a ‘wow’ factor to this painting method. It’s a favorite for my toddler and big kid both!

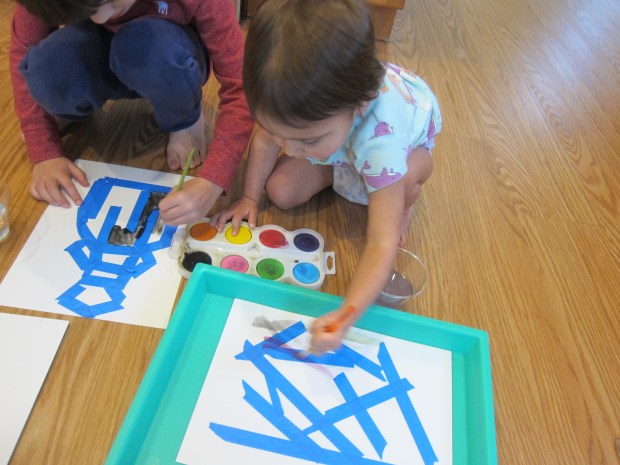
For toddlers, simply encourage them to lay down strips of painter’s tape any which way on thick watercolor paper. I helped Veronika makes lots of crisscross shapes. You could also experiment with making deliberate shapes, like squares or triangles, if desired.

Watercolor & Painter's Tape (3)

Travis wanted to see if he could make a favorite Lego character show up in tape form, which was admittedly harder to do. I taped out a rough outline, leaving empty space for the watercolor to show through.

Watercolor & Painter's Tape (1)

Time for watercolors! I loved watching brother and sister work side by side for this one.

Watercolor & Painter's Tape (5)

Travis loved choosing the right colors for his character. Veronika sometimes painted on her paper…

Watercolor & Painter's Tape (2)

…and sometimes preferred mixing the watercolors right in the tray. I loved seeing her artistic exploration.

Watercolor & Painter's Tape (6)

Once the pages were covered, we set them aside to dry. Then it was time for the big reveal!

Watercolor & Painter's Tape (8)

Pretend Play Tea Party

Pretend Tea Party (9)

Veronika is really starting to enjoy dramatic and pretend play, so today we staged a proper tea party! I thought we might set the scene by dressing her in a fancy dress and shoes…

Pretend Tea Party (1)

…but nope. Veronika wanted to wear a bathing suit! For easy to clean “tea”, I skipped anything liquid and instead used blue crinkle paper (available at craft stores).

Pretend Tea Party (2)

She loves this material, and soon it was brimming out of our tea pot and cups.

Pretend Tea Party (3)

That’s one big pot of coffee she’s brewing!

Pretend Tea Party (7)

She loved stirring through the tea, and of course her dolls all wanted a cup.

Pretend Tea Party (5)

We then added little white pom poms to be sugar cubes, either in the cups or in the sugar bowl.

Pretend Tea Party (4)

Did she always understand the imaginative part of the game? At two years old, of course not. But between the sensory play and the dolls and all those cups to fill and dump out, she had a great time.

Pretend Tea Party (6)

Toddler Pouch

Toddler Pouch (3)

If your toddler wants to carry along a little purse just like mommy, all you need to do is put together this simple craft!

To start, Veronika helped decorate some paper plates. Use whatever coloring material your toddler likes best; Veronika jumped right to it with her favorite color crayons (purple and blue), and lots of stickers.

Toddler Pouch (2)

I also drew familiar images on the plates for her like a rainbow and sun.

Toddler Pouch (1)

Cut one of the paper plates in half, and then staple it onto a second paper plate.

Toddler Pouch (4)

Punch two holes at the top of the full plate and thread through with yarn. Now it was ready to sling over her shoulder! Or to be stuffed full of toys and treasures.

Toddler Pouch (5)

She seemed so delighted with this pouch of her very own.

Hot Chocolate

Hot Chocolate (2)

This recipe makes just enough for one, but is easily doubled or tripled. Ice cubes cool it down to the perfect tot temp, and are built right into the ingredient list!

Ingredients:

  • 1 tablespoon agave nectar
  • 2 teaspoons cocoa powder
  • 1/2 teaspoon vanilla extract
  • 1 cup soy milk
  • 2 ice cubes
  1. Combine the agave, cocoa powder, and vanilla in the bottom of an empty coffee mug. Meanwhile, warm the soy milk in saucepan over medium heat just until warm.
  2. Pour the soy milk over the other ingredients, whisking to combine, then add the ice cubes.

Hot Chocolate (1)

Go, Car, Go!

Go Car Go (2)

Today seemed ripe for a little cause-and-effect play with Veronika. We built a series of “ramps” out of books or board game boxes for her cars, and then experimented with them in multiple ways!

To start, I stacked up a few books and then set one at an angle as a ramp. I aimed for a medium incline with this first round, and showed her how to set a car at the top and give it a push. Gravity does the rest of course!

Go Car Go (1)

First, she simply experimented with driving the car up and then letting it go. She tended to let go in the middle of the ramp, not the top, but it was great for a toddler effort!

Go Car Go (3)

Now to add a little early STEM to the lesson. What if the stack was very low and our tilted book wasn’t steep at all?

Go Car Go (4)

She seemed more confused by this set-up than anything else, so I quickly changed the slope again. Now we had a really steep incline! She loved when we set two cars at once down the slide and made it a race.

Go Car Go (6)

From here, it turned into more of an engineering project, with a stack of books in the middle and multiple books angling down as ramps from all sides.

Go Car Go (7)

I let her explore any way she wanted, whether driving cars up the ramps, letting them race down, or sometimes just gathering them all near the top in a little parking garage.

Go Car Go (9)

Pom Pom Busy Box

Pom Pom Busy Box (1)

I needed a box to keep Veronika busy this morning, and I needed it fast! This one fit the bill. First, I filled a plastic toy bin with pom poms – as many as you can! Be sure to include lots of different colors and lots of different sizes. I then set out a few empty cardboard tubes and some brightly colored straws, thinking these would be great for scooping and stirring.

Pom Pom Busy Box (3)

Veronika very quickly had other plans. She loved the straws and pretended she had a “smoothie”. So I made her one! I showed her how to stuff pom poms into the cardboard tubes like “juice”, then insert the straw.

Pom Pom Busy Box (5)

Now she was running a juice bar!

Pom Pom Busy Box (6)

When she tired of that game, there was still so much more to do. Next, we buried a few favorite small toys in the pom poms. “Where are you bunny?” she called, as she sifted through either with fingers or with the straws.

Pom Pom Busy Box (9)

For older kids, you could even make this more of an ‘I Spy’ search with laminated pictures of every object you hide, but I knew that would be too advanced for Veronika.

Pom Pom Busy Box (8)

Next we had fun watching items drop through the tubes. We could drop a toy down to land with a plop in the soft pile of poms pom. Or just let handfuls of pom poms rain through.

Pom Pom Busy Box (11)

She was frustrated trying this a few times with the largest pom poms, which wedged into the tube instead of slipping through, so it turned into a useful lesson on relative size.

Pom Pom Busy Box (10)

And then sometimes she just wanted to run her fingers through the whole pile for the feel of it, or stir with the straws, or stuff the tubes full of pom poms.

Pom Pom Busy Box (2)

Needless to say, this bin lived up to its name; it was the perfect way to keep her busy.

Pom Pom Busy Box (13)

Sink or Float Toys

Sink or Float (2)

There are many ways to teach the notion of what sinks and what floats to a toddler, but I loved that this one could be done right before bath time without any special materials needed.

I lined up a variety of objects on the side of Veronika’s bath, some I knew would sink (toy cars, a spoon) and others I knew would float (her rubber ducky, toy boats).

Sink or Float (1)

It was up to her to toss them all in from the line-up and see how they landed in the water.

Sink or Float (3)

Some, like a plastic apple or the rubber duck gave a splash and and a bounce before bobbing along on the surface. Others made a big plunk (the car!) and sank to the bottom. We stopped to talk about each of these different ways that the objects had made the water move.

It was the first time I saw a spark in Veronika’s eyes as I repeated the words “sink” and “float” deliberately.

Sink or Float (4)

By the time she was sitting in the tub and playing with all the items, she was using the words in full sentences. “The spoon sinks! The boat floats!” A great first lesson on this everyday scientific concept.

Sink or Float (5)

Mulling-Spice Cake

Mulling Spice Cake (2)

I don’t often make cake on a whim, but when I spotted this recipe in the New York Times Sunday magazine, I was thrilled to realize I had all the ingredients on hand and could veganize it in a pinch. Because sometimes, you need to bake a cake for no reason at all.

Ingredients:

  • 2 and 1/4 cups flour
  • 1 teaspoon ground cinnamon
  • 1/2 teaspoon ground cloves
  • 1/2 teaspoon ground nutmeg
  • 1/4 teaspoon ground ginger
  • 1/2 teaspoon salt
  • 1 cup Earth Balance butter, softened
  • 1 cup brown sugar
  • 2 Ener-G eggs
  • 3/4 cup molasses
  • 1/2 teaspoon baking soda
  • 1/2 cup apple cider
  • 1 jar non-dairy vanilla frosting
  • Sprinkles for garnish (optional)
  1. Combine the flour, cinnamon, clove, nutmeg, ginger, and salt in bowl; set aside.
  2. Beat the Earth Balance butter and brown sugar in the bowl of a stand mixer until creamy. Add the Ener-G eggs and beat until blended.
  3. Pour the molasses into a liquid measuring cup and add the baking soda. Meanwhile, bring the apple cider just to a boil over medium heat. Add the cider to the molasses mixture and whisk together (the mixture will be foamy).
  4. Alternate adding the flour mixture and molasses mixture to the butter mixture, beginning and ending with the flour mixture.
  5. Coat two (9-inch) round cake pans with cooking spray and line the bottoms with parchment paper. Divide the batter evenly among the pans. Bake at 350 degrees F for 30 minutes. Let cool for 15 minutes in the pans, then transfer to a wire rack and cool completely.
  6. Once cool, spread the frosting evenly over the layers and place one atop the other. Add sprinkles for garnish, if desired!

Mulling Spice Cake (3)

Foam Number Sensory Bag

Foam Letter Sensory Bag (3)

Veronika is just starting to recognize the written numeral that goes along with each number, and I thought it might be fun to make the experience more hands-on today. After all, toddlers learn so well through sensory play!

I set up a classic sensory bag for this activity, just a large zip-top bag filled with cheap clear hair gel. I kept the layer of gel very light so the emphasis was on the numbers.

Foam Letter Sensory Bag (2)

Add the foam numbers and seal the bag, and it’s ready for your child to squish the numbers around. Big brother Travis wanted to see how it felt, too!

Foam Letter Sensory Bag (4)

At first I only used numbers 0 through 4, intending to keep things simple. But she spotted the extra numerals (5 through 9) on the floor and wanted a new bag for them. Since she was already tempted to open up the goopy bag, I decided to give her a clean one for this second batch of numbers

Foam Letter Sensory Bag (5)

She loved adding 5 through 9 to this second bag, then taking them out and starting over again. This turned out to be even better, because she named each number as she added it! I was surprised to realize she already seems to know 5, 7, and 8 quite well.

Foam Letter Sensory Bag (6)

She also discovered that the bags were fun to toss on the floor, especially the one filled with hair gel since it made a satisfying plop when it landed.

Foam Letter Sensory Bag (7)

So we had some good sensory play with some good early learning built right in.

Water-Powered Window Stickers

Water Powered Window Stickers (8)

All you need for this activity are a few sheets of craft foam. And since these “stickers” peel off and on any window as many times as your child wants, they lend themselves perfectly to imaginative stories and play.

We used craft foam in three colors, and started out by tracing cookie cutters to make shapes and people (hint: you’ll want to use a gingerbread man cookie cutter!). Travis quickly wanted all our stickers to have a Star Wars theme, so we traced a few nightlight inserts in favorite shapes like R2-D2 and The Millennium Falcon, too.

Water Powered Window Stickers (3)

Then he decided to draw a few favorite characters free-hand, like Jabba the Hutt! I was impressed with his creativity.

Water Powered Window Stickers (2)

Draw on any details like facial features, buttons, or hoods with permanent marker, then cut each shape out.

Water Powered Window Stickers (4)

All Travis had to do to create a stage for his little characters on the window was to dip them in a dish of water. I set down a bowl of water (and a paper towel to clean up any drips!) and the fun began.

Water Powered Window Stickers (5)

Travis loved the way he could manipulate the characters all over the window, changing the scene and staging battles and rescues.

Water Powered Window Stickers (10)

Because you can layer one foam piece atop another, be sure to add accessories, too. Darth Vader’s mask could go over any of the little people’s heads, for example. You could even make a foam cut-out to look like a speech bubble and add words with permanent marker.

Water Powered Window Stickers (7)

No matter what theme your child has for these stickers, they are sure to be easy and fun.

Water Powered Window Stickers (11)