Pretend Islands

Pretend Islands (6)

Here’s a great spin on using cushions to practice gross motor skills in the house. Simply up the ante by telling your kids the floor is hot lava!

Okay, so a two-year-old might not entirely understand the concept, but certainly your child will pick up on your enthusiasm. The more excited you act, the more quickly he or she will play along!

Pretend Islands (1)

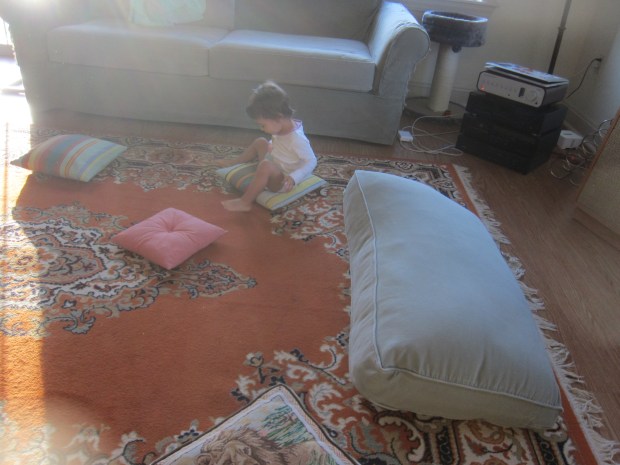
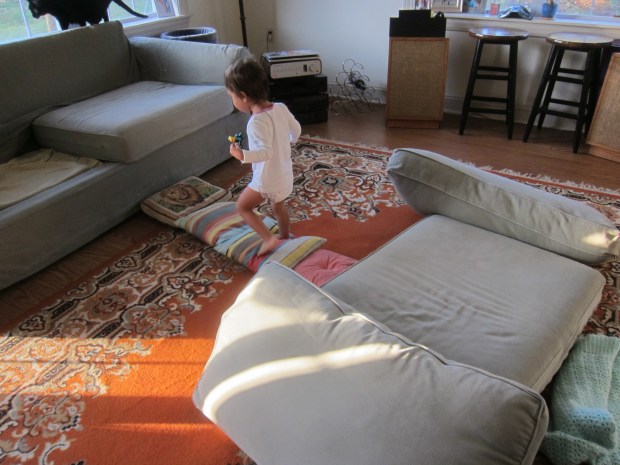
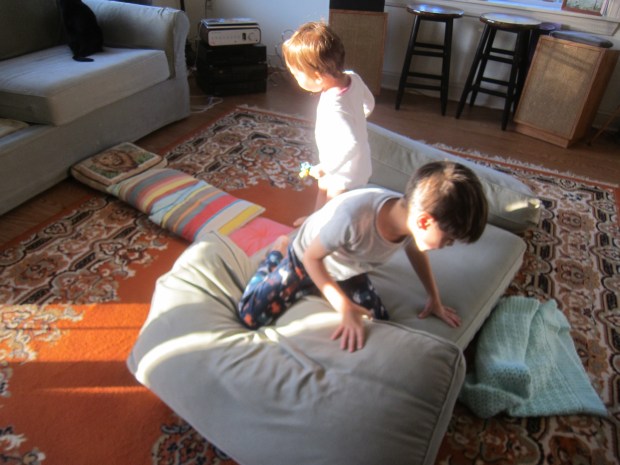
I tossed our couch pillows on the floor and said, “Quick Veronika, the floor is lava! Jump onto a pillow,” and encouraged her to hop from one pillow to the next. She eagerly dove into the game.

Pretend Islands (2)

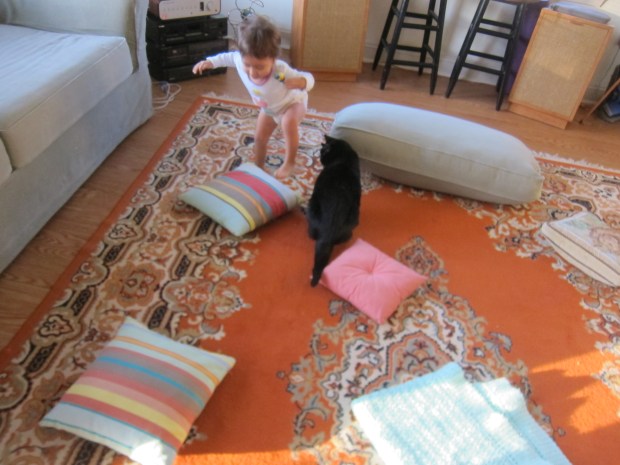
To switch it up after a few rounds, we made Pillow Island instead (a giant batch of pillows in the center of the rug), as a safe zone from the lava.

Pretend Islands (4)

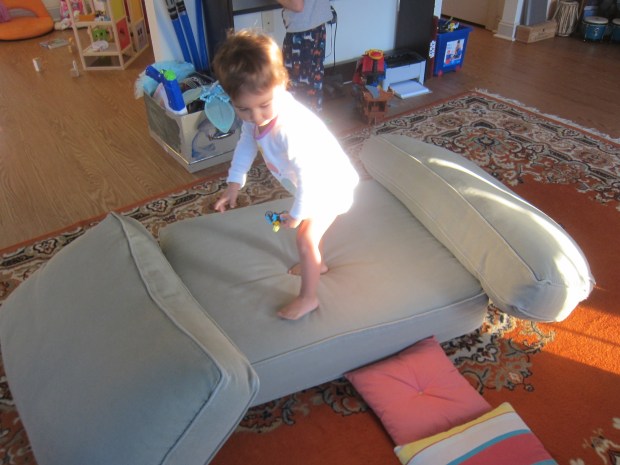
This was so fun for her to clamber around on, and we connected it to the nearby volcano (couch) with a bridge (little pillows).

Pretend Islands (5)

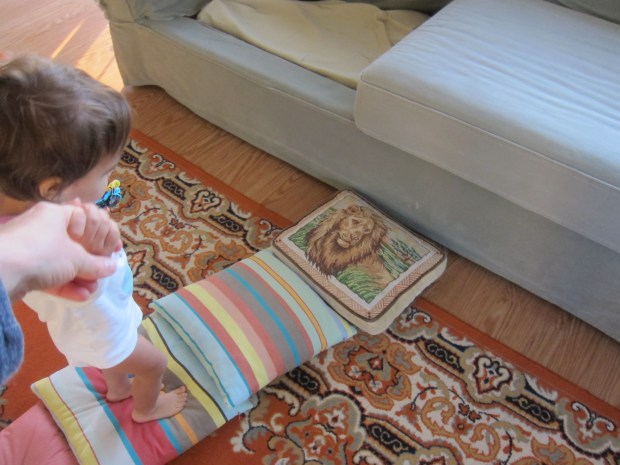
Big brother Travis loved the imaginative element of the game, and he helped play up the lava scenario. He was also so proud he could run across the pillow bridge without falling.

Pretend Islands (7)

What a great way to squeeze in some exercise right after breakfast!

Pretend Islands (8)

Balloon Art

Balloon Art (3)

We’ve painted with a balloon before, but today Veronika had a chance to paint on a balloon. She absolutely adored this simple art project.

I covered the floor with scrap paper to catch any mess and then set out uninflated balloons and little cups of paint. Veronika always asks for yellow, and this time wanted to add dark blue and light blue!

Balloon Art (1)

She immediately started painting the paper, but I showed her how to paint on one of the balloons instead. She loved it! She narrated all her color choices to me as she worked. “A little pink. Now let’s add a little blue…” It was like watching a miniature Bob Ross.

Balloon Art (2)

At first we only worked on light-colored balloons (whites and yellows) but she spotted a black one in our pack and wanted to paint on that. The color contrast looked quite neat!

Balloon Art (10)

When she seemed close to tiring of the craft, I inflated one of the balloons. (Note: Be careful that there is no wet paint at the rim before you blow it up). I wanted to show her how the smears of paint would now spread and thin out.

Balloon Art (5)

For the best contrast, make a few of the uninflated balloons with only small dots which will become more like blotches once inflated.

Balloon Art (6)

I thought she might want to switch to using the balloon like a paintbrush once it was blown up, but now she wanted to paint on this big bubbly canvas.

Balloon Art (9)

The colors started mixing now that she’d dipped her brush in all the cups several times, and she took such delight in it. “I have yellow. I have blue… I have green!” An early lesson on color mixing!

Balloon Art (8)

Again, she narrated her painting to me and kept it up for quite some time.

Balloon Art (7)

If your child wants to play with the balloons, set them aside on paper plates to dry completely first, and then it’s time for a round of painty balloon tennis!

Apple Core Craft

Apple Core Craft (6)

We’ve been reading books about apples for fall, so this cute apple core craft was a fun hands-on extension. Bonus points if you share a real apple snack afterwards!

To start, paint two coffee filters red and leave them to dry on paper plates. If you have a standard brown toilet paper tube, paint it white and let dry. I had one that was already white, which saved that step.

Apple Core Craft (2)

Once the paint dries, apply glue to both rims of the toilet paper tube and attach the red coffee filters. To make a stem, glue two green construction paper leaves to a craft stick and insert into the top of the apple.

Apple Core Craft (3)

Don’t forget to add a few seeds with black marker! If you have a preschooler, you might consider cutting the seeds from black construction paper instead and gluing on. This will be great for honing fine motor skills.

Apple Core Craft (4)

This craft was so great for talking about all the different parts of the apple, whether stem, leaves, flesh, core, or seeds. Veronika loved pointing to each portion as we talked about the name for each!

Apple Core Craft (5)

Black Bean Cakes

Black Bean Cakes (1)

These easy patties come together in a flash, and make a nice alternative to burger night in your home!

Ingredients:

  • 1 (15-ounce) can black beans
  • 3 tablespoons salsa
  • 6 tablespoons breadcrumbs
  • 1 tablespoon canola oil
  1. Drain and rinse the beans, then mash with a potato masher. Stir in the salsa and breadcrumbs.
  2. Meanwhile, heat the canola oil in a large skillet over medium heat. Shape the bean mixture into 4 patties and add to the pan. Cook for 3 to 4 minutes no each side, until lightly browned.

Black Bean Cakes (2)

Bedtime Buddy

Bedtime Buddy (7)

This craft was originally meant as an extension of a Getting Dressed activity Veronika and I did months ago, but this time the idea was to make 3-D version of herself, not a flat one. It turned out that the project was beyond my crafting abilities (full disclosure: I cannot sew) but it was still fun to play with the materials as we made an attempt!

Bedtime Buddy (1)

First trace your child on a large sheet of craft paper. Veronika loved seeing her little mini-me image! Cut out and transfer the paper to an old sheet.

Bedtime Buddy (3)

Trace and cut out two times, so you now have two little versions of your child.

Bedtime Buddy (5)

As long as you’re more skilled than I am, sew the two halves together, then turn inside-out and stuff with cotton roving before flipping back to outside-in. Ideally, you’ll now have a little person just the same size as your child that he or she can take up to bed!

Bedtime Buddy (4)

Needless to say, as neither a seamstress nor artist, we realized the craft wasn’t working. I cut the legs from our version to make it smaller (more like a stuffed animal) and I wasn’t really able to stitch the two halves together in a durable way.

Still, Veronika loved helping decorate the face and body with fabric markers! We ended up with a little soft toy that was fun to play with.

Bedtime Buddy (6)

If you’re able to sew together a proper Bedtime Buddy, please share in the comments!

Torn Paper Apple Sun Catcher

Apple Tree Suncatcher (8)

Before the fall ends, I wanted to do a few apple-themed crafts with Veronika, and this particular activity resulted as an extension of an apple-themed story time. So start with an apple book your child loves! Apples by Gail Gibbons, is a classic, and we also read Dr. Seuss’s Ten Apples Up on Top and Secrets of the Apple Tree from Usborne Books.

Apple Tree Suncatcher (1)

Now it was time to make an apple! Tape down a piece of contact paper with the sticky side up. I drew a big red circle on the paper with a marker, and then tore up pieces of construction paper in red and green. I invited Veronika to start filling in the apple with the torn pieces.

Apple Tree Suncatcher (2)

She was less interested than I thought she would be, but she did lay down a few pieces of paper and I then filled in the rest.

Apple Tree Suncatcher (3)

When finished, cover with a second sheet of contact paper, wedging a brown paper stem in between, and then cut out.

Apple Tree Suncatcher (6)

This is yet another craft that makes a dazzling display in the window.

Apple Tree Suncatcher (7)

It would probably have been even prettier with red tissue paper, but we recently used ours up! Still, the construction paper worked in a pinch.

Apple Tree Suncatcher (9)

Cheesy Polenta with Roasted Vegetables

Cheesy Polenta with Roasted Vegetables (1)

Top homemade polenta with warm roasted vegetables for the perfect autumn meal.

Ingredients:

  • 1 cup (1-inch) pieces asparagus
  • 6 ounces cremini mushrooms, halved
  • 2 tablespoons olive oil
  • 1/4 teaspoon salt
  • 3 cups water
  • 1 cup polenta
  • 1/2 cup shredded vegan cheddar
  1. To prepare the vegetables, combine the asparagus and mushrooms in a baking dish and toss with the olive oil and salt. Roast at 400 degrees F for 15 minutes, until tender.
  2. Meanwhile, bring the water to a boil in a saucepan. Add the polenta; continue to cook, stirring constantly with a whisk, for about 5 minutes, or until the mixture thickens.
  3. Remove from heat and add the cheddar, stirring until the cheese melts.
  4. Serve the roasted vegetables directly over the polenta for a hearty “stew”.

Cheesy Polenta with Roasted Vegetables (2)

Egg Sort

Egg Sort (4)

If you’re wondering what to do with all those plastic Easter eggs off-season, then consider all the ways they can be turned into a learning tool!

For a simple sorting game today, I hot-glued a few of last year’s eggs together, using 3 each of 3 different colors. Then I set them all down on the ground in front of Veronika.

Egg Sort (1)

At first she simply gathered them all into a pile, clearly excited. “A blue one, a green one, a pink one,” she said as she lifted each egg.

Egg Sort (2)

I then laid out pages of construction paper in corresponding colors. She quickly began piling the blue eggs on the blue, etc., but then grew a little confused since I had red paper to go with the pink eggs, not pink paper!

Egg Sort (3)

Instead, she soon was more interested in transferring the eggs in and out of a little bucket.

Egg Sort (5)

This set off a lot of busy play toting the bucket around or rolling the eggs across the floor. So we had a little learning, plus a lot of fun too!

Egg Sort (7)

Rock Painting

Rock Painting (8)

Veronika has enjoyed painting methods in the past that involve closing a box lid, rattling something around, and seeing the messy artwork that results (think a toddler Jackson Pollock).

She also loves rocks, so this craft combined the two perfectly! She loves to collect pebbles, and considers the most mundane little ones her “treasure.” Today I asked if she wanted to paint with one of her rocks.

I cut a square of watercolor paper to fit inside a small shoebox, then set out a few colors of paint on paper plates. I next showed her how to dip a rock in the paint. “Can you dip yours?” Yes!

Rock Painting (1)

“Should we put it in the box?” Yes!

Rock Painting (5)

Close the lid and help your toddler shake the box around.

Rock Painting (2)

When you open it up, the rock will have splattered paint in neat designs. We quickly repeated with a second color.

Rock Painting (4)

I loved watching Veronika put her own spin on the project, too. After a few rounds of shaking the box, she actually preferred to dip the rock in one of the paint colors and then dot it onto the paper. A rock paintbrush!

Rock Painting (6)

After that she discovered that she could be her own canvas. So this project turned into not just rock painting, but Veronika painting. Bath time!

Rock Painting (9)

Either way, the resulting craft makes such pretty little postcard-sized works of art that perhaps we’ll use them for thank you notes!

Rock Painting (10)

Indian Corn Squish Bag and Painting

Corncob Painting (7)

Indian corn makes a beautiful decoration this time of year. And not only does it look great on a harvest table or doorway, but it makes for fantastic sensory play, too!

Indian Corn Squish Bag (1)

Today, I set out three ears of this multicolored corn on a tray for Veronika and first just invited her over. She wanted to smell it, one of the first ways she likes to approach a new item.

Indian Corn Squish Bag (8)

We discovered that if we cracked an ear in half, we could then pick off the hard kernels. This left behind smooth divots underneath. She loved running her finger over the cob, feeling the contrast between these soft and hard parts.

Indian Corn Squish Bag (3)

Next, we turned the corn kernels into part of a sensory bag. I didn’t have any hair gel on hand to fill a small zip-top bag, but corn syrup worked in a pinch. I added a little seasonally-appropriate yellow food coloring, and then some of the corn kernels we’d pulled from the cob.

Indian Corn Squish Bag (4)

Seal tightly and pass over to your child. “It’s a squishy bag!” Veronika said with delight, now familiar with the concept. And this one was great for squishing. She could squeeze it between two fists…

Indian Corn Squish Bag (5)

…or chase around little kernels of corn with a finger.

Indian Corn Squish Bag (6)

With a few corn cobs still on the tray, we decided that they would be fun to paint with. I pulled out brown, red, and green, and poured a little of each color onto a plate.

Corncob Painting (1)

Show your toddler how to roll a cob in one of the colors and then across a piece of sturdy paper. I placed the paper in a craft tray to contain (most of) the mess.

Corncob Painting (4)

Note: If you do this project with red, green, and black paint in December, it would also make a lovely Kwanzaa craft given corn’s symbolism during the holiday.

Corncob Painting (3)

As a finishing touch, we decided to add dots of glue over the dried corncob painting and pressed on a few of the final loose kernels of corn.

Corncob Painting (5)

What fun play we had simply by exploring a piece of seasonal decor!

Indian Corn Squish Bag alt