Indoor Sledding

Indoor Sledding (1)

Why should big kids have all the sledding fun? Here’s a wild idea I never would have come up with until spotting in a baby game book. The cardboard “sled” is great for developing your little one’s muscles.

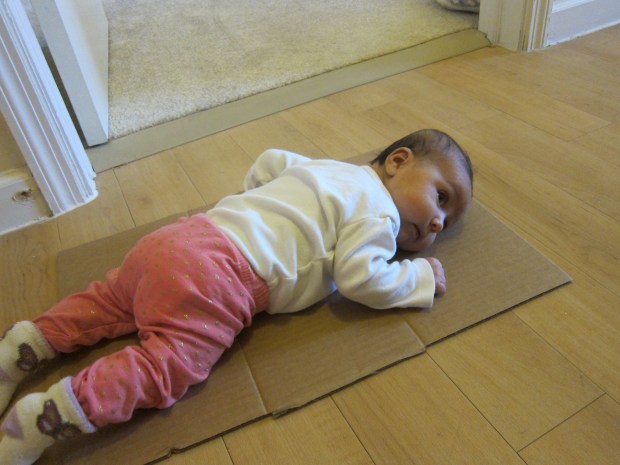
Lay your baby on a large, flat piece of cardboard; make sure the cardboard is completely smooth, with no staples, tape, or other items protruding out.

Indoor Sledding (4)

Very gently start to move the cardboard back and forth – this isn’t a downhill ride folks, just a gentle motion!

Veronika seemed to really enjoy it!

Indoor Sledding (2)

She instantly picked her head up to see what was going on, great for muscle development. Tummy time on steroids!

Indoor Sledding (5)

Because she was relaxed and happy, I also experimented with moving the cardboard forward and backward. Whee!

Indoor Sledding (3)

Here’s a quick clip of her ride:


Advertisement

White Noise

White Noise (2)

First-time parents tend to be nervous about noise and napping babies… But as a veteran, I can promise you that nothing is further from the truth. First of all, I recommend making noise as your child naps, simply so they don’t become precious sleepers. Travis can sleep through just about anything!

But perhaps even more counter-intuitive, common “loud” appliances actually provide white noise that helps babies sleep, provided they are not too close to the source and the decibel level isn’t too loud. Rather, it’s sharp, sudden noises that might startle a baby awake. (That adorable Moro reflex isn’t so cute when it interrupts a much-needed nap).

Perfect examples? The dryer, as Veronika models at the top of this post, and also the dishwasher.

White Noise (4)

Other things to try include humming air vents, or baby swings that come with built-in noise, such as the Mamaroo seat.

And yes, the vacuum… tho here’s Veronika checking it out very curious and awake!

White Noise (1)

Cardboard Tube Star Garland

Star Garland (8).JPG

January always feels so sad after the holiday decorations come down – so why not leave some sparkle up in your home to brighten the dark winter days? To wit, this glittery star garland added shimmer and shine to the wall that held our holiday cards, up until a few days ago. Enlist your kids and you’ll have a fun afternoon project before school starts back up again!

Star Garland (4)

You’ll need paper tubes to make the garland, either toilet paper rolls or paper towel rolls; for the latter, cut the tube into thirds.

Travis helped use grown-up scissors to make five slits in each tube, nearly to the edge. Fan out the slits and you have a star shape.

Star Garland (2)

We smeared a glue stick on each of the five arms, and pressed into a plate of glitter, one at a time.

Star Garland (3)

Set aside to dry. Because we used a glue stick instead of white glue, it dried fairly quickly.

Star Garland (5)

Travis got to use his new one-hole punch on one arm of each star.

Star Garland (6)

Thread a string or twine through the holes, and mount on a doorway, window, or wall for sparkly decoration.

Star Garland (9)

Happy January!

Star Garland (7)