Patience is a Virtue

Pumpkin Cookies (6)

Ah, the age-old question, how to teach patience to a preschooler when there is so much to do and see and explore. Because let’s be honest – waiting is hard! But to drive home the idea that patience and waiting are worth the wait, cookies are the perfect teaching tool. Yes, cookies! They only take about 20 minutes, which means you’ll have to wait, but not too long. Did Travis make it through our experiment? Read on and find out…

We picked a pumpkin cookie recipe because, well, it’s autumn. This recipe had the added bonus of only using three ingredients!

In a bowl, we mixed:

1 (13-ounce) package spice cake mix*

1 can pumpkin puree

1 cup non-dairy chocolate chips

Travis was a big helper with the stirring…

Pumpkin Cookies (2)

…But immediately asked if he could taste both the pumpkin.

Pumpkin Cookies (1)

Oh, and the chocolate chips. Hmm, was this good waiting? I decided that a little nibble wouldn’t hurt.

Pumpkin Cookies (3)

We popped the cookies in the oven and baked at 350 degrees F for 18 minutes.

Pumpkin Cookies (5)

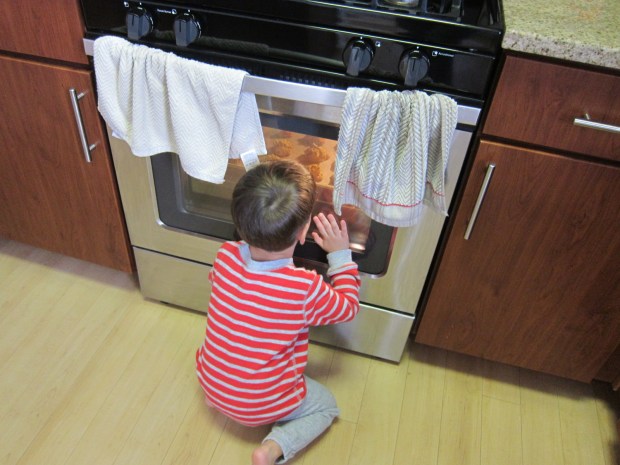
The cookies are good warm, but even better the next morning for an a.m. snack after they had completely set and cooled. So see, patience is a virtue!

Pumpkin Cookies (4)

*Be sure to check ingredient lists in any pre-made cake mix for items that are not vegan. The spice cake mix from Namaste Foods was perfect, but comes in a 26-ounce bag. Measure out about 2 and 1/2 cups mix to equal 13 ounces.

Teensy Tostadas

Teensy Tostada (2).JPG

Nachos for dinner? What kid wouldn’t say, “Yes please!” To give these a little extra protein boost, I serve over bean tortilla chips, but regular corn tortilla chips work just as well.

Ingredients:

  • 1 (15-ounce) drained and rinsed can pinto beans
  • 1/4 teaspoon garlic powder
  • 1/8 teaspoon chili powder
  • 18 tortilla chips
  • 1/4 cup shredded Daiya cheddar
  • Cherry tomatoes
  • Shredded lettuce
  1. In a bowl, mash together the pinto beans, garlic powder, and chili powder, set aside.
  2. Arrange the tortilla chips in two piles on a baking sheet lined with foil. Top each pile with about 1/2 cup bean mixture and sprinkle each pile with 2 tablespoons cheddar.
  3. Bake at 375 degrees for 4 minutes, just until the cheese melts.
  4. Sprinkle with halved cherry tomatoes and shredded lettuce to taste before serving.

Teensy Tostada (1)


Color Hopscotch

Color Hopscotch (5)

Travis was late to jumping… so all the more reason to celebrate his new accomplishment with this fun game! It had us exercising our brains and our muscles. Instead of leaping from number to number, in this version you’ll be hopping from color to color or shape to shape.

To play, use foam sheets to cut out a variety of shapes. Ideally use two sheets of foam in each color so you wind up with two red triangles, two green squares, two blue circles, etc.

Color Hopscotch (2)

Arrange the shapes in any pattern on the floor, then have fun calling out instructions to leap.

We had fun testing shape combinations, like “Circle, Rectangle, Triangle!”

Color Hopscotch (8)

Or color ones: “Yellow, Black Green!”

Color Hopscotch (3)

Travis also made up silly ways to cross the shapes, such as jumping feet onto one row, then putting your hands down on the second. I loved seeing his creativity with the suggestions.

Color Hopscotch (6)

For bigger kids who are readers, consider making a spinner for the game. Write out different instructions in each space of the spinner, and then perform the motion on the space you spin to.

Color Hopscotch (7)

Halloween Luminaries

Halloween Luminary (10)

Last year we indulged in an extra crate from Kiwi Co to make a trick-or-treat tote bag (which we’ll be using again this year!). This Halloween, Travis has graduated up in crafting skills and could help put together Kiwi Co’s neat luminary project, a reminder that it’s not just pumpkins that glow on All Hallow’s Eve.

To replicate the project at home, you can purchase similar materials to everything described below at a craft store.

To start, we taped down the two provided clear sheets of flexible plastic onto a work surface (a brown paper bag or scrap paper work fine), and painted them with a layer of glaze (which looked quite similar to Mod Podge).

Halloween Luminary (1)

We divided the provided tissue paper squares into oranges and purples, and pressed onto the sticky glaze.

Halloween Luminary (2)

Travis had fun with the orange one, but then decided he didn’t like the way the glaze felt on his fingers. So I finished up the purple one, and then we painted over the tissue with an additional layer of glaze before setting them aside to dry.

Halloween Luminary (3)

To make our luminaries spooky, we had fun adding the provided stickers – Travis particularly liked making a “pumpkin patch” on one.

Halloween Luminary (4)

The plastic is then folded into a cylinder, and secured with clear round stickers.

Halloween Luminary (6)

Place your luminaries on any surface, then add a tea light inside.

Halloween Luminary (7)

Boo-tiful!

Halloween Luminary (8)

No-Bake Spider Cookies

Spider Cookie (1)

We’re one week from Halloween, and the bushes all around town are draped in fake cobwebs or plastered with giant black spiders. We added to the arachnid fun with this easy dessert idea from Highlights magazine. For vegan chocolate cookies, try the wheat-free Newman O’s oreo cookies; scrape out the crème filling and replace with the cream cheese or peanut butter. If you can’t find Newman O’s, any vegan chocolate cookie will do!

Ingredients:

  • 8 round chocolate cookies
  • 1 tablespoon non-dairy cream cheese or peanut butter
  • 16 pretzel sticks
  • 8 raisins
  1. Divide the cream cheese or peanut butter evenly among 4 of the cookies. Set aside.
  2. Snap the pretzel sticks in half so you have 32 pieces. Arrange 8 pieces on each of 4 cookies, to be the spider legs, using the cream cheese as “glue” to hold them in place. Top with the remaining 4 cookies.
  3. Add an extra dot of cream cheese on the top cookies, and press on the raisins as eyes.

If only all spiders were this adorable!

Spider Cookie (2)

Blow Your Nose!

Nose Blow (2)

As much as we all hate to think of it, cold and flu season will be upon us all too soon. Before those first stuffed-up sniffles hit your little one, arm them with the knowledge of how to blow their nose. It seems obvious to adults, but how do you explain this motion to a little tyke? With a game, of course!

To start, set out a variety of light objects such as pom poms or wadded up pieces of tissue paper. We’ve played games where we tried to move such objects about by blowing through a straw. This time I challenged Travis to huff through his nose.

It took him a few tries, but soon he got the hang of it!

Nose Blow (1)

If you want to make things more interesting or challenging, try moving the items to a goal line, using nothing but your nose blows. Older kids might enjoy turning this into a race!

Nose Blow (4)

Just be forewarned that your play surface might get a bit… snotty. Have wipes on hand to clean up any mess when you’re done.

Halloween Sensory Bin

Halloween Sensory (3)

Seasonal sensory bins are always good fun, equally delightful for little tots as they are for preschoolers. This one gets an October twist with an orange and black background, and Halloween goodies tucked inside.

To prepare the rice, place white rice in a zip-top bag and shake with orange food coloring – I achieved a nice orange by mixing the yellow and red from Color Kitchen. Spread on a foil-lined baking sheet and let dry.

Halloween Sensory (1)

Fill a tub with the orange rice on one half and dried black beans on the other – it’s getting spooky in here!

Halloween Sensory (2)

Next I placed a few odds and ends in the bin, like mini pumpkins and gourds, and foam in the shape of jack-o-lanterns. I added a whisk and spatula, then presented the bin to Travis after a morning at school.

Halloween Sensory (4)

He loved sprinkling the black beans onto the rice for a startling contrast. Pretty soon this was an imaginative game of making pumpkin soup.

Halloween Sensory (7)

The texture of the dried beans was a big hit…

Halloween Sensory (5)

…as was the sound they made when sprinkled on top of the pumpkins, making this bin a delight for auditory senses as well.

Halloween Sensory (10)

You can keep bins like this around for a couple of days for children to return to. Later, we added some wobbly Halloween stickers and a few more pumpkins to our “patch.”

Halloween Sensory (12)

What else would you add to your Halloween sensory bin? Please share in the comments!

Halloween Sensory (13)

Leaf Paintbrush

Leaf Brush (6)

Wondering what to do with the leaves and other odds and ends that have blown in from your fall nature walks? Turn them into paintbrushes!

We tried out a few different methods for this fun art project. Some twigs we brought home already had multiple leaves attached, and these were ready-made brushes.

Leaf Brush (1)

The other option is to gather together a few leaves of the same size and shape, and secure with twine or string around a twig.

Leaf Brush (2)

Pine needles made a brush that looked like a mini broom!

Leaf Brush (5)

I set Travis up with his “brushes” and paints, and let his creativity go wild. We started out with small pieces of poster board to paint on…

Leaf Brush (3)

But he requested a bigger canvas, which soon had him splattering and swishing colors this way and that.

Leaf Brush (7)

He loved pouring out big dollops of paint and running the brush through them.

Leaf Brush (8)

Our verdict is that the pine needle brush definitely worked best, but all of them were fun. “Mom, is it okay if I’m messy?” he asked at one point. Embrace the chaos and say yes, and let your little artist have fun with this one! You can always wipe the paints off the floor after.

Leaf Brush (4)


Black Bean and Rice Cakes

Black Bean Rice Cakes.JPG

These are easy little patties that can work as a snack, or turn into a meal when served on a bun like a burger. I still sometimes need to trick my son into eating beans… but tasty patties like these make it easy!

Ingredients:

  • 1 (15-ounce) drained and rinsed can black beans
  • 1/2 cup cooked white rice
  • 1 tablespoon chopped fresh chives
  • 1/2 teaspoon cumin
  • 1/8 teaspoon garlic powder
  • 1/2 cup panko breadcrumbs
  1. Place the beans in a bowl and mash until mostly smooth. Add the rice, chives, cumin, garlic powder, and breadcrumbs, stirring until combined.
  2. Shape the mixture into 8 or 9 small patties.
  3. Heat 1 tablespoon olive oil in a large skillet over medium heat. Add the patties, working in batches, and cook for about 4 minutes on each side, until crisp and golden.

Flying Ghost Teabag

Flying Ghost (3)

Here’s a Halloween experiment that’s exciting for kids and grown-ups both. A note of caution, since the game involves fire; I recommend making this an activity for two adults and any children; one grown-up can light the match while the othe keeps kids a safe distance away.

Snip open a tea bag and empty the tea – as a nice bonus, the experiment smells lovely already!

Flying Ghost (1)

Once you open up the tea bag you’ll be left with a long cylinder. To give it a spooky flair, draw a ghost face on the bag.

Flying Ghost (2)

Now set alight the top edge of the cylinder with a match.

Flying Ghost (4)

The flame will travel down the “ghost”, and when enough heat is trapped in the cylinder, he rises up and flies!

Flying Ghost (5)

Everyone in the room gasped and giggled at this one, from kids to grandparents.

Interestingly, we tried it with a different brand of tea bag on the final go, and it burned faster but didn’t fly as well – so if yours doesn’t work spectacularly at first, consider testing a few tea brands. This final try is the one I caught on video, though, so enjoy!