Pollinators for Every Flower

Pollinators (11).JPG

The final lesson plan for the Garden Party kit from Raddish Kids was a huge hit, since Travis loves bugs and everything about them. He was a whiz already at much of this topic, but enjoyed the hands-on and artistic aspects of it!

When he came to the table for our lesson, he was surprised to find a flower waiting.

Pollinators (1)

We explored the flower in detail, including: rolling the leaves between his fingers to see how that changed the texture; smelling it; feeling the fluffy petals; and looking closely with his eyes.

Pollinators (3)

As he explored the flower, I read to him from a provided chart about plant anatomy. Much of it was a bit over a preschooler’s head, so focus on the bits your child will grasp. He liked the rather astounding fact that while people and animals are either a man (male) or woman (female), a plant is both!

Pollinators (10)

Some pollen ended up on the table… the perfect segue-way!

Pollinators (2)

I asked him to name pollinators he knew and he quickly rattled off butterflies and bees. After some prompting, he also guessed birds. I told him he was correct, especially hummingbirds, and then named a few surprises: bats, beetles, and the wind!

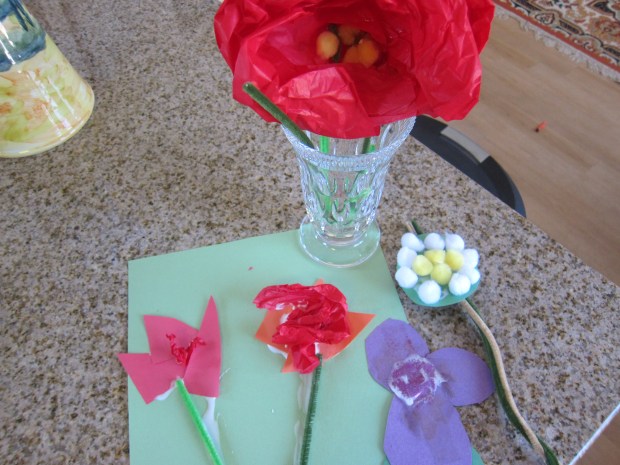
The next challenge was to pick a pollinator and make a flower with art supplies that was specific to that pollinator. First up was a bee! Thanks to the provided pollinator profile cards from Raddish, we learned that bees like flowers that smell sweet and in bright colors like yellow and purple.

Travis chose construction paper for this flower, and added glittery “pollen” in the center. To make it smell sweet, we dabbed a vanilla extract-scented pom pom around the petals. Travis loved this!

Pollinators (6)

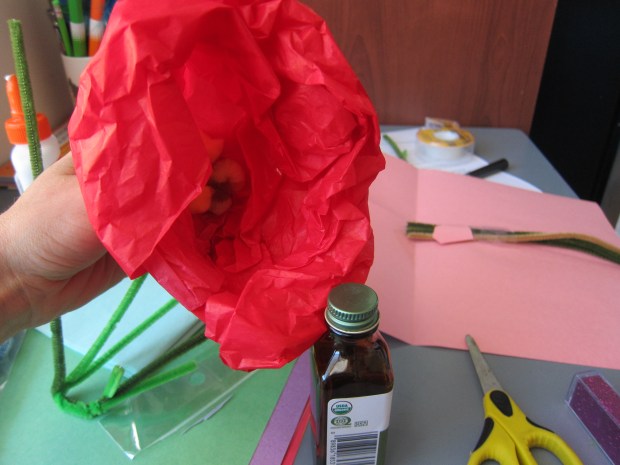
Next he wanted to make one for a hummingbird. Our card said the birds don’t land on the petals but instead dip in their beaks, so I helped him fashion a tube-shaped flower from tissue paper (we used red, since the birds like the bright colors). It was fun to add vanilla to the “pollen” pom poms in this one, too, even though the profile card said the birds had good vision but a poor sense of smell.

Pollinators (5)

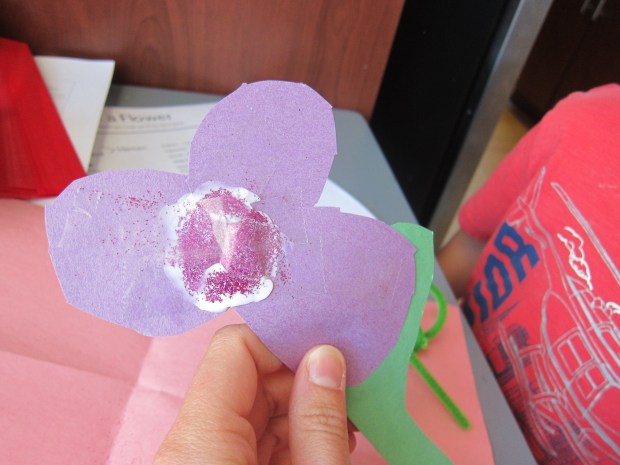
Travis next wanted beetles, delighting in the notes on the card that they like “unpleasant” smelling flowers or ones with no scent. We used white pom poms, since beetles prefer pale or dull colors, and added lots of yellow pollen in the center, which the beetle eats.

Pollinators (7)

He was so proud! I loved watching him think carefully about each pollinator, as well as use different materials each time.

Finally, he wanted a flower for butterflies! This one needed petals for the butterfly to rest on, bright reds and oranges, and no vanilla extract since the butterfly has good eyesight but a poor sense of smell.

Pollinators (9)

Overall, a fantastic lesson, with a little bit of art, a little bit of science, and important information about the role pollinators play in food crops thrown in there.

Advertisement

Jellybean J

Jellybean J (2)

Today’s letter of the day for tracing had an edible treat at the end – jellybeans!

Travis easily traced both upper case J and lower case j, and then I told him he was going to love our 3-D model today because it involved a favorite treat.

Place jellybeans on a sheet of parchment paper, and challenge your child to recreate the letter with the candies.

Jellybean J (1)

Travis didn’t even need to look at an example. I helped him make his dot a bit more precise…

Jellybean J (3)

…but then it was impishly gobbled up.

For the big J, I pulled out a few old winter scarves (how jolly!), and I asked him to make them into the upper case letter. This wasn’t as easy as the candy. He looked at me in amused confusion.

Jellybean J (4)

I helped him form one scarf into the hook. He still couldn’t quite see where the second should align…

Jellybean J (5)

Aha, now he saw how to cross it at the top.

Jellybean J (6)

As with the other letters we’ve tackled this summer, these hands-on models are fantastic for reinforcing the two-dimensional lesson of tracing on paper.

Take a Mini Break

Mini Break (1)

Today’s activity probably sounds like an easy one to most parents – but it’s the hardest kind for me! It challenged me to take a mini break, not only to help Veronika out as she enters the phase of separation anxiety, but also for me, the caregiver. We tend to forget to take care of ourselves, or quite simply don’t have the time to, but it’s important to remember to take a time-out every now and again.

So I stunned my husband announcing I’d be taking a ten minute break.

I waved bye bye to Veronika, who was playing on daddy’s lap. The goodbye is important here, instead of sneaking away.

Mini Break (6)

Then I shut the bedroom door, and this is the key; don’t be available for a full 10 minutes. Do something just for you. Here’s the chair where Veronika normally sits when I shower. It entertains her fantastically, but it also means I’m still “on” even during shower time, frequently singing ‘Wheels on the Bus’ from behind the curtain.  So wow, a baby-free shower!

Mini Break (3)

I had time to read a magazine and pen in a journal.

Mini Break (4)

Oh wow, this is almost relaxing. Are those my feet, up off the floor?

Mini Break (5)

I’m exaggerating somewhat, but you get the idea. That ten minute pause was amazing, and then I headed back out with renewed energy for my little one. And Veronika did great in the separation! If your spouse isn’t home, consider this activity with a grandparent or babysitter, and enjoy the pause.

Rainbow Breadcrumb Edible Sensory Tray

Rainbow Breadcrumb (9)

Aside from a simple bowl of cooked pasta, this was Veronika’s first sensory tray, and the first that I truly prepared for her. At this age, edible sensory trays are best, especially when you have a baby like Veronika who puts everything in the mouth.

The prep for this was so fun. Divide a loaf of bread into equal portions – as many portions as you want colors. You can make a full rainbow, but I stuck with the primary colors: red, yellow, and blue.

Rainbow Breadcrumb (1)

Place 1/3 of the bread in a food processor and process until you have coarse crumbs. Stir 2 to 3 drops of natural food coloring into 2 tablespoons non-dairy milk. Add to the food processor and pulse until the crumbs are coated.

Rainbow Breadcrumb (2)

Transfer to a plastic bag and let dry out. Repeat for your remaining colors.

Rainbow Breadcrumb (3)

Once the bread had mostly dried, I arranged it on a baking tray for Veronika, and sat her down on a blanket; we were prepared for a mess!

Rainbow Breadcrumb (4)

She knew what to do instantly.

Rainbow Breadcrumb (5)

Little hands pulled up big fistfuls of the crumbs.

Rainbow Breadcrumb (6)

They went right to her mouth, which was precisely the point, so I didn’t have to worry one bit.

Rainbow Breadcrumb (7)

I showed her how to run her hands through so that the colors mixed.

Rainbow Breadcrumb (10)

But mostly she was content to reach in, squish the mixture in her hands, have a nibble, and begin again. This one will keep your baby entertained for ages!

Rainbow Breadcrumb (8)