Fall Hair Gel Sun Catchers

Orange Leaf Bag (9)

I wanted to make a couple of orange sensory bags for Veronika this morning, with Halloween and autumn in full swing, only to realize I didn’t have any orange food coloring! I didn’t have yellow, either, which meant I couldn’t even mix red and yellow to make orange.

On a whim I decided to see if I could dye things the old-fashioned way (spices!) and there was orange turmeric in the spice rack. The result wasn’t perfect, but adding the spice turned out to be half the fun.

Orange Leaf Bag (1)

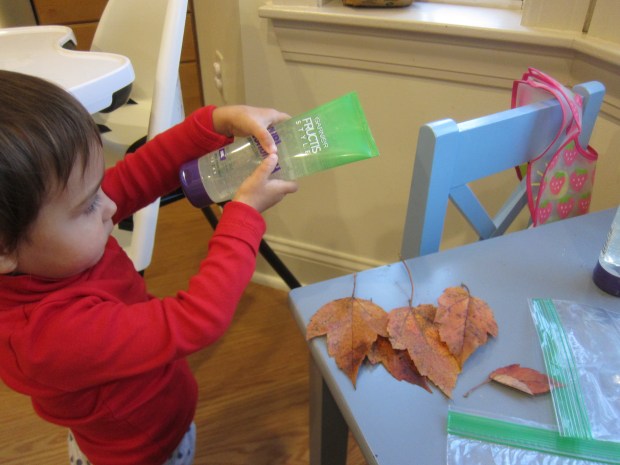
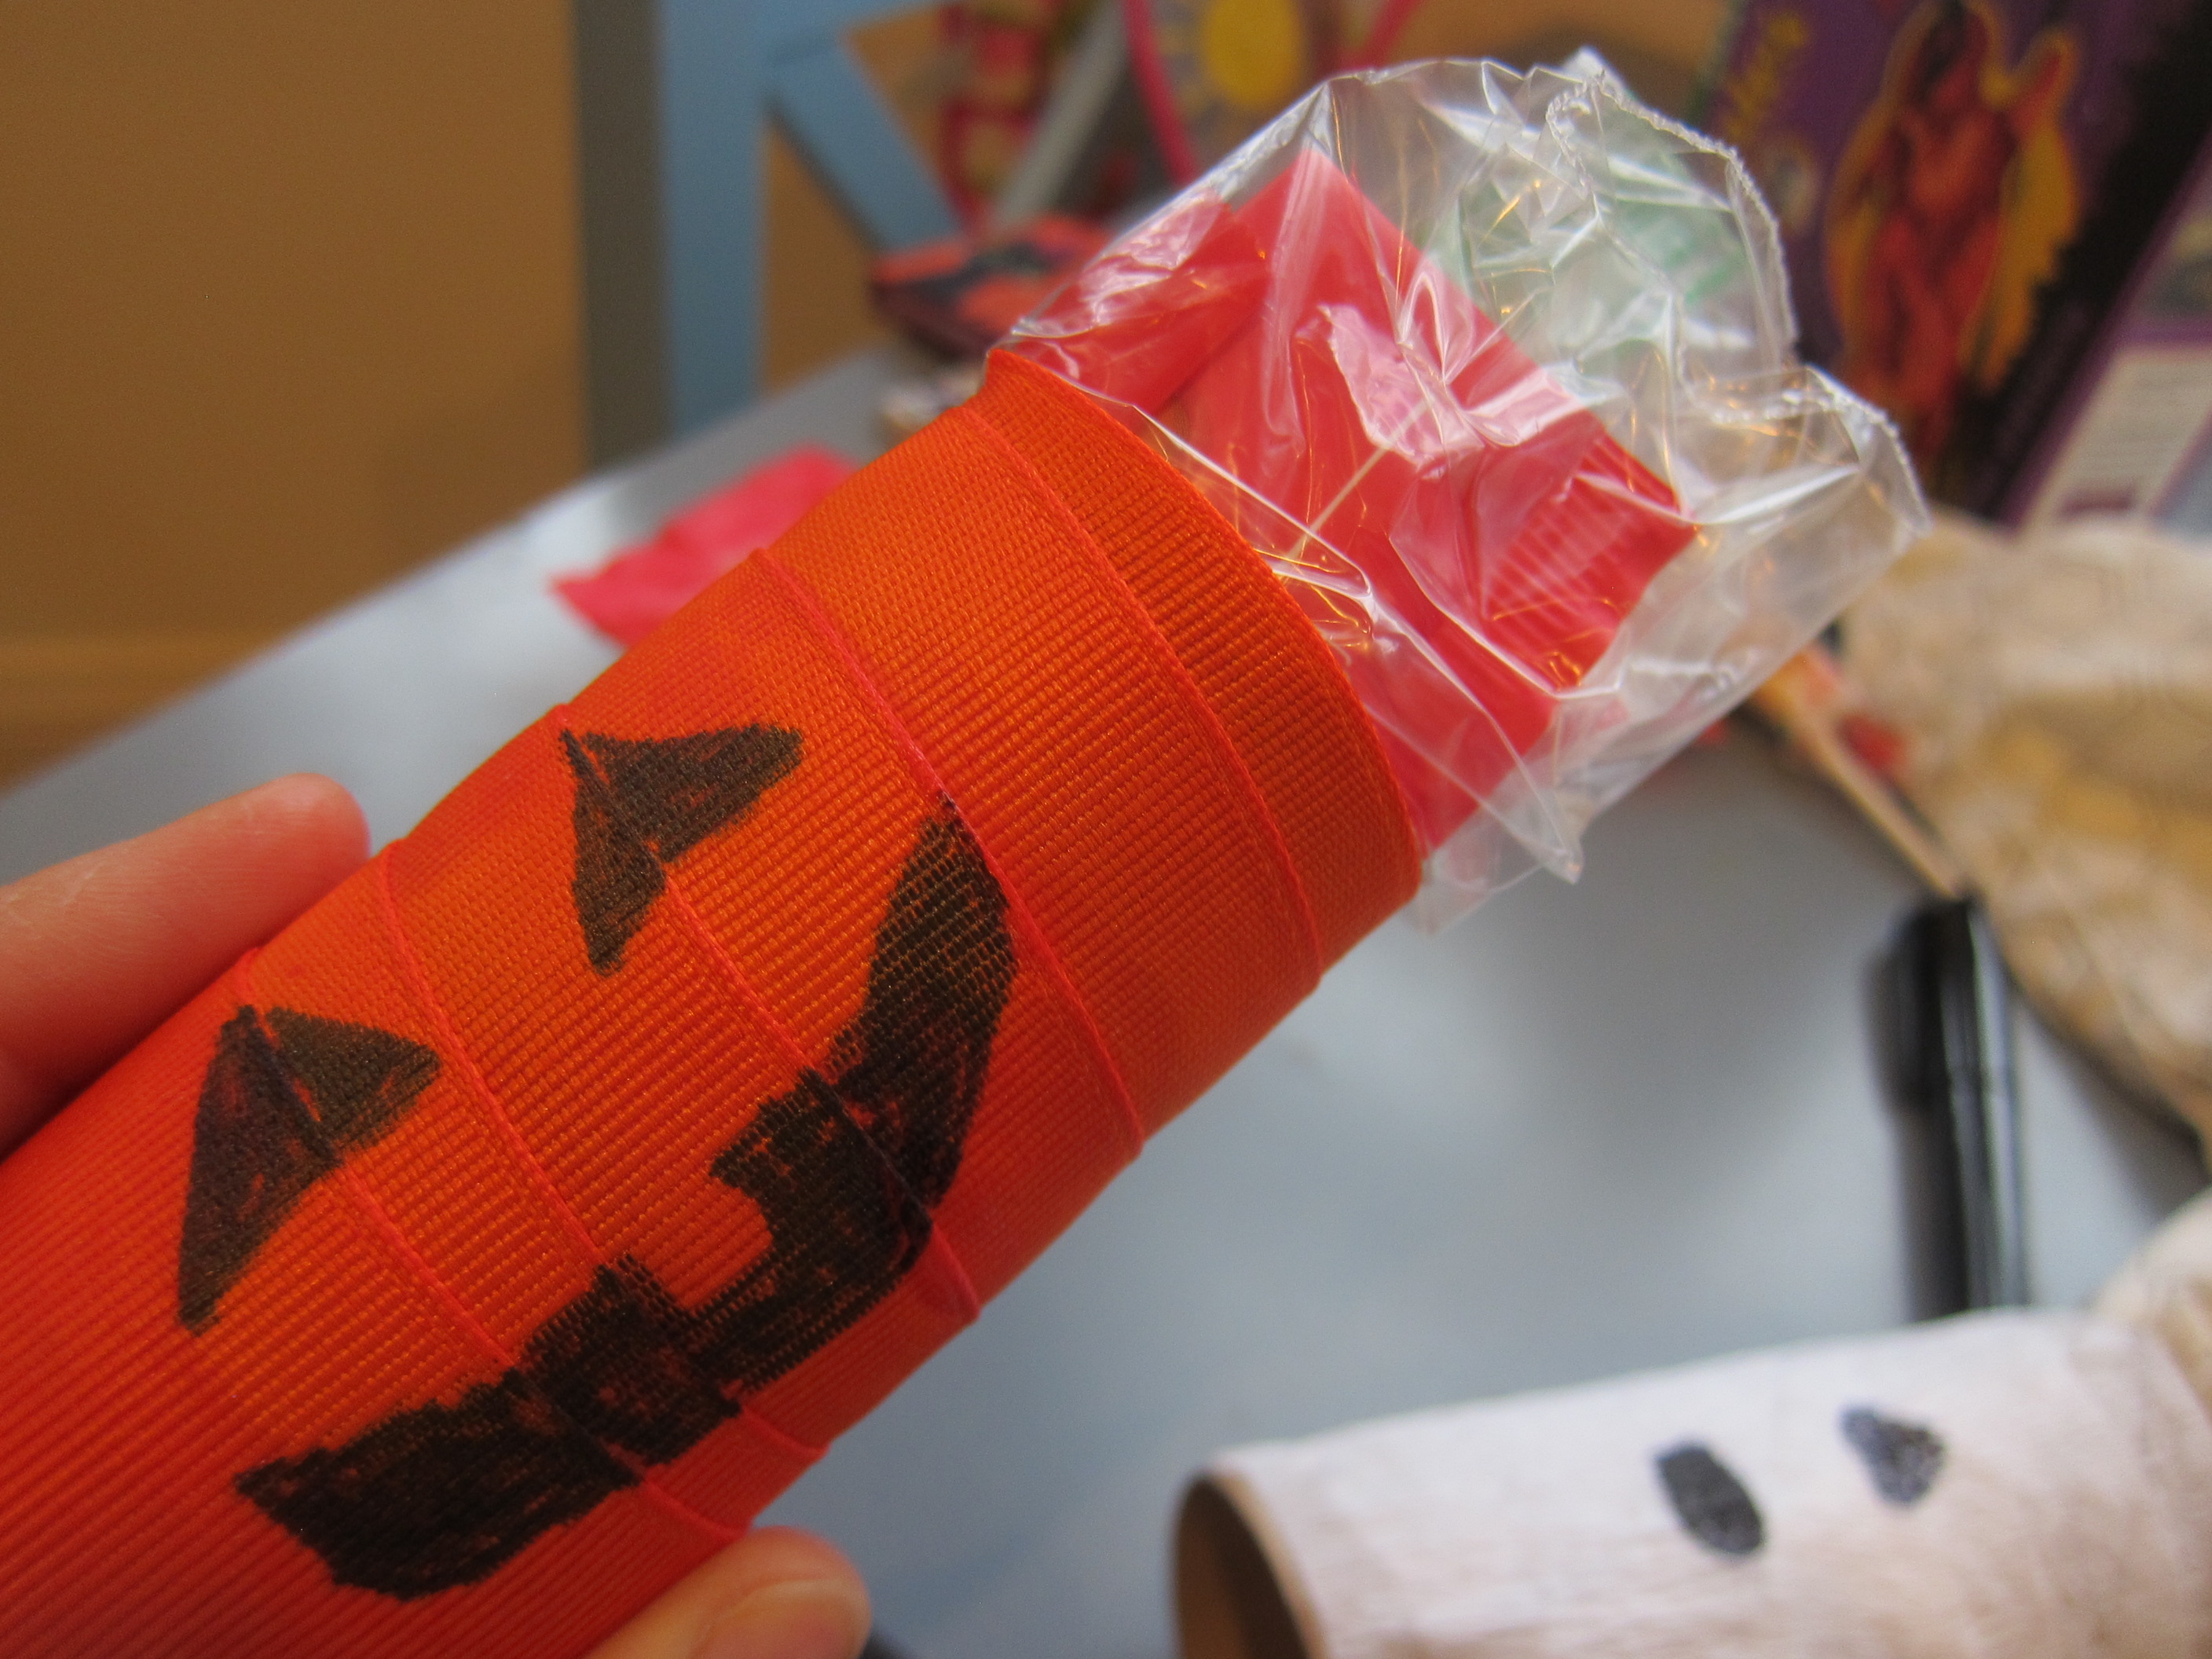
I squirted a generous amount of clear hair gel into each of two small zip-top bags to start. In the first, I added about a teaspoon of turmeric and mushed around until it was orange. Veronika loved the smell of the turmeric, and wanted to help measure out the spoonful!

Orange Leaf Bag (2)

Then I added orange leaves we’d brought home from the playground yesterday. The turmeric did make the bag slightly cloudy and hard to see the leaves, but it worked fine if in direct sunlight.

Orange Leaf Bag (3)

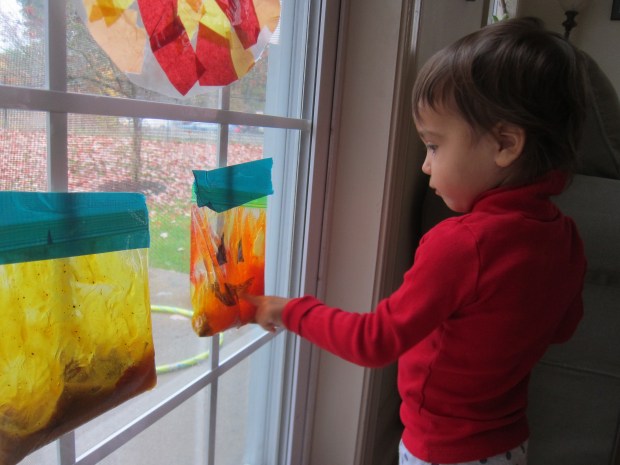
For the second version, I drew jack o’ lantern features directly on the plastic bag with a black sharpie. Again I added 1 teaspoon turmeric, along with 1 drop of red food coloring. This made a great orange!

Orange Leaf Bag (6)

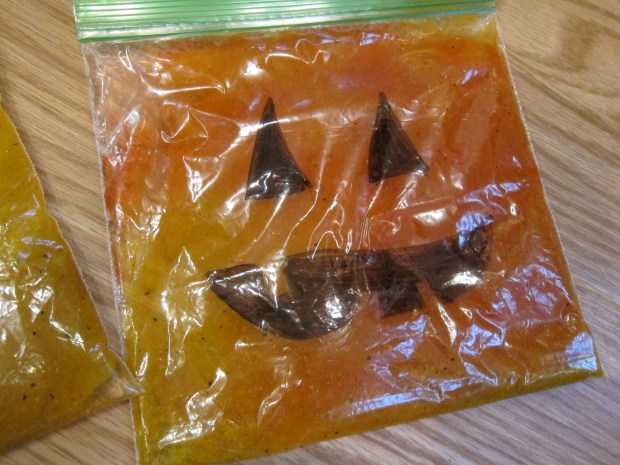
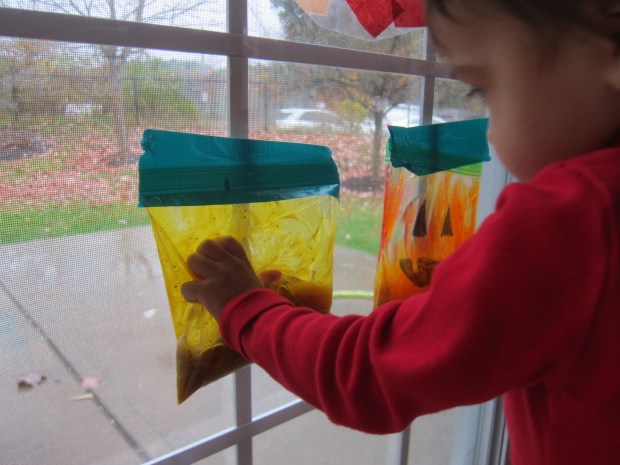
Because the black features were on the outside, the graininess of the spice didn’t matter this time. Veronika loved playing with this squishy bag where I taped it against the window.

Orange Leaf Bag (8)

These turned out to be so fun, and spot-on for the season, too.

Orange Leaf Bag (7)

Spooky Treat Holders

Halloween Treat Bags (5)

These easy treat containers are a great way to hand out Halloween candy this year without kids reaching into a communal bowl. Make a few or a lot, and leave on a patio or table where kids can easily take a single serving. They’re a fun alternative to a standard treat bag.

To assemble, first wrap empty toilet paper tubes in crepe paper or ribbon. I made one version with orange ribbon and another with white crepe paper. Other fun ideas include: green (for Frankenstein!), blue (for silly monsters!), black (for bats!) or even tricolor white-orange-yellow for candy corn.

Halloween Treat Bags (1)

As you wrap, you’ll need to work carefully, wrapping one side of the paper or ribbon and then applying glue before wrapping the next section. Wrap, glue, wrap, glue, repeat until the tube is completely covered.

Now add details with pieces of cut construction paper or marker. For example, add wiggle eyes to the blue monster, if you’ve used blue crepe paper or ribbon. Our orange ones became pumpkins and white became ghosts.

Halloween Treat Bags (3)

You can then use either cellophane treat bags or regular zip-top bags to stuff candy inside. I filled baggies with a few treats (make sure the stuffed bag is narrow enough to fit inside the tube), and insert into your spooky creations.

Halloween Treat Bags (4)

We’re ready for contact-free trick-or-treaters!

Halloween Countdown Day 27: Doll Trick-or-Treat

Halloween 27 Doll Trick or Treat (2)

The kids won’t actually be knocking on doors and shouting out “trick-or-treat!” this year, so I wanted a way for them to at least simulate the fun. An easy alternative? Have all the dolls in your house stage a practice round before the big day!

This was a fun way to show Veronika, especially, what the holiday normally looks like since she’s too young to remember last year. We used a pack of Smarties (the perfect doll-sized treat) and sprinkled a few behind the door of her dollhouse.

Halloween 27 Doll Trick or Treat (4)

The kids were having so much fun with the charade that we set up a whole neighborhood. Soon there was a castle and a stable in town, with treats behind each door. Knock knock!

Halloween 27 Doll Trick or Treat (3)

I loved watching the kids play this simple game together as our countdown nears the grand finale.

Halloween 27 Doll Trick or Treat (5)

Halloween Countdown Day 26: Pumpkin Power

Pumpkin Power (7)

It turns out that October 26 is Pumpkin Day, as if the gourd needs one specific day in a month that seems to be all about it! But we took the opportunity to test an unappreciated ability of pumpkins: to generate electricity!

Pumpkin Power (1)

Much like those old potato or lemon experiments, you can hook up two pumpkins to make a clock run or an LED light turn on.

I originally tried to follow online instructions, but had to maneuver things a little differently to line up with the particular items that came in a fruit-battery kit we purchased. The set-up looks like this: lnsert a cooper strip and a zinc strip into each of 2 small pumpkins.

Pumpkin Power (2)

Use an alligator clip wire to attach the copper strip from one pumpkin to the zinc strip from the second pumpkin.

Now, use a second wire with alligator clip to attach the zinc strip from the first pumpkin to the negative node of either a multimeter, clock, or LED light.

Use a third wire with alligator clip to attach the copper strip from the second pumpkin to the positive node of the multimeter, clock, or LED light. Hopefully the photos in this post make all that clearer!

Pumpkin Power (3)

Your circuit should be complete.

Pumpkin Power (6)

Travis was wowed watching our clock blink on. At one point we left it running for over an hour.

Pumpkin Power (4)

Why does this work? Pumpkin flesh has acid (though not as much as lemons), which means the zinc strip will start to lose electron ions. Those ions travel over to copper, which generates electricity.

Pumpkin Power (5)

Now that’s pumpkin power!

Chick’n Nacho Box

Chicken Nacho Box (5)

This is a fun bento box-style lunch to put together for kids. The homemade chips are fun, but you can skip that step and use store-bought tortilla chips to save time.

Chicken Nacho Box (4)

Ingredients:

  • 6-inch corn tortillas
  • Cooking spray
  • 1 (9-ounce) package Gardein chick’n strips
  • 1/4 cup non-dairy sour cream
  • 2 teaspoons fresh-squeezed lime juice
  • 1/4 teaspoon chili powder
  • 1/4 teaspoon cumin
  • 1/2 cup frozen yellow corn, thawed
  • 2 tablespoon chopped fresh cilantro
  • Shredded non-dairy cheddar
  • Store-bought salsa
  • Store-bought guacamole
  1. To prepare the chips, use a 3-inch cookie cutter to make circles from the tortillas until you have the desired amount of chips.
  2. Turn a mini muffin tin upside down and coat with cooking spray. Nestle each tortilla circle in the space between muffin cups, to form tiny bowl shapes. Coat with cooking spray and bake at 375 degrees F for 10 minutes. Let cool.
  3. Meanwhile cook the chick’n according to package directions. Chop and set aside.
  4. In a bowl, whisk together the sour cream, lime juice, chili powder, and cumin. Add the chick’n, corn, and cilantro, stirring to coat.
  5. To serve, place the chick’n mixture alongside the tortilla chip cups with your favorite vegan cheddar, salsa, and guac on the side!

Chicken Nacho Box (6)

Harvest Word Games

Harvest Word Games (7)

To finish the fun with Travis’s Harvest Party Raddish Kids, it was time for harvest party games! These were fun to play just with our family, but would also be the perfect games if you’re able to safely social distance with extended family. Perhaps over a tractor harvest-themed party?

First up was Autumn Doodles. Shuffle a pile of harvest word cards. (Note: Raddish provided these, but you could also make your own.

Harvest Word Games (1)

Write an autumn word or phrase on each slip of paper, such as “apple picking” or “hay ride”).

Harvest Word Games (4)

Select a card (we got “scarecrow”) and everyone in the family then draws their interpretation! We simply had fun laughing and checking out each other’s different takes on the same topic. Older kids might want to make it a competition, in which case you can appoint a judge who picks the “best” drawing.

Harvest Word Games (3)

Next up: Fall Danger! One player picks a card and then has to describe that harvest word, but can’t say three danger words listed below it (e.g. for “apple cider” you couldn’t say “juice” “drink” or “fruit”). This one was a little hard for Travis to grasp, but he caught on after his dad and I demonstrated a few rounds! If you’re playing with a larger crowd, make teams.

Harvest Word Games (5)

You won’t be able to play the final game with anyone outside of your COVID-19 bubble since this one does involve leaning in close, but get ready for… Farmer’s Telephone!

Harvest Word Games (2)

This one had us roaring with laughter. For example, “I like the smell in the kitchen when I’m baking a pie” turned into “I like the smell of witches while they’re drinking rye” turned into “I like smelly witches!”

Harvest Word Games (6)

Halloween Countdown Day 25: Spider Countdown

Halloween 25 Spider Web Countdown (5)

We’re one week away from Halloween, and it was time for a countdown-within-our-countdown! With only a few days left, I had to up the ante on the anticipation for the kids.

I had originally planned to hang plastic spiders on a large piece of black felt for this activity, adhering them with Velcro sticky dots. But I couldn’t find a large enough piece of black felt, so had to improvise a bit.

I painted a piece of poster board black, then added Velcro dots (and some hot glue for extra security) to attach white yarn in the shape of a spider web.

Halloween 25 Spider Web Countdown (3)T

o make the “spiders”, first fill plastic Easter eggs with a few small candies (we love Giggles, an organic alternative to Skittles), or other Halloween trinkets, then close tightly.

Halloween 25 Spider Web Countdown (2)

Use hot glue to add pipe cleaner legs and a Velcro dot to the back of each spider.

Halloween 25 Spider Web Countdown (8)

Add the other halves of the Velcro dots to your poster board (or felt, if using) and then stick on the spiders. Now mark each spider with dots in permanent black marker. The first spider gets one dot, the second gets two, and so on up to seven.

Halloween 25 Spider Web Countdown (6)

In the morning, the kids came down and discovered this web of delights. I asked Travis to find the spider with only one dot, which he then proudly pulled off and opened up for a surprise.

Halloween 25 Spider Web Countdown (7)

Needless to say, candy before breakfast meant happy kids.

Halloween 25 Spider Web Countdown (9)

Tomorrow they’ll move on to spider #2. This should tide them over until the big day!

Halloween 25 Spider Web Countdown (10)

Second Birthday Party: Tractor Harvest

2nd Birthday (3)

Veronika is obsessed with tractors, and since her birthday is in the fall, it was a natural fit to tie the vehicle in with a farm theme for the autumn harvest.

This party was very different departure from others I’ve planned, since it was the first time an event took place off site, followed by the party finale back at home.

But as always things start with the invite! I ordered a classic green-and-yellow tractor design (from Amazon) to fill guests in on the deets.

2nd Birthday (20)

The birthday girl got a tractor dress to fit the theme (Etsy), and was so thrilled when I pulled it out on party day. “It’s cozy!” she told me.

2nd Birthday (9)

The rest of us didn’t want to overdo it on the tractor theme, but plaid prints seemed appropriate for farmers and harvest time.

Onto the decor! Yellow and green balloons matched with a set of party ware (also Amazon) including plates, napkins, paper cups, and cutlery.

2nd Birthday (3)

Outside, where the two-year-old guests would be playing, we set up a mini farm! Small straw hay bales (from Party City) were topped with our farm and tractor toys.

2nd Birthday (1)

Don’t forget a few seasonal pumpkins. A vinyl tablecloth underneath meant cleanup of all that straw was, well, a piece of cake.

2nd Birthday (2)

I kept food primarily to single-serve noshes to keep the party safe in the era of COVID-19.

2nd Birthday (7)

Packets of Cape Cod trial mix, applesauce pouches, and clementines (which looked like mini pumpkins), all fit the harvest feel, as well as veggie chips in a trio of harvest colors: orange, yellow, and green.

2nd Birthday (6)

Even the cake featured veggies from the earth: Carrot cake perfectly fit the bill.

Happy Birthday Carrot Cake (6)

Before all of that, though, our guests gathered at a local farm for a behind-the-scenes tour. Including of course, tractors!

2nd Birthday (11)

Then it was back to our patio for cake and socially-distanced play outside. Entertain big kids with pumpkin bowling while the little ones play with the farm toys. If you want to organize a toddler circle time, sing classics like Old Macdonald Had a Farm or Baa, Baa, Black Sheep.

2nd Birthday (18)

Favors were very simple: mini bottles of farm animal bubbles to take home!

2nd Birthday (8)

Needless to say, this party girl had fun on the farm.

2nd Birthday (19)

Party Tablecloth

Party Tablecloth (3)

This is an easy and fun way to get even a toddler involved with the decoration for his or her own birthday party. Set out a long piece of craft paper, along with coloring supplies, stamps, or stickers, and let the fun begin!

Veronika loved the ink pad and tractor stamp I handed over in anticipation of her tractor-themed party. She dotted it all over the paper, with a little mommy help to make sure the ink prints were dark enough for guests to see.

Party Tablecloth (2)

Then she wanted to use markers. I gave her green and yellow since these were the party theme colors, although she asked for blue, too!

Party Tablecloth (1)

If you have stickers or even images cut from magazines that fit your child’s birthday theme, add those, too. It was the perfect homemade touch to the decor for her second birthday party! We even got half of a little footprint in red ink, making it a neat keepsake

Party Tablecloth (4)

Happy Birthday Carrot Cake with Cream Cheese Frosting

Happy Birthday Carrot Cake (7)

Everyone will love this carrot cake: Parents will love that all the sweetness comes from pineapples and maple syrup; birthday boys and girls will love that it tastes great! It’s perfect for toddler parties, in sum.

Ingredients:

For the cake:

  • 1 and 1/2 cups flour
  • 1/2 cup oat flour
  • 2 and 1/2 teaspoons baking powder, divided
  • 1 teaspoon baking soda
  • 1/4 teaspoon salt
  • 1 cup canned crushed pineapple
  • 1/4 cup Earth Balance butter, softened
  • 1/2 cup maple syrup
  • 1 teaspoon vanilla extract
  • 1 cup grated carrot

For the cream cheese frosting:

  • 1 cup non-dairy cream cheese
  • 1/3 cup canned crushed pineapple
  • 2 tablespoons apple juice
  1. To prepare the cake, combine the flour, oat flour, 2 teaspoons baking powder, baking soda, and salt in a bowl. Set aside.
  2. In a large bowl, combine the remaining 1/2 teaspoon baking powder with 1 cup crushed pineapple. Add the Earth Balance butter, maple syrup, and vanilla extract, stirring until combined.
  3. Add the dry ingredients to the wet ingredients, stirring until wet. Mix in the grated carrots.
  4. Spoon the batter into a lightly-oiled round cake pan and bake at 350 degrees F for 45 minutes, or until a toothpick inserted in the center comes out clean. Cool on a wire rack.
  5. To prepare the frosting, combine the cream cheese, 1/2 cup pineapple and apple juice in a stand mixer; beat until combined.
  6. Spread the frosting evenly over the cooled cake.

Happy Birthday Carrot Cake (3)

The birthday girl loved watching this bake in the oven.

Happy Birthday Carrot Cake (2)

The best kind of anticipation!

Happy Birthday Carrot Cake (8)