Dinner Games with Baby

Dinner Guest (3)

Dinnertime doesn’t have to be difficult with a baby… Just strategic! Here are two simple ideas that I have found helpful in keeping Veronika entertained, both during meal prep and during the meal itself.

If you’re cooking for grown-ups or older siblings, that’s the perfect time to park your baby in the high chair. Right around 20 minutes before mealtime, Veronika gets fussy. Once she’s seated, she can enjoy watching the action while I narrate her through the cooking motions. Better yet, I make her my taste tester!

Taste Test (3)

Thanks to Baby Led Weaning, I’m not afraid to offer Veronika foods that aren’t “baby foods.” She can handle soft-cooked pasta pieces as I prepare a larger batch.

Taste Test (1)

Or I scatter about a few pieces of breakfast cereal (or try those very popular puffs). Veronika loves being my “tester” as I prep around her!

Taste Test (2)

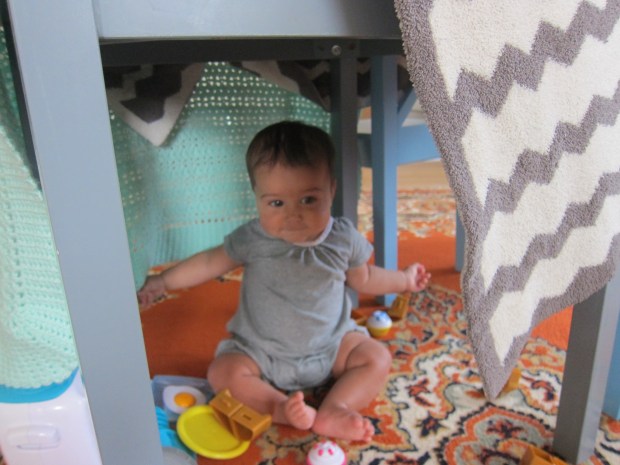
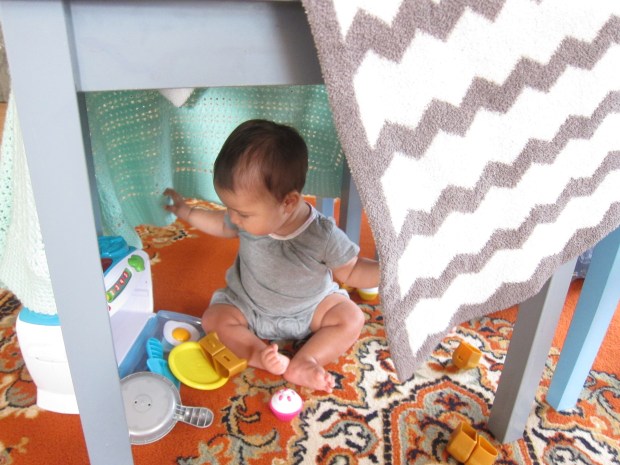
When it’s time to eat, we invite a friend to dinner. Bring along a toy that’s easily wiped clean, and make it a special dinner guest.

Dinner Guest (5)

The first time we played this game, I showed Veronika how to “feed” the toy.

Dinner Guest (6)

Pretty soon she was cutely mimicking the motion!

Dinner Guest (9)

She loved having the company, and when she grew bored of the food, she could play with the toy!

Dinner Guest (7)

This is a great way to give yourself or big kids time to finish the meal before having to whisk baby off for a cleaning.

Dinner Guest (8)

How do you entertain baby in the kitchen? Please share in the comments!

Dinner Guest (10)


Easy E

Easy E (5)

For lack of a better title, today Travis and I made Es with two easy materials (straws and string)… But it turns out they were quite tricky to master!

First we traced big E and little e, and then I presented him with 4 straws; 3 were short, and 1 was long.

Easy E (1)

At first, he added the short straws to the long one in a rather slapdash way.

Easy E (2)

He traces E this way sometimes, too, so I challenged him to look closer at the E in his tracing book. Aha! One short line comes from the top, one from the bottom, and one from the middle.

Easy E (3)

Making little e with another easy material (string) was even harder. He got frustrated figuring out how to twist it in just the right way, until I provided direction.

Easy E (4)

What material would you make an E? Please share in the comments!

Simon Says Alphabet

Simon Says (1)

Here’s a fun twist on ‘Simon Says’ that will reinforce letter recognition as well as promote direction-taking. The perfect game, in other words, to help prevent a summer slide before Kindergarten.

I laid out alphabet flash cards using only the lower case letters, so as not to make things confusing. If you have older players, you could hypothetically include capitals and lower case.

Simon Says (2)

“Simon” began giving Travis directions .Put your toe on ‘w’, put your thumb on ‘e’.

Simon Says (3)

Turn over the ‘h’ card.

Simon Says (4)

Whoops! I didn’t say ‘Simon Says’, and Travis laughed about being tricked.

Simon Says (5)

Now he was the Simon and he loved getting to be the boss and give mommy directions. Simon Says put your toe on ‘p’!

Simon Says (7)

He was gleeful when I did a direction that omitted the ‘Simon Says’, and immediately wanted more rounds. We’ll be playing this one all summer!

Simon Says (8)

Jell-o Sensory Activity

Jello Sensory (5).JPGThis twist on jell-o play will be a delight for any baby around 7 months old! Not only are babies at this age making their first forays into finger-feeding themselves, but any activities involving texture are a hit. Add a prize to dig for and an edible medium, and you pretty much have the prefect game.

First I made jell-o with our favorite vegan brand, Simply Delish’s jel desserts. Big brother Travis picked the flavor – strawberry!

Pour the jell-o over soft toys in Tupperware containers (make sure all are large enough not to pose a choking hazard).

Jello Sensory (1)

I thought large containers would be easier, but the toys popped up to the surface! Instead, it was easier to “trap” them in small containers.

Jello Sensory (2)

You can also wait for the dessert to set slightly, then push the toy down inside.

I presented Veronika with the Tupperware and the task to dig up the toy treasure. Of course at first she was just fascinated with the container and lid!

Jello Sensory (3)

Then she became aware of the items buried inside. Little fingers began digging. Once the toys were out, it was straight to her mouth. Yum, it tastes like strawberry!

Jello Sensory (6)

Now she wanted more of what was in the bowl. After feeling around…

Jello Sensory (7)

…the dessert plopped out into her lap.

Jello Sensory (8)

I rescued her from this and now it was fun to squish around on the tray. Soon she had big fistfuls going right up to her lips.

Jello Sensory (10)

Basically this was messy and perfect fun.

Q-Tip Painting

Q Tip Paint (6).JPG

Sometimes it seemed like every other project Travis brought home from pre-k involved dot markers; teachers sure do love this art medium! This craft is almost like a homemade version, but will help with precision and letter tracing.

I wrote Travis’s name all in capital letters on construction paper and set out bowls of paint and q-tips.

Q Tip Paint (1)

He thought the idea of “homemade” dot markers was so neat! At first he intended to smear along the lines of the letters, but when I showed him how to dot the q-tip, he quickly took to it. I had imagined he’d dot at intervals, but he wanted his dots right up against each other so no line showed through.

Q Tip Paint (2)

This activity is nice reinforcement if your child already knows how to spell his or her name. Because he had to move slowly through each letter, Travis noticed that an upper case R starts out looking like a P, until you add the last diagonal line. What a way to notice the building blocks!

Q Tip Paint (3)

He wasn’t satisfied until he’d added the last dot.

Q Tip Paint (4)

And loved mixing up the colors, too.

Q Tip Paint (5)

Off-Peak Play

Off Peak Play (3)

Grown-ups like off-peak prices on train tickets, and babies like off-peak hours at indoor  play spaces… but which I mean, going when it’s not too crowded! If you’ve been curious about checking out such a place with your baby, I highly recommend going when you know it won’t be packed (hint: lunchtime, when everyone else makes an exodus home).

To wit, we showed up at a play space today when it was quite crowded (whoops, I should have known, on a rainy day!). Veronika seemed tentative as she tried out a few baby toys on the soft mats…

Off Peak Play (1)

and the ball play area…

Off Peak Play (5)

and soft blocks to build with.

Off Peak Play (4)

Once the space cleared out, I saw her whole body loosen up. Suddenly her movements were bigger, her expressions happier, and the “ga ga gas” began in earnest.

Off Peak Play (9)

Now she loved baby toys!

Off Peak Play (2)

And balls!

Off Peak Play (6)

And soft blocks!

Off Peak Play (11)

I loved watching her and brother in the soft block space! If there is a ball pit, dangle your baby in gently and swish him or her around, for a gentle introduction.

Off Peak Play (10)

Do you have a favorite local indoor play space? Please share in the comments!

Off Peak Play (8)

Simple Shower

Simple Shower (7)

This is a quick and easy DIY activity that will help teach your baby about cause and effect – and make for a great bath toy!

Use a leftover container from the grocery store that has an easily-pierceable lid: think non-dairy cream cheese or cottage cheese (if your family eats dairy).

SImple Shower (1)

Use a small screwdriver or metal skewer to pierce holes through the lid. It helped to twist the screwdriver a bit to make the holes wide enough.

SImple Shower (2)

Fill the container about half way with water and add the lid. Invert over your baby in the tub, and watch the water shower down!

Simple Shower (4)

Veronika looked up in wonder – and of course tried to reach for it.

Simple Shower (5)

I had to give the container a little squeeze for the water to come out, which was nice since I could control the speed. Drizzle the little shower of water over your little one’s tummy or hands, and then encourage him or her to take the container and continue the fun!

Simple Shower (8)

Once in her hands, she was more interested in the container itself than in making it “rain,” but one way or another, it made for a fun bath.

Simple Shower (6)

Design a D

Design D (6)

Our summer letter of the day for tracing and writing was D. Travis doesn’t struggle with the upper case, but still sometimes confuses his little d with little b. Working slowly through a worksheet helped him focus on which direction the line and circle needed to go.

To think about it spatially, we then designed D in two ways. First I gave him a pencil and string; could he make an upper case D?

Design D (1)

At first he was confused, but kept a good attitude about it!

Design D (2)

I helped him make the loop of the D with the string. Now could he see where the pencil needed to go?

Design D (3)

Tada!

Design D (4)

Next we made a lower case d with our hands. He remembered cupping his hand into a c from yesterday, which worked the same for the loop, here. His other hand went straight against it, for a delightful d!

Design D (5)

Create Your Baby’s First Fort

First Fort (8)

Forts are such an iconic part of childhood – and it was about time to introduce Veronika to her first!

First Fort (1)

To make a cozy, baby-sized version, use a children’s table as the top of the fort. I draped it with blankets, and set her gently underneath. Her eyes went wide and she took to it right away!

First Fort (4)

Everything was fascinating, from the texture of the blanket “walls”, to the way the light came through the blankets, to the legs of the table.

First Fort (3)

Big brother needed to join, of course!

First Fort (7)

If there are no siblings in the house, consider inviting in a stuffed animal friend or two.

If you need an activity inside your fort, what’s better than a tea party or picnic? We added pretend food and invited Veronika to the “party.”

First Fort (6)

Cupcakes fore everyone! She was delighted with the play scenario going on around her, and the fun only ended when we needed the table for the next meal!

First Fort (5)


Garden Games

Garden Games (14)

A trip to a local botanical garden had us playing garden games in two ways today. First up: a scavenger hunt! The printable Garden Bingo card from Raddish Kids gave purpose to our walk along the paths and past the beautiful blooms.

Garden Games (1)

Some items we spotted right away (grass, flowers, leaves, hoses).

Garden Games (2)

Others we really had to look for, like sprinklers:

Garden Games (10)

And wheelbarrows:

Garden Games (9)

Travis got down low to spot clover:

Garden Games (5)

And dug in the dirt for worms!

Garden Games (8)

I was amazed when he spotted a rollie poly bug crossing the gravel path. I thought for sure that one would go unmarked on our sheet.

Garden Games (4)

Travis loved the hunt; near the end we had four boxes crossed off in multiple directions, but no actual Bingo. Then a watering can sealed the deal!

Garden Games (13)

Meanwhile, midway through our hunt we paused to play Bug Detective. I challenged Travis to pick an insect and observe it in close detail. He found a big fat wood ant and stopped to watch.

Garden Games (6)

We kept it in our bug jar for a short time, but then released it.

Garden Games (7)

Travis watched the ant scurry about. We hoped it would pick something up, but never did.

Later, Travis drew the ant, working from memory to make the three parts of the body and the legs. He added an arrow for the direction the ant had gone, as well as the grass it had been crawling through.

Garden Games (11)

Both of these activities really had Travis thinking about nature in new ways, and challenged him to see the garden on the macro and micro levels. What fun!

Garden Games (12)