Cotton Ball C

Chalk c (4)

Today Travis practiced tracing C – an easy one! – but after the tracing, I challenged his dexterity to form a C in three ways.

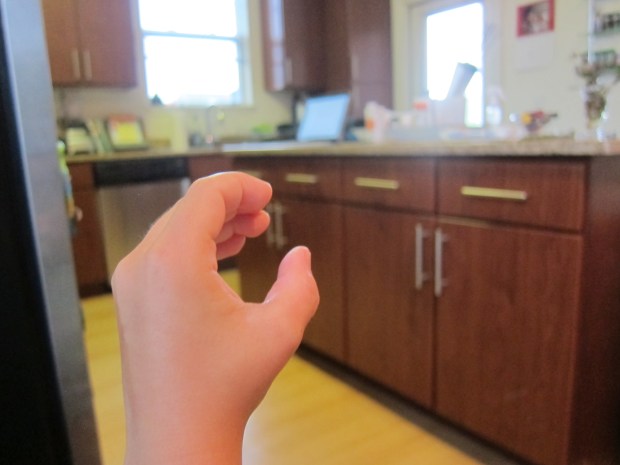
First, have your child cup their hand (make sure to use the left) to form the letter. Travis had to think hard about this, but was so proud when he got it right!

Chalk c (1)

Next we headed outside to draw c’s with chalk. This was a great chance to make sure his form was correct, since there was no line for him to trace outdoors!

Chalk c (2)

I noticed that his C’s were a little short, and encouraged him to extend the line for a curvier final result.

Chalk c (3)

Finally, back inside, I drew a C for him on construction paper and we filled it with cotton balls.

Chalk c (5)

Travis wanted to do his own glue, following perfectly along the line I’d drawn.

Chalk c (6)

And he was completely in charge of placing each cotton ball, too! Again, what a difference in dexterity and patience.

Chalk c (7)

Button B

Button b (6)

Today’s summer letter of the day was B! After tracing, I helped Travis draw two very careful Bs using white crayon on black paper (a fun chance to use white, sadly always the most underutilized crayon in the box).

Button b (2)

Travis made dots of glue on each B, and filled the upper case with buttons

Button b (3)

…and the lower case with breakfast cereal.

Button b (5)

He was so careful applying each piece along the lines; I sat back and marveled at how his fine motor skills (and patience!) have changed over the course of pre-k.

Button b (4)

Even better, he enjoyed the button art so much that he asked for a second piece of paper and a glue stick to continue the fun once our Bs were complete – what could be better than that? If you don’t have buttons, beads would also work great for this project.

Button b (7)

Aluminum A

Aluminum a (4)

Travis is a pre-k grad, and although we intend to have lots of fun this summer, I also want him to avoid the “summer slide.” To keep him fresh, we’ll be working on the alphabet. This took me back to our journey through the alphabet when he was a toddler! But now the emphasis is different; he knows his letters and phonemes, but needs to work on the fine motor skills of tracing and writing.

After tracing the letter A, both upper and lower case, we designed one from a material that started with a – aluminum foil.

I showed Travis how to roll a sheet of foil into a coiled rope – fun!

Aluminum a (2)

We looked at the “a” in his workbook, and he thought hard about how to shape his foil. For the majority of it, we twisted one coil until it made a circle.

Aluminum a (1)

The second, shorter coil would be the line on the end. Travis has a habit of putting this line closer to the middle of the a’s bottom, but this “close reading” helped him pinpoint that it should go on the side.

Aluminum a (3)

Next we made an Artistic upper case A, using a favorite art medium: crayons.

I presented him with three crayons – two long and one short – and challenged him to decide which should go where.

Aluminum a (6)

After initially making what looked more like an H, he was quite proud when he tilted the two long crayons to make an A.

Aluminum a (7)

One down, 25 to go!

Aluminum a (8)

Dine on Roasted Finger-Foods

Dine Roasted (2)

I mentioned previously that Veronika has little interest in purees, and refuses to be spoon-fed. It’s been finger-foods and Baby Led Weaning for this little girl! I’ve had to completely rethink how to introduce food, compared to when Travis was little, but such parenting curve-balls are a great chance to learn something new.

I’m planning to post a round-up of her favorite recipes soon, but here’s a quick, adaptable recipe that works with almost any veggie. Tonight I used:

  • 1 zucchini
  • 1 turnip, peeled
  • 1 parsnip, peeled
  • 1 carrot, peeled

Cut all of the veggies into 2-inch sticks. The carrot sticks especially should be long and thin, so they pose no choking hazard.

Dine Roasted (1)

Toss the veggies with 1 tablespoon olive oil in a baking dish. Roast at 425 degrees F for 25 minutes.

Transfer to paper towels to drain the excess oil and cool completely before serving.

Veronika loved choosing among the colors in this dinner veggie medley!

Dine Roasted (3)

Walk-and-Spot Game

Walk and Spot (4)

Aaah, those summer walks in the park or the woods. It seems like the perfect family pastime… until the kids tire out, amiright? Here’s the perfect new game to play if you need to motivate your kids through the miles!

One person is the spotter, and picks an item a little ways away without revealing what it is. The spotter tells the other players the color of the item, and then begins beeping.

Beep slowly when the item is far away. Beep faster as you get closer. Whoever guesses correctly is the next spotter. Well, Travis took to it right away! First he got us with this yellow sign.

Walk and Spot (1)

Then it was mommy’s turn – an orange cone!

Walk and Spot (2)

Don’t overlook little items, like purple flowers.

Walk and Spot (3)

Daddy picked something green. Hmmm, what could it be? Beep beep beep. The green bench! Travis guessed.

Walk and Spot (5)

This game kept him happy for ages and easily ate up the last mile of our excursion. What’s your favorite game to play on a walk? Please share in the comments!

Summer Memory Jar

Summer Jar (8)

School’s out for summer! 

My boy is officially a pre-k graduate, and we have two glorious summer months ahead before Kindergarten. To make the most of it, we made this summer jar to fill.

First, glue a ribbon around the top of a mason jar. I purchased a large jar, in anticipation of lots of little mementos.

Summer Jar (1)

Use puffy paint to decorate the jar. I suggested to Travis that we make a yellow summer sun across the front, but Travis had other plans: big drippy blobs in lots of colors.

Summer Jar (3)

It took forever to dry, but why not – it’s his summer!

Summer Jar (5)

Once dry, I used marker to add “Summer 2019” across the top of the jar. We also tried writing “summer” with puffy paint, but this proved to be too drippy.

Summer Jar (4)

Now we’ll fill it, moment by moment and experience by experience.

On the first full day of summer, we did a family walk at a national park, and Travis very carefully selected the best rock to add to our jar.

Summer Jar (6)

I will post an update to this blog at the end of summer!

Summer Jar (7)

What’s in your summer jar? Please share in the comments!

Pasta Play

Pasta Play (4)

Looking for the perfect sensory game for your baby? Look no further than cooked pasta from your pantry! As soon as your baby can pick up food and chew, you can safely play this texture game.

I cooked a batch of rotini pasta, figuring the swirls and ridges would make for the most exciting texture. Let cool completely, then set out a bowl or strainer of the pasta for your little one. It helps to have a blanket underneath – this game is about to get messy!

Pasta Play (1)

Veronika got her hands right in there.

Pasta Play (5)

First we simply talked about texture. I used words like soft, squishy, and cool to describe the noodles that she pulled up by the handful.

Pasta Play (3)

Picking up individual pieces is great for developing her pincher grip.

Pasta Play (6)

She also loved scattering them about on the blanket.

Pasta Play (8)

And of course a few made their way up to her mouth!

Pasta Play (7)

In sum, this is simple fun, as cheap as it comes and perfect for kicking off a summer of play!

Spring Flower Arrangements

Spring Flower (7)

We’re only one week away from the end of spring and the spring flowers are fading, making room for summer counterparts. It’s the perfect time to put together a floral arrangement for someone special – perhaps a graduate in your life, or a dad you’re celebrating this weekend!

Travis wanted to put together this bouquet for dad; we skipped the store-bought stuff, and opted instead for a wildflower hunt! (Okay, maybe a hunt around our apartment complex).

Spring Flower (1)

Travis loved gathering an assortment of greenery and different colored blossoms, as we took care to take only one flower from each bush.

Spring Flower (2)

Once home, we laid out the flowers and a pretty vase. Fill the vase 2/3 of the way with water – a good little fraction lesson!

Spring Flower (3)

To help our flowers stay healthy and strong, we added 1/2 teaspoon sugar and 1 tablespoon cider vinegar.

Spring Flower (4)

Travis was then in charge of arranging our blooms. Any that were too long, he seriously and carefully snipped shorter.

Spring Flower (5)

Teach your child to hold the stem of each flower on the outside of the vase to assess if it is too long or too short.

Spring Flower (6)

Tada! A beautiful spring bouquet.

Spring Flower (8)

For more flower fun, check out our recent ikebana craft. And for garden recipes to go with these garden blooms, check out our strawberry shortcakes!

Fabric + Wipes Container

Fabric Scraps (10).JPG

Veronika and I have played with fabric before as a texture sensory activity. Today, we played with fabric again but it was less about texture and more about the fun of putting in and pulling out!

An empty diaper wipe container is the ideal container for this game. It’s deep, but small enough for little hands. And the pop-up lid is perfect! In fact, before we introduced fabric into the game, Veronika just wanted to check out the box and pop the lid open and closed!

Fabric Scraps (1)

Next, I filled it with a variety of fabric scraps from our craft bin. I had some eye-catching patterns like bright green and little foxes, which provided visual stimulation.

Fabric Scraps (2)

A loosely-woven burlap and a few silky scarves provided textural variety. Old washcloths would work well, too!

Fabric Scraps (4)

Fill up the container and simply let your little one pull out the scraps.

Fabric Scraps (5)

What fun!

Fabric Scraps (6)

Then I made it more challenging, putting on the lid so she could pull the scraps up through the opening.

Fabric Scraps (7)

This was a little tough for her fingers at seven months old, but this is the kind of game we’ll revisit; it will be toddler heaven!

When she tired of the fabric, she went back to the box.

Fabric Scraps (8)

Playing with it lasted the whole time I made dinner – the perfect way to self entertain!

Fabric Scraps (9)

Seek Out the Squeak

Seek Squeak (7)

This cute little activity will hone your baby’s skills in a number of areas: fine-tuning their hearing; playing with their sense of object permanence, and exciting them with a little anticipation!

First, I rounded up a few toys that squeak. I guess in our house that tends to be little pigs!

Seek Squeak (1)

Hide one squeaky toy under a scarf (or a dish towel would work), and make it squeak.

The muffled sound was less distinct than Veronika is used to. Where was the sound coming from?

Seek Squeak (2)

She homed in quickly on the scarf – although this may have been because the scarf itself looked novel and interesting.

Seek Squeak (3)

Tada! A squeaky toy. I squeaked it again as her reward, and praised her efforts.

Seek Squeak (4)

Uh oh, is that another faint squeak she heard?

Seek Squeak (5)

Now she knew how to locate the second toy.

Seek Squeak (6)

Okay, so maybe she was more thrilled with her little scarf toys than with the pigs underneath but she still was reaping the benefits of this game tangentially – and having lots of fun in the process!

Seek Squeak (8)