Glowing Creepy Crawly Sensory Bag

Glow Bag (4)

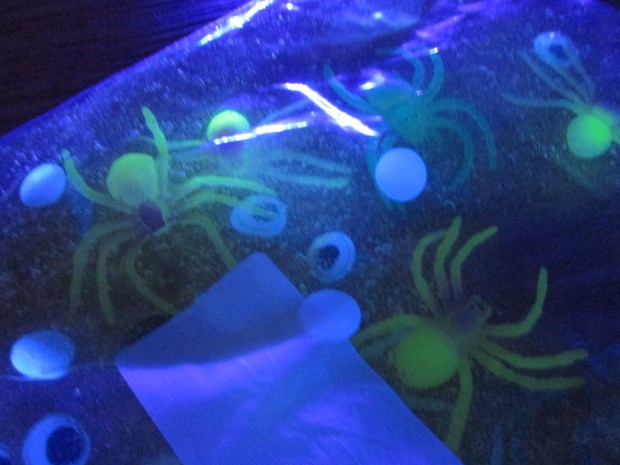
I used a black light and glow-in-the-dark spiders for this novel sensory bag. I thought Veronika would be very into the glowing bugs, but it turns out the black light was too interesting and distracting! I had read online that tonic water glows under black light. It was hard to tell if this was actually true, but the project was still fun!

To set up, combine 1 bottle of hair gel (use clear or yellow) and about 1/4 cup tonic water in a large zip-top bag.

Glow Bag (1)

Seal and mix, then open the bag back up to add your “creepy” stuff. I had glow-in-the-dark spiders, as well as a few googly eyes from the craft bin.

Glow Bag (2)

Seal the bag, then place on the ground and turn out the lights. Turn on your black light and watch it glow!

Glow Bag (3)

When the black light was on, the hair gel mixture was most evident. If we turned it off, the glow of the spiders became more apparent.

Glow Bag (6)

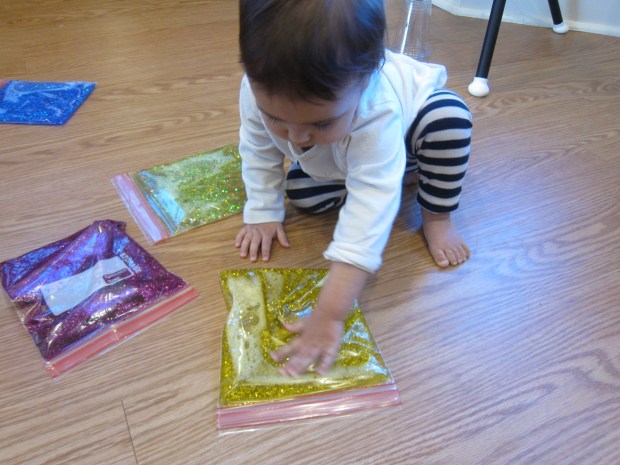
Veronika loved poking at the eyes and bugs with a finger, and generally just squishing her hands all over it.

Glow Bag (5)

But as mentioned, the black light was very distracting, so I’m going to think of ways to make a glowing sensory bag that doesn’t involve the light. Stay tuned!

Glitter Water Blob Sensory Bags

Glitter Blob Bag (3)

Veronika has been having so much fun with sensory bags lately. What’s better than a rainbow array of bags to play with? Rainbow bags with glitter and bubbles inside!

To make these glittery bags, fill sandwich-sized zip-top bags about one-third of the way with water. Now add food coloring and glitter.

Glitter Blob Bag (1)

They will look best if the glitter and food color are in the same family; so for example I used a purplish glitter in the red bag, gold in the yellow bag, and silver for the blue and green.

Glitter Blob Bag (2)

Seal the bags (tightly!) and place where your toddler can come discover them.

Glitter Blob Bag (5)

Veronika first just loved squishing her hands on them and watching all that glitter and water move about.  She seemed especially intrigued by the red one.

Glitter Blob Bag (7)

Then we stood them upright so she could lift the bags and grip in two hands, which was good glittery fun. We talked about how sparkly they were!

Glitter Blob Bag (10)

If you lay one bag over the other, as with blue and yellow, you get a color-mixing effect, too, although this was a bit lost on her.

Glitter Blob Bag (4)

The most fun was when we shook the bags and produced bubbles inside – sometimes huge! – which she then chased around with a finger.

Glitter Blob Bag (11)

These easily kept her busy for about a half hour, a big hit.

Glitter Blob Bag (12)


Playing with Cups

Plastic Cups (3)

Let’s face it: sometimes a toddler can be in the way. Whether you’re helping an older sibling with a project or trying to get chores done, sometimes those little hands just need to be kept busy!

The easiest hack ever? Give them plastic cups to play with. Do you need to add anything to the cups? Nope, that’s it; just plastic cups!

Plastic Cups (1)

I handed Veronika this stack of clear cups when originally she wanted in on a messy project with big brother. But the moment she saw the cups on the floor, she was hooked.

Plastic Cups (4)

She sat surrounded by a pile of them and stacked them. Sometimes she stacked them upside down, and sometimes facing up (nesting).

Plastic Cups (2)

Sometimes one faced down and one faced up. Then she could topple them over.

Plastic Cups (8)

After a while, she had fun kicking and rolling them, and chasing after them. She even discovered that they made neat reflections when held in front of the shiny dishwasher.

Plastic Cups (5)

I may just give her cups to play with every day. We’ll have to try some in colored plastic for future variation!

Plastic Cups (7)

What’s your favorite toddler toy hack? Please share in the comments!

Melting Race

Melting Race (5)

Here’s a clear way for even kindergartners to learn about how temperature affects states of matter: have a “race” between two toys trapped in ice, and see which one emerges first!

Before heading off to school, Travis selected two toys that fit into paper cups. We filled the cups with water and placed them in the freezer. By the time he got home, the toys were trapped in giant ice cubes. Oh no! Peel off the paper cups, and place the resulting ice blocks in larger plastic cups.

Melting Race (2)

We filled these cups with water, one cold, and one warm (don’t use hot or the race will be over too quickly!). Travis was proudly in charge of pouring the cold water.

Melting Race (3)

He hypothesized that the warm cup would melt the ice faster, and the results were immediately evident. Within a few minutes, the front wheels of the truck were already out of the ice. “It’s coming free!” he exclaimed.

Melting Race (4)

About 15 minutes later, the car was completely free. Meanwhile the poor dinosaur was still in ice for hours, only breaking free at bedtime.

Melting Race (6)

Creamy Cauliflower Soup

Creamy Cauliflower SOup

This soup is full of good-for-you tidbits like cauliflower and potatoes and toddlers will love the creamy consistency.

Ingredients:

  • 1 tablespoon olive oil
  • 1 small onion, chopped
  • 3 Yukon gold potatoes, peeled and chopped
  • 1 head cauliflower, chopped
  • 4 cups vegetable broth
  • 2 tablespoons nutritional yeast
  • 1 bay leaf
  • 1 cup plain non-dairy yogurt
  1. Heat the olive oil in a large saucepan over medium heat. Add the onion and saute for 3 minutes.
  2. Stir in the potatoes, cauliflower, vegetable broth, nutritional yeast, bay leaf, and yogurt. Bring to a boil, then reduce heat and simmer for 30 minutes until the vegetables are very tender.
  3. Remove the bay leaf, then mash with a potato masher until the soup is chunky. If your kids prefer a smoother soup, transfer to a blender and puree instead.

Cream of Wheat Imagination Bowl

Cream of Wheat (2)

One of Veronika’s latest words is “truck” and she has a set of construction trucks that she loves to play with, just right for toddler-sized hands. Today, I engaged her imagination by making an indoor “construction site”. Cream of wheat made the perfect base for this easy sensory play; it’s simple to clean up from floors or wipe off of clothing, and it also makes it okay if a toddler decides to taste the “sand”, resulting in a much more pleasant experience than an outdoor sandbox!

Once I demonstrated how she could drive her trucks through the pretend construction zone, she jumped right to it. I showed her how she could use the bulldozer blade to push through the cream of wheat, which was a big hit.

Cream of Wheat (3)

I loved watching her concentration as she carefully sprinkled “sand” into the dump truck.

Cream of Wheat (5)

She also loved just vrooming the various trucks, which made fun tracks in the “sand”.

Cream of Wheat (4)

Trucks lend themselves naturally to lots of onomatopoeia as you play. Be sure to make  beeps and vrooms and other car noises, and your toddler is sure to join in!

Cream of Wheat (6)

What a great way to get the imagination going and have hands-on sensory play.

Cream of Wheat (7)

Hot Cocoa Sensory Tub

Hot Cocoa Sensory (4)

Disclaimer: This is by far the messiest sensory play I’ve undertaken with either of my children, and that’s saying a lot. But it’s worth it!

In retrospect, I would have done this activity around Christmas. Something about it felt very seasonal, perfect for the holidays, although technically it is still winter which means hot cocoa season. The original version of this game called for a container of hot cocoa mix, but it’s very hard to find a brand with no milk powder. Instead, I mixed together a tub of cocoa powder but added about 1/2 cup vanilla-flavored protein powder. This meant the mix wouldn’t be too bitter if Veronika happened to lick her fingers (which she did!). Straight cocoa powder probably won’t appeal to your little one.

To complete the set-up, I added a few gingerbread people ornaments. in keeping with the cocoa theme. If you want to keep the bin fully edible, use mini Dandies marshmallows instead. Or try gingerbread men cookies, if in stock around the holidays.

I added a funnel and a few scoops and rakes, and Veronika went to town!

Hot Cocoa Sensory (5)

This was like indoor dirt, except it smelled divine. I held the scoop up to her nose a few times to fully enjoy that chocolate-y scent, which prompted little “mmm’s” of delight.

Hot Cocoa Sensory (8)

Mostly she loved scooping through it.

Hot Cocoa Sensory (2)

Once I showed he how to fill up the funnel, she became an expert at that.

Hot Cocoa Sensory (9)

The gingerbread men were fun to put in the cocoa and bury, then dig up again. Again, I wish I’d thought to use edible marshmallows, though!

Hot Cocoa Sensory (3)

By now she had completely spooned cocoa powder all over her pants and socks. Another mea culpa: wear only a diaper next time!

Hot Cocoa Sensory (7)

Well, since we were already this messy, I figured why not take our sensory bowl from indoor “dirt” to “mud”. I poured in a little oat milk, which made the whole thing smell even better. She loved stirring and watching the powder dissolve in big bubbles.

Hot Cocoa Sensory (10)

Okay, playtime complete; now it was immediately upstairs for a wash and a change!

Sticky String

Sticky String (4)

Here’s a simple ice project, but one that has a bit of  a “wow” factor to it!

For set up, fill a bowl with water and add ice cubes on top.

Place a piece of yarn over the ice, making sure it is fully saturated. Travis pretended this was spider silk, and we were testing how strong it was. What an imagination!

Sticky String (1)

Sprinkle the yarn generously with salt. How much do you need to use? Unfortunately, I can’t give you an exact answer, as Travis just dumped in a lot of the container, but I would imagine a tablespoon or two is plenty.

Sticky String (2)

Now wait for 1 minute. He proudly helped count to 60 seconds!

Sticky String (3)

Lift gently on the yarn and watch as the ice cubes rise. I thought the yarn might be strong enough to pick up one cube, but it could even pick up a whole clump. So even mom said “wow!”.

Sticky String (5)


Fruity Tortilla Pizza

Fruity Pizza (2)

Pizza for breakfast? Yes please, when it’s this peanut butter-and-fruit-topped version! Or have the kids help you put it together for an afternoon snack.

Ingredients:

  • 1 (8-inch) flour tortilla
  • 2 tablespoons creamy peanut butter
  • 2 tablespoons blueberries
  • 2 tablespoons sliced strawberries
  • 1 baby banana, sliced
  • 2 tablespoons coconut chips
  • 1 tablespoon non-dairy mini chocolate chips
  1. Toast the tortilla for 2 minutes on each side in a skillet over medium heat.
  2. Transfer to a cutting board and spread with the peanut butter.
  3. Top evenly with the blueberries, strawberries, coconut chips, and chocolate chips, then slice into quarters.

Repeat with additional ingredients to make as many of these as you need!

Fruity Pizza (1)

Show Love Around the World

Love World (9)

Raddish Kids had a heart-warming lesson this month about different ways that cultures celebrate love, specifically on Valentine’s Day, but also throughout the year. As a kindergartner, Travis is working on learning and showing empathy, so it was a nice lesson to make things concrete. First, we spent a few nights devoting story time to books about love, including:

  • Snuggle Puppy by Sandra Boynton
  • Best Friends (Owen and Mzee) by Isabella and Craig Hatkoff
  • Mama, Do You Love Me? by Barbara M. Joose

Love World (1)

After each one, we discussed the type of love relationship it entailed. Sometimes it was two friends, sometimes a parent and child, and sometimes members of different species! This was a great jumping-off point for talking about what love means, and how we might express love differently towards different people (or animals).

Travis said he shows love to a parent by hugging, but love to a friend by playing.

Love World (2)

Raddish provided lots of links to learn more about other cultures’ love traditions, including silly bits like how to say “love” in Klingon. Some made Travis giggle, like walking barefoot in Slovenia. Overall, though, this section of the lesson was geared towards older children and Travis was too antsy to sit and go through all of the customs.

Instead, we jumped ahead to the project: making up his own love celebration. The provided worksheet helped direct Travis’s thinking, but he gave a lot of silly answers before honing in on a real idea.

Love World (3)

He wanted to celebrate sibling love (aww!) so we ended up combining this with a winter picnic for Veronika.

Love World (5)

I loved watching them play and share the moment together!

Finally, we put together a Love Jar. Decorate any container you like, whether a shoe box or a mason jar or anything in between. Travis drew designs on a mason jar with permanent markers, including hearts and arrows.

Love World (8)

I left out post-it notes by the jar with the idea that he can write down a moment he appreciated or loved each day.

Love World (10)

Reading these out can become a special moment each week! We finished off all the heart-shaped fun with a quick compound word game from Raddish, filling in the blanks on “broken hearts” to complete each word.

Love World (4)