Motorized ArtBot Robot

Motor Art Bot (4)

This quirky little project results in a “robot” that can draw on paper, thanks to the use of a small hobby motor. I didn’t think we’d be able to make it… until I spotted a hobby motor in my junk drawer! If you don’t have one, check with your local electronics store.

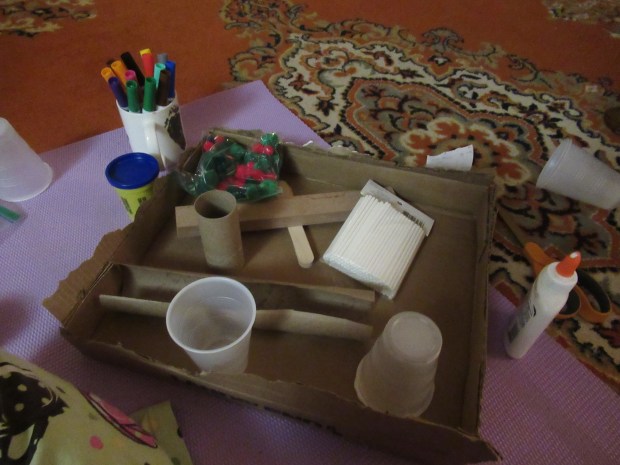
To start, secure three or four colored pencils (or thin markers) around the sides of a sturdy plastic cup with masking tape. Add wiggle eyes to give your Bot some character, or even draw on a face with a Sharpie.

Motor Art Bot (2)

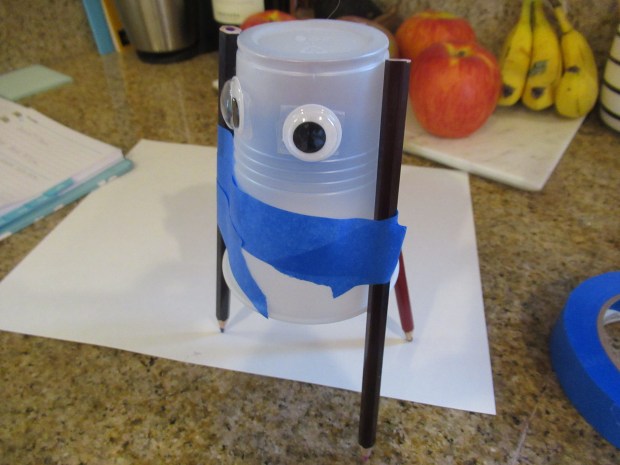
Next, you’ll need to attach the hobby motor to a battery pack, and then secure all that on top of the Bot. This part was tricky, since the wires from the battery pack came off the motor unless taped tightly. The whole thing was so heavy that when we turned on the power, it often either fell down or couldn’t move far. It actually worked best if I held the battery pack lightly, my hand following along in the robot’s wake.

Motor Art Bot (5)

We did get this quick clip!

Next time I would use a much sturdier cup, and find a way to tape both motor and battery pack on the top, to see if we got better artwork. But for some novel STEM play, this was a great project!

Motor Art Bot (3)

Dream Playground

Dream Playground (8)

When I was in elementary school, I came up with the idea for a “trash playground”, imagining a mini playground crafted from leftover trash. For a brief moment, I was sure this idea would a) save planet Earth and b) make me famous. Imagine my delight, then, when I spotted the same idea in a recent Parents magazine: have kids raid the craft bin or recycle bin and turn the odds and ends into a playground for toys!

This project was great because it engaged both of my kids, but for different parts. First, Travis helped me design the playground. He loved mapping out elements like a giant slide (an empty paper towel tube taped to stacked plastic cups), a seesaw (a wood scrap balanced atop craft sticks as the fulcrum), and more.

Dream Playground (1)

He decided that the slide should lead into a “ball pit” (made from pom poms and lollipop sticks).

Dream Playground (3)

Then we needed a trampoline, which was crafted from playdough lined with more lollipop sticks.

Dream Playground (4)

We left the glue to dry overnight and in the morning it was time for our expert toy tester (a.k.a. little sister Veronika) to test it out.

Dream Playground (6)

Her bunnies loved the slide!

Dream Playground (9)

Not to mention the seesaw and the tunnels to crawl through. She had fun in this miniature playground for ages!

Dream Playground (7)

What will your child put in a mini playground? A jungle gym? Monkey bars? Swings? We’d love to hear in the comments!

Secret Plum Burgers

Secret Plum Burgers (2)

The secret ingredient in these moist vegan burgers? A jar of baby prune puree!

Ingredients:

  • 1 (12-ounce) package meatless crumbles (such as Lightlife)
  • 1 (4-ounce) jar baby prune puree
  • 1 tablespoon ground flaxseed
  • 1/3 cup chopped onion
  • Whole wheat burger buns, to serve
  • Ketchup, to serve
  1. To prepare the patties, combine the meatless crumbles, prune puree, flaxseed, and onion in a bowl. Mix with your hands, then shape into 4 patties.
  2. Heat a skillet coated with cooking spray over medium-high heat. Add the burgers and cook for about 6 minutes on each side.
  3. Serve on whole wheat buns with ketchup or your other favorite condiments!

Secret Plum Burgers (1)

Coffee Filter Bunny

Coffee Filter Bunny (6)

Easter comes early this year (April 4), which means Veronika and I are turning our attention to all things Easter crafts even though it’s still March. This adorable bunny craft was a great one to make as we talked about the Easter bunny.

Coffee Filter Bunny (1)

To start, set out white coffee filters and let your toddler decorate with dot markers. These are perfect for toddlers because the bright bold colors appear with just a little tap.

Coffee Filter Bunny (3)

While she was dotting, I traced bunny shapes onto brown cardstock. You’ll need a circle with two long ears for the bunny’s head, as well as four ovals for paws.

Coffee Filter Bunny (4)

Veronika loved seeing the design once it was laid out against white paper. “He has paws!” she said with delight. She helped use a glue stick to secure the little bunny down.

Coffee Filter Bunny (5)

Draw on a few final features and your Easter bunny is ready to hop! I did this part for Veronika, but preschoolers can use markers to make color on the faces and ears by themselves.

Tissue Paper Baby Chick

Tissue Paper Chick (6)

Our fun with spring chicks continues, and Veronika has loved exploring the different materials from our craft bin as we make each version to mark the season. This time, she got to have fun with tissue paper!

First, you’ll need lots of squares of yellow tissue paper. You can invite your child to help rip up pieces, or preschoolers can use the opportunity for scissor practice instead. Next, I traced a circle onto white paper and cut out, and then Veronika helped smear it with a glue stick.

Tissue Paper Chick (1)

All she had to do was cover it with tissue paper. This is such a forgiving material for toddlers, since it takes very little glue to make tissue paper stick. In short order, we had a fluffy yellow chick.

Tissue Paper Chick (2)

To make the legs, twist a small piece of orange pipe cleaner around a larger piece of pipe cleaner, such that it forms three toes.

Tissue Paper Chick (4)

All that was left to do was to glue down two wiggle eyes and an orange paper beak.

Tissue Paper Chick (7)

Fruit Dips

Fruit Dips (1)

Veronika doesn’t like to eat yogurt off a spoon, but here’s a fantastic way to introduce the flavor to little ones who might otherwise be hesitant: turn it into a dip!

In general, toddlers love to dip food and this snack plays right into that desire. I set out a plate for her with a variety of cut up fruits, including strawberries, nectarine, oranges, green grapes, apple, banana, and pineapple. I wasn’t aiming for a full rainbow (although you could!), but we did hit nearly every hue from ROYGBIV.

Fruit Dips (2)

Next, I cut plastic straws into short pieces and then poked a straw piece into each fruit cube. Spoon a little vanilla non-dairy yogurt directly into the center of the plate. Time to dip!

Fruit Dips (3)

Veronika loved that she was in charge of this snack. Sometimes she would dip a fruit piece in and eat fruit and yogurt together. Sometimes she used the fruit more like a spoon for the yogurt, scooping it up and licking off. Apple pieces were her favorite for this particular method.

Fruit Dips (5)

I had one very happy little snacker.

Fruit Dips (6)

Contact Paper Chick

Contact Paper Chick (4)

We already have one cute spring chick up on our doorway to celebrate the season, and here was a second toddler-friendly version to join the first!

To start, I cut out a piece of contact paper in roughly the shape of an Easter egg, then taped it down to a piece of white paper with double-sided tape. The sticky side of the contact paper should be facing up.

Contact Paper Chick (1)

Next I set out a tray full of feathers for Veronika. All yellow would have been ideal for a chick, but we had a mix of reds, yellows, and oranges, which worked just as well.

Contact Paper Chick (3)

She loved picking which feather to use, plus the discovery that the contact paper was sticky and grabbed on to the delicate feathers.

Contact Paper Chick (2)

Once the egg shape was filled in, we transformed it into a chick with just a few final details: Two wiggle eyes, a beak cut from colored paper, and two legs drawn on with orange marker. Peep peep!

Fun up the Pretend Play

Movie Scene (4)

Travis loves to play with his Legos, but sometimes even his imagination needs a boost. When boredom struck today, I challenged him to have his favorite characters hold a “ceremony”. You could do this game with just about any toy your child love, whether that means dolls, stuffed animals, action figures, or something else.

Travis chose to have a coronation ceremony to proclaim one of his Legos as king. If that doesn’t interest your child, you could also suggest weddings, birthdays, or other big celebrations as the “ceremony” of choice.

Coronation (2)

To start he wanted to set up a throne and a long hallway for the royal procession. Other Legos would be the bystanders of course, and the new king needed guards.

Coronation (4)

All hail the king!

Coronation (7)

You can make this game as elaborate as your child wants, adding music, props, and lots of fanfare. Veronika was so jealous that we quickly built a throne for Queen Bunny, too!

Coronation (5)

After this round of imaginative play had the creative juices flowing, we upped the ante: challenge your children to act out a scene not with toys but with their own bodies!

The easiest way to do this, unless your child knows a particular movie by heart, is to set a favorite scene playing in the background and act along with it. In short order, we had the following cast from The Mandalorian:

Dad: Mando

Mom: Fennec

Travis: Boba Fett

Veronika: Baby Yoda

Baby Yoda had to sit in the center of a meditation rock.

Movie Scene (1)

Uh oh, Baby Yoda lost interest quickly, so a prop stood in, instead.

Movie Scene (2)

Travis loved imitating poses and hearing us get into character with our lines. This activity was such a novelty, and is a sure way to perk up your child’s pretend play no matter what day of the week!

Movie Scene (3)

Pineapple Salsa

Pineapple Salsa (1)

This easy salsa brings a tropical vibe to dinner. We love to serve it with vegan fish fillets!

Ingredients:

  • 1 cup chopped pineapple
  • 1/2 cup chopped red bell pepper
  • 1/2 cup chopped yellow bell pepper
  • 1/2 cup drained and rinsed black beans
  • 1/4 cup chopped red onion
  • 1/4 cup chopped fresh cilantro
  • 1/4 cup orange-pineapple juice
  • 2 tablespoons fresh-squeezed lime juice
  • 1/4 teaspoon salt
  1. Combine the pineapple, bell peppers, black beans, red onion, and cilantro in a bowl. Set aside.
  2. In a small bowl, whisk together the orange-pineapple juice and lime juice. Pour over the pineapple mixture, and sprinkle with salt, stirring to combine.

Pineapple Salsa (2)

Pretend Airplane and Rocket Play

Set up Airport (2)

We’re marking the one-year anniversary of the COVID-19 pandemic, and still searching for novel ways to fill long days indoors. Here’s a simple twist on couch cushion play to keep things novel!

I pulled out all the couch cushions and simply told the kids it was an airplane, a little bit of imagination required; two long pillows formed the body and the two back pillows jutted off to the sides as the wings.

Set up Airport (1)

From there, the imaginative play was up to them! They added stuffed animal passengers, and got a kick out me taking on the role of pilot to make landing and takeoff announcements. (Depending how many times your children have traveled by air, you’ll likely need to model this for them before they pick up the lingo).

Set up Airport (5)

My passengers’ favorite part? Not just having a snack when the “concession cart” came along, but being naughty and eating snack on the wings!

Set up Airport (3)

If your kids are familiar with airports, they can make a much bigger game of this. Ticket counters? Security check?

Set up Airport (7)

Veronika has never seen an airport, but she latched right on to the idea of baggage claim. We packed up a little suitcase with some of her summer clothes and I placed it on the edge of the couch for her to claim.

Set up Airport (6)

She quickly ran over and was soon busy unpacking!

Set up Airport (8)

Why stop at the limits of Earth’s atmosphere? A little more imagination and a quick switch-up of the pillow configuration, and it swiftly became a rocket instead.

Trip to Space (1)

Here goes Veronika on a space walk!

Trip to Space (2)

We made pictures of the planets so we could decide which one we were zooming to.

Trip to Space (3)

This little astronaut needed her space suit on!

Trip to Space (4)

Again, your kids might want to get much more detailed with the game, especially if they’re older. Moon boots? Buttons and command controls inside the space ship? Experiments on board? We’d love to hear your how imaginative play goes, in the comments!