Spring Flower Pretend Play

Spring Flower Pretend (6)

Spring has sprung, the grass is ris,

I wonder where the flowers is.

This has always been one of my favorite lines of poetry, and it always rings so true. Today, we welcome spring, but the flowers are still several weeks away! To fill the interim, Veronika played with fake flowers in two ways today.

I had purchased bunches of fake flowers on sale at the craft store and then used a wire cutter to snip them into individual segments instead of big bouquets.

Spring Flower Pretend (1)

First, Veronika got to be a florist! Plastic cups and colanders were perfect for toddler-safe vases and making “arrangements”.

Spring Flower Pretend (3)

The colander is great because your little one will need to poke the stems down into the holes, which is excellent for fine motor skills.

Spring Flower Pretend (2)

She also loved just holding the flowers, peeling back the layers of petals to peer inside and talk about the colors of each, including great vocab like “lavender” and “peach”.

Spring Flower Pretend (4)

When this game was done, we made things even more realistic… with a potting soil sandbox! Potting soil makes a great alternative to sand as an indoor sandbox. I poured some into a tray with the pretend flowers on the side. Make sure you cover the floor underneath with newspaper!

Potting Soil Sandbox (4)

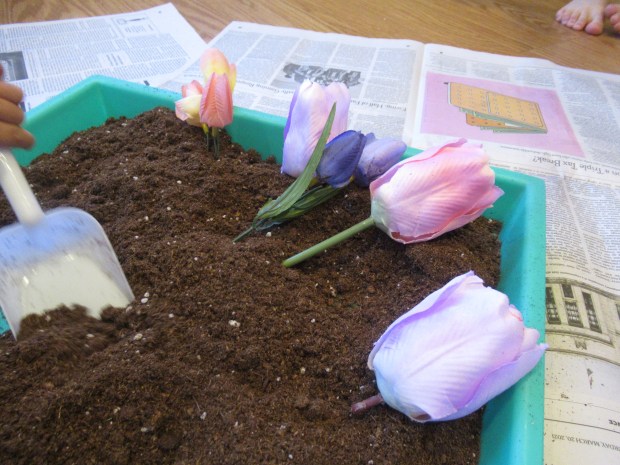
Veronika trotted over to help “plant” the flowers.

Potting Soil Sandbox (2)

She also loved scooping dirt between two containers, using a beach shovel as her gardening spade.

Potting Soil Sandbox (5)

Or picking up bandfuls to see how the dirt felt, and then letting it sprinkle down.

Potting Soil Sandbox (6)

Overall, what beautiful flower play to tide us over for a few more weeks!

Spring Flower Pretend (7)

Spinach and Pine Nut Lasagna

Spinach Lasagna (2)

Layers of fresh spinach and pine nuts not only make this lasagna feel gourmet, but it’s also a cinch to prepare.

Ingredients:

For the vegan ricotta:

  • 1 (14-ounce) package firm tofu
  • 1 tablespoon nutritional yeast
  • 1 tablespoon olive oil
  • 1 tablespoon lemon juice
  • 1 teaspoon garlic powder

For the lasagna:

  • 2 Ener-G eggs
  • 4 cups Italian herb pasta sauce
  • 8 ounces uncooked lasagna noodles
  • 1 (16-ounce) package baby spinach
  • 1/2 cup pine nuts
  • 1/2 cup vegan Parmesan shreds
  1. To prepare the ricotta, combine the tofu, nutritional yeast, olive oil, lemon juice, and garlic powder in a blender; process until smooth and refrigerate until ready to use.
  2. To assemble the lasagna, combine the prepared ricotta in a bowl with the Ener-G eggs; set aside.
  3. Spoon a little sauce into the bottom of a 9×13-inch baking dish. Add a layer of lasagna noodles followed by half the spinach, 1/4 cup pine nuts, and half of the remaining sauce.
  4. Top with a second layer of noodles, the remaining spinach, and the remaining 1/4 cup pine nuts. Add a final layer of noodles, followed by the remaining sauce. Sprinkle with the Parmesan.
  5. Cover with foil and bake at 350 degrees F for 1 hour.

Spinach Lasagna (1)

Egg Carton Animal Portraits

Egg Carton Animals (6)

We spotted this adorable idea for animal “portraits” on artist Nylah Khan’s Instagram, and had to try our hand at the craft. Bonus points: I found Easter decorations that came in an egg carton, meaning there was no need to purchase a chicken’s egg carton.

I cut apart the segments of the carton and each one could now be the face of a separate animal. Paint accordingly! You can plan ahead and choose your colors (i.e. pink for pigs), or just let your child choose the colors and see what animals match up. We ended up with one pink face and one yellow.

Egg Carton Animals (2)

I used hot glue to secure these segments to a rectangle of cardboard as a background. Now paint on more features! If you want to get silly, add a human body for the animal. My “pig” was wearing a pink suit and blue tie, as an example for Veronika to follow.

Egg Carton Animals (3)

Veronika loved painting features on the yellow one, telling me she was adding eyes and more. I let her painting dictate the direction this particular creature went.

Egg Carton Animals (5)

A long streak of yellow paint made it look like a giraffe!

Egg Carton Animals (4)

Once the paint dried, we hung these up for an art gallery in the playroom. I loved that one of these creations was purely a toddler’s, while the other hewed closer to Khan’s original portrait idea.

Egg Carton Animals (7)

What animals will your child make? Please share in the comments!

Spare Part Sidekicks

Spare Part Sidekicks (4)

We’ve done projects in the past that are meant to clear out the craft bin; this project is similar, except was meant to clear out the tool box! Now’s the chance to use all those spare parts you might have lying around (think: paper clips, brads, washers, corks, screws, and bits of yarn).

Spare Part Sidekicks (1)

As a base for Travis’s pals, we used spare pieces of wood from a relative’s woodshop. If you don’t have wood scraps, rinsed out metal cans work great, too; just add tape around the rim to cover any sharp edges.

Spare Part Sidekicks (2)

Travis worked on the layout for each “sidekick”, deciding where the spare parts should go. He particularly wanted to use a cork as a big nose for one!

Spare Part Sidekicks (3)

I then handled the assembly since it involved hot glue. If your child wants to tackle the project solo, use glue dots instead.

Spare Part Sidekicks (6)

These sidekicks were ready to play!

Bubble Fun

Bubble Fun (4)

Veronika loves the end of her toddler gym class when the teacher pulls out a bubble machine, sending multiple bubbles out at once. We made this low-tech version for fun on the patio this morning!

Cut two straws in half so you have four pieces, and secure in the middle with masking tape. Trim the edges so they line up to the exact same length. That’s it!

Bubble Fun (1)

Pour a little bubble solution into a plate or dish, and dip in one end of the straws. You’ll get not one but lots of little bubbles at once.

Bubble Fun (3)

Veronika was so proud that she could make bubbles appear all by herself, huffing into the straws!

Bubble Fun (6)

In sum, this made for quick and fun bubble play on a morning just warm enough to feel like spring.

Bubble Fun (5)

Teach Your Child To… Take a Cell Phone Photo

Take a Photo (2)

This month’s how to from Parents magazine is both practical and fun. Teaching your child how to take not just any pic but a good pic with a cell phone will not only make them feel proud and artistic, but also comes in handy for all those times you want to be in the picture.

Parents did a great job of breaking this down into 5 easy steps.

First, I showed Travis where the lens viewer was, so he would understand not to cover it up with his fingers. No more thumbs in photos!

Next, we talked briefly about portrait versus landscape as the orientation. I told Travis to remember to hold the phone horizontal as the default.

Now it was time to line up a shot. A trip to a local art museum was a great chance for him to zero in on interesting subject and practice. He really started to get the idea of making sure the full object was in frame as he wanted, from top to bottom.

Take a Photo (1)

The fourth task was to show him how to press the circle shutter button quickly, then release. Finally all he had to do was…hold steady! Not a bad shot!

Take a Photo (5)

He was so proud making his way through the museum and finding items that were photo-worthy. And look: Mom even made it into a picture for once!

Take a Photo (3)

Froot Loop St. Patrick’s Day Fun

Froot Loop St Pats (11)

If ever there’s a day for rainbow cereal fun, St. Patrick’s Day is it. Here are a few ways we incorporated Froot Loops into the day to mark the holiday.

To start, surprise your kids in the morning by pretending a “leprechaun” visitor left behind a rainbow. I threaded Froot Loops in rainbow order onto a pipe cleaner, then inserted the ends into two “pots of gold” (vegan mini muffins), following a tip from Painted Confetti.

Froot Loop St Pats (1)

Since Froot Loops aren’t vegan, I told the kids this was magical leprechaun food for decoration, not eating. Travis was too busy to care, since he was so busy peeking inside a homemade leprechaun trap to see if it was caught inside. Looks like the little fellow got away!

Froot Loop St Pats (2)

Later in the day, Veronika and I used extra Froot Loops for a pretty rainbow craft. I drew the arcs of a rainbow with marker, and then dumped some of the cereal onto a tray. (Since it would be unfair to allow no snacking during a craft like this, I gave her a bowl of vegan cereal on the side for munching!).

Froot Loop St Pats (5)

Working with one color at a time, we made a line of glue dots along that rainbow arc and found the right color cereal in the tray.

Froot Loop St Pats (7)

Veronika stuck with it for a few pieces in each color, and I filled in the gaps. Preschoolers can try to tackle the full rainbow by themselves.

Froot Loop St Pats (8)

Cotton ball clouds were the final touch!

Froot Loop St Pats (10)

I loved the touch of magic that these projects gave to our holiday, leaving the impression that the leprechaun had really been there. If you truly want to wow your kids this St. Patrick’s Day, here’s one final shenanigan: Sneak downstairs before everyone else is awake and add a little green food coloring to the toilet bowl. Travis couldn’t believe this final bit of leprechaun evidence!

Froot Loop St Pats (3)

Spring Swirl Fudge

Swirled Fudge (5)

This recipe is basically pure sugar, but for one afternoon of spring fun it was the perfect indulgent treat!

In a bowl, stir together 1 (11-ounce) jar vegan vanilla frosting and 1 (11-ounce) can sweetened condensed coconut milk, until well combined. Spoon the mixture into an 8-inch baking dish lined with parchment paper. Squirt green food coloring on top and swirl with a skewer to disperse the color through the top layer. Veronika loved this part, delightedly helping turn our mixture green.

Swirled Fudge (1)

For spring decorations, we added colorful sprinkles and Annie’s Bunnies & Blossoms cereal in flower and bunny shapes.

Swirled Fudge (3)

The little bunnies were hopping over to smell the spring flowers!

Swirled Fudge (2)

Refrigerate for at least 3 hours, until set. This won’t quite set like real fudge, but once chilled, you can slice into small cubes!

Swirled Fudge (4)

If your family is not vegan, give the fudge this quick St. Patrick’s Day twist: Use 16-ounces melted white chocolate in place of the vegan frosting, and then decorate with Lucky Charms marshmallows instead of the bunny cereal.

Thermal Powered Flower

Thermal Flower (9)

Caution: This project uses real candle flame, so requires grown-up supervision. It’s worth it though, because it’s a neat way to show your child thermal power in action.

To set up, I printed out a template for a flower and traced onto yellow paper. Cut slits inward for each petal and fold them like the blades of a fan, all in the same direction. Set aside.

Thermal Flower (1)

Next, I trimmed a plastic straw to 3 inches and a wooden skewer to 4 inches. Stand the straw up in a little clay on a sturdy base. Attach the skewer to the flower with a little more clay. Slip the skewer into the straw, making sure it isn’t stuck in the clay below.

Thermal Flower (7)

Set out 4 tea lights and carefully light. As the air under the flower heats up, it will rise and – ta da! – the flower starts to spin.

Thermal Flower (9)

Note: Because our skewer and straw rubbed against one another, the most our petals really did was wave up and down and occasionally a little to the side. For better spinning power, attach a small screw eye at the top of the straw to hold it apart from the skewer. You can check out the full details here. This project still got a thumbs up from Travis though!

Vegetable Lasagna

Vegetable Lasagna (1)

This hearty lasagna is literally packed with veggies, making it a perfect all-in-one meal.

Vegetable Lasagna alt

Ingredients:

For the vegan ricotta:

  • 1 (14-ounce) pkg. firm tofu
  • 1 tablespoon olive oil
  • 1 tablespoon nutritional yeast
  • 1 tablespoon lemon juice
  • 1 teaspoon garlic powder

For the lasagna:

  • 2 tablespoons canola oil
  • 2 minced garlic cloves
  • 1/2 red onion, chopped
  • 2 carrots, peeled and chopped
  • 1 large red bell pepper, chopped
  • 2 small zucchini, chopped
  • 1 (12-ounce) pkg. broccoli florets, chopped
  • 2 Ener-G eggs
  • 1/2 teaspoon salt
  • 3/4 cup vegan Parmesan shreds, divided
  • 8 ounces uncooked lasagna noodles
  • 4 cups marinara sauce
  • 3 tablespoons Italian seasoning
  1. To prepare the ricotta, combine the tofu, olive oil, nutritional yeast, lemon juice, and garlic powder in a blender; process until smooth. Refrigerate until ready to use.
  2. To prepare the lasagna, heat the canola oil in a large pot over medium-high heat. Add the garlic, onion, carrots, bell pepper, zucchini, and broccoli; cook for 10 minutes, until the vegetables are tender.
  3. Meanwhile, whisk together the prepared ricotta with the Ener-G eggs, salt, and 1/4 cup Parmesan; set aside.
  4. Spoon a little marinara sauce into the bottom of a 9×13-inch baking dish coated with cooking spray. Add a layer of lasagna noodles, followed by half the ricotta mixture, half the vegetable mixture, and half of the remaining marinara.
  5. Top with a second layer of noodles, followed by the remaining ricotta mixture, remaining vegetables, remaining noodles, and remaining marinara.
  6. Sprinkle on top with the final 1/2 cup Parmesan and the Italian seasoning. Note: If you don’t have Italian seasoning, use a mix of dried basil, oregano, thyme, and parsley to equal 3 tablespoons.
  7. Cover and bake at 350 degrees F for 1 hour.

Vegetable Lasagna (2)